1

Fall Decor Ideas

Autumn in Simsbury, Connecticut

Though I am not ready to give up on summer yet, I feel I could easily welcome cooler Fall temperatures. It doesn’t get Fall-like here in the Valley of the Sun until late October. We seem to be hotter now with all the new growth and development, which is unfortunate. I recall cooler weather in mid-September when I first moved here. Fall decor is on the store shelves and typically, by the time I am ready to decorate everything is gone.

Front Porch decor

So today I would like to share some inspiration as we dream about apples, sweaters and falling leaves. The front porch is always a fun place to decorate and the wreath is the first item that goes up. Since our front door is wider than a standard size, our larger wreath is an investment. As a result, I store them carefully year to year. I love the rich fall colors and surprisingly, they do work with my light blue front door.

Fall wreath using natural grasses

Or you can make a wreath using some natural materials from nature. To see my blog post on this, please click here.

Adding fall plants like wild grasses or coleus creates an autumn tapestry of textures and shades.

Pillows and Blankets

Wool blanket and orange pillow

Pillows and blankets are an easy way to bump up your fall theme. This is a welcoming spot by the front door to sit and just relax. You can find great pillows on Etsy or Amazon here. And I love this blanket from Amazon too.

Fall DIY

DIY fall trees

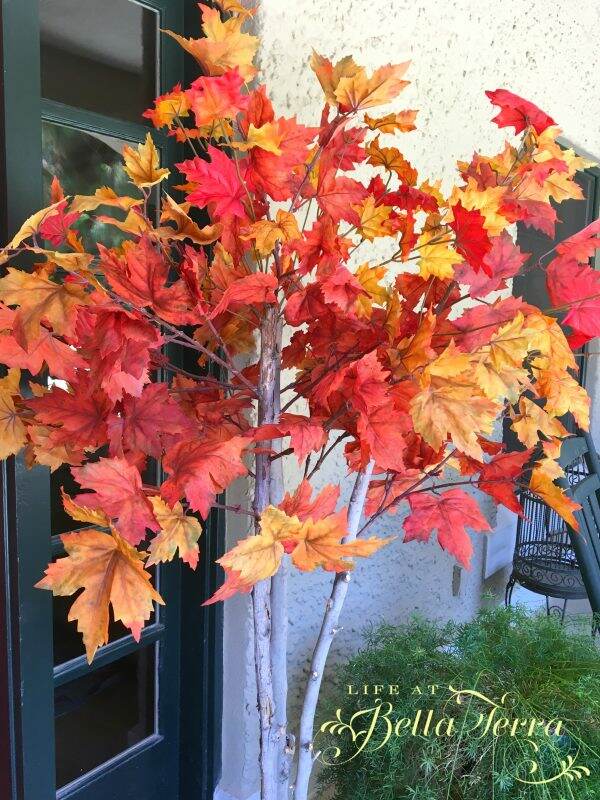
Making fall trees (see post here) is a simple DIY utilizing all the fall foliage that can be found at Michaels or Hobby Lobby. Keep some of your outdoor branches and with a drill and glue gun you are good to go!

Freshly cut maple branches

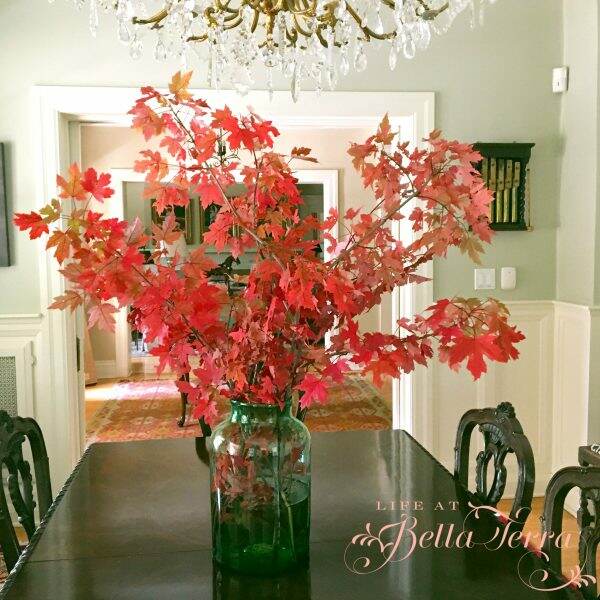
Fresh cut branches with colorful autumn leaves in a large glass vessel can provide an instant change in season. Since we don’t really have these lovely deciduous trees here in Phoenix, I cut branches on our trip to the mountains each October.

Accessories

Spicy Apple candle by Rosy Rings

A few years ago, I discovered these amazing candles by Rosy Rings. They are works of art~beautiful to look at and smell great too. This autumn candle is Spicy Apple and you can see the slices of apple, cinnamon sticks, leaves and berries in the wax. You need one, right? See it here.

Painting by me

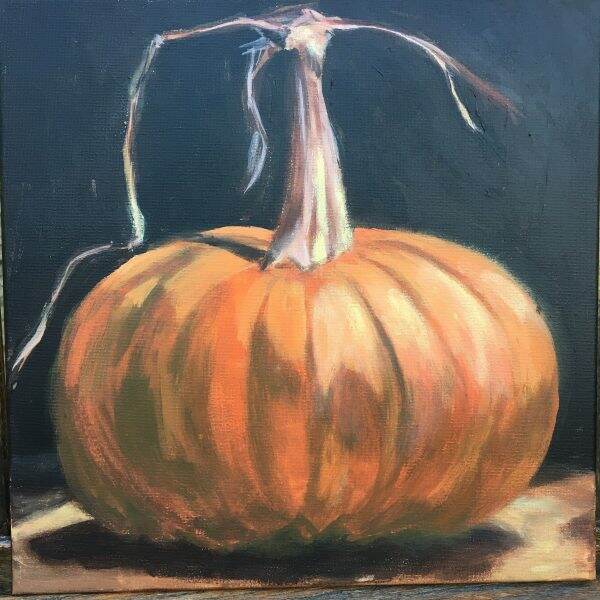
Adding a few pieces of seasonal art brings new color to any room. Here is a painting I did a few years back…my first pumpkin!

A California autumn by Lynn Winans (1897-1982)

Decorating Shelves

I love adding a bit of fall decor to each room, but one of my favorite spots is the antique Hepplewhite secretary from the late 1700s which sits in our living room. From my Johnson & Johnson plates to the pheasant soup tureen, everything about this vignette screams autumn.

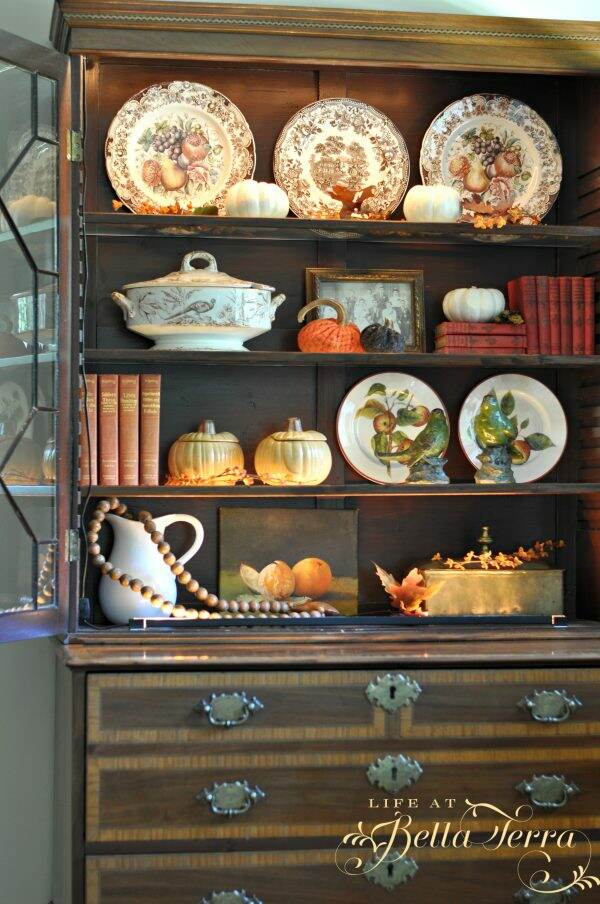
Last year I made fabric pumpkins, to replace the ones damaged by creepy bugs. This DIY is really easy and if you can get your hands on real pumpkin stems, then the possibilities are endless.

We have a huge pine tree in our front yard and for the first time it is dropping big, gorgeous pinecones. I cannot wait to figure out what I am going to do with this pretty gifts from nature.

Bleaching pinecones

Last year I did bleach pinecones and the results are a bit different but perfect for a more monochromatic theme. And you can use them into the Christmas holiday too. See that project here.

Well hopefully I have your fall decor juices going. I think my focus this year will be on making some of the mantels truly spectacular.

Do you have a favorite fall theme or color? Are you more traditional in the shades of oranges, reds and browns? Please share any fun projects that you are doing.

Happy Wednesday!

I always appreciate it when you share my pins on Pinterest. Thank you!


Christmas in July

Holiday table setting

I am so delighted to be part of a very talented group of bloggers who are celebrating Christmas in July. What exactly is Christmas in July? I did some research and you can read more about it at the bottom of this post. Psychologically, in the sweltering Arizona heat, a mental escape to Christmas it is a quick way to beat the high temps.

Pinks, burgundy and silver for a different holiday scheme

But right now, some stores already have their autumn decorations up and retailers seem to dictate the seasons long before they arrive. Each Christmas, I do try to decorate something/someplace in a “different” way. For years I would put our decorations in the same areas. But stepping back and looking at your space with a critical eye, can spark refreshing ideas on how to use the decorations you already have. Whether it be a new color combination or a holiday theme, by mixing it up a bit, tends to keep me out of a decorating rut.

Experiment with Color

Being a bit of a traditionalist, I do love reds and greens for Christmas. However, last year, instead of focusing on Christmas colors, I based my decorations on the shades and tones of each individual room. Since we do decorate nearly the entire house, there is a great deal of pleasure in making each room unique and different.

Our dining room (see post here) has a beautiful Oriental rug with shades of cranberry, pink and greens. This rug isn’t going anywhere as it is very high quality and the perfect size for the room. But red and green in a room whose dominating colors are cranberry/pink/teal, just doesn’t work well.

Pink it is!

Pink ornaments from Michaels

Though pink isn’t a traditional Christmas color, I am able to find this large container with ornaments in the blush/pink tones. The ribbon is typically available on Amazon here. But it is currently out of stock. A pink polka dot ribbon in similar shades can be found here.

In addition to the ornaments, these glittery floral picks are also from Michaels. Please note that I waited to the early part of December to look for pink-toned items. The inventory is so low at that point, but by chance I did find one container of ornaments hidden along with these pink blush picks on a low shelf. If you are looking for a unique color, I recommend starting your search a lot earlier than December!

Addition of a fresh tree

Armed with ornaments and ribbon, we did splurge on a fresh evergreen tree in a corner of the room. This tree is the perfect size for the dining room, elevating the entire Christmas theme (and smell) of the room.

Surprisingly, I did find pink Christmas wrapping paper to give the gifts under the tree a similar theme.

For a tree skirt, I gently wrapped my pink/white Valentine quilt around the base of the tree. Again, try and utilize what you have on hand.

With the tree complete and in the pink, now I need to focus on the rest of the room.

The Mantel

Being a historic home, we have a fireplace in nearly every room. With a wide and deep mantel, they are perfect for holiday decorating. In the dining room, I apply a faux garland, white lights and tuck in dried pink peppercorns, pink hydrangea and a sparkly pink ball floral wire.

The bottle brush trees in shades of pink, teal, evergreen add height and dimension to the linear mantel. For fun and balance, I hang the pink balls on fishing line on clear Command hooks on the underside of the mantel.

You don’t need to buy new holiday items every year. Here’s a photo of Christmas 2019 where I use the same pink balls, but in a different application. Playful and festive, they are hanging from the crystal chandelier over the dining room table. Reimagine and repurpose!

More festive touches

With the tree decorated and the mantel adorned, the rest of the room gets a few pink touches.

Pink satin ribbon with boxwood wreaths are pinned to the tops of the upholstered Parson chairs. These wreaths are an after Christmas significantly discounted purchase from Ballard Design. I use them year after year in different ways and they look as good as they day they arrived. See boxwood wreaths here.

Our Christmas dinner is a bit on the formal side and many memories are shared here in this room. Instead of using our traditional red/green, it is fun to change it up a bit to go with the rest of the pink/blush/tree decor.

The sparkly bits of the centerpiece are glittered pine cones, silver trees, coppery votives and silver mint julep cups as vases.

Natural elements like fresh greens, deep ruby pomegranates, alstroemeria and pink roses bring color to the table. Dark cranberry ribbon secure the napkins and a sprig of greens tie it all together. Plain white dishes, pink glassware are layers toward a compliment of colors.

With a burgundy/pink toile tablecloth, the entire new color scheme pulls together.

I can honestly say this is one of my favorite holiday rooms. Getting the colors right with minimal cost is so rewarding. Just writing this blog post and seeing the photos over again, makes me so happy.

Since this is a time of celebration, change your decorations up a bit. If you always put the snow globes in the same place every year, think of where else you can still display them but in a new and exciting way. And if you are buying a unique item or color, don’t wait until December to do it. Most stores will be out of stock by then.

What is Christmas in July?

Per Real Simple Magazine, according to legend, Christmas in July was first celebrated at a summer camp in 1933, when Keystone Camp in Brevard, North Carolina decided to dedicate two days (July 24 and 25) to the holiday—complete with cotton fake snow, a decked-out tree, a gift exchange, and, of course, Santa.

The tradition carries on today, and blistering-hot Southern summers have yet to stop the camp’s tradition—now they simply go for a dip in the lake post-presents. 

Thanks for joining me today! And now let’s see what these talented gals are sharing below.

Christmas in July Blog Hop

Don’t you love looking at other holiday ideas? Me, too. My sweet friend, Rachel from the Pond’s Farmhouse is the host and clever coordinator. I you are visiting me from The Pond’s Farmhouse, welcome to my historical home.

Let’s get started and see what the other 13 bloggers have in store.


Click on the highlighted links below to follow along on the tour.

Stacy Ling – Bricks N Blooms –/– Chloe – Celebrate & Decorate –/– Anne & Ann Marie – Simply 2 Moms –/– Cindy – County Road 407 –/– Jenn – Down Shiloh Road –/– Kelly – The Tattered Pew –/– Rachel – The Ponds Farmhouse –/– Mary – Life At Bella Terra –/– Michele – Vintage Home Designs –/– Jen – MIdwest Life & Style –/– Kim – Shiplap & Shells –/– Kristen – White Arrows Home –/– Andrea – Design Morsels –/– Chas – Chas Crazy Creations


DIY Patriotic Wreath

I confess that I am not a good DIY-er. My optimistic and ambitious nature often leads me into a false sense of “I can do this”. Yesterday, I got a bee in my bonnet to use up some of the numerous ribbon I have and decide it might be fun to make a ribbon wreath. If you have any red, white, and blue ribbon or even fabric, you too can make this DIY patriotic wreath.

Since we always celebrate July 4th at our mountain cabin, I realize that I have very little July 4th decor here in Phoenix. So the combination of getting rid of excessive ribbon and my silly belief that I can do anything, I ambitiously set forth and seek my materials.

Generally to be successful, one needs a positive attitude, fortitude and hopefully a bit of aptitude. I definitely possess the first two, but for some reason DIY projects do not come naturally to me. However, I plow through them and occasionally I will have a success.

The Materials

Starting with a single wire 14″ wire frame (I did not use the green one in the photo above) and lots of leftover ribbon, you will also need floral wire and scissors. I would imagine you can make this with any wreath frame you may have on hand.

Making the Bows

Now I proceed to make bows, lots of them. The more you fold the ribbon, the more fluffy the bow will be. I use floral wire around the middle.

Tightening the wire will pinch the center of the ribbon. Pull the layers of ribbon apart for fullness.

My first mistake is that the bows are a bit too small. Making bigger and more abundant bows will make this project go by much faster. Once I realize this, I add larger bows next to the smaller ones.

Affixing to the Frame

Twisting the wire around the frame secures the bows, but does not keep them from rotating. The more bows you add, eventually they will pack together and not spin around. Again, think bigger bows! Less work!

Mix up the colors and patterns of the ribbons. This is a great way to use up all the scraps of ribbons I collect (does anyone else do that?)

For the 14″ wire frame, I made approximately 32 bows. To fill in, I also add single ribbons that are tied to the frame to add more color and interest.

Couple of things to note:

The larger the frame, the more bows you will have to make. This would actually look cute in a smaller size too. I wonder if you could just tie strips of fabric onto the frame and tie bows, but I’m not sure how time consuming that would be.

Here is the finished wreath. I suppose you could squish more bows onto it if you’d like. But at this point, I am ready for it to be done!

If I were to do this again, I would make much fuller bows and I bet you would be able to reduce the bow-making task significantly.

How Long?

The entire project did take me about 2 hours, with some interruptions. I think this would also be cute as a table wreath with a vase of flowers or perhaps a tray of cookies in the middle? If I were to use this outside, I would spray the ribbon with a UV protectant spray like this.

If you are not a DIY person, here is a very cute wreath on Amazon that is quite affordable. Patriotic ribbon can be found here and wreath frames here if you don’t have any on hand. Floral wire can be found at Michaels or any craft store or here.

Happy Wednesday, my friends! The air conditioner has been replaced and now it is cool and comfortable in my kitchen!!

For more July 4th ideas, check out these previous posts.

If you enjoy this post, please share on Pinterest!

This post shared with Between Naps on the Porch Tablescape Thursday #666


Ways to Enhance Your Entry

Like every first impression, the entrance to your home says alot about you. Is it welcoming? Warm? Impressive? Easy to find? Often we take the entries of our homes for granted, because we are in and out of them frequently. So it’s time to step back and ask yourself the question, how can I create an impressive entrance?

Front Entry Update

Getting ready for our pre-renovation party 1999

Sometimes your entry needs a major facelift. This photo is our house prior to the extensive restoration. It is the only picture I found of the front door that shows the bare light bulb on the front porch. And back then, there were security bars on all the windows and doors.

Front Entrance today

With new house paint, removal of the security door and bars, new front door paint color, new light fixtures we transform the scary front of our home into something much more welcoming. Adding plants and a bench do add to the notion that we actually want you to enter the house and stay awhile.

Bella Terra

To read a detailed version of the restoration of the front of our home, click here.

Willetta Restoration before

I must be attracted to home with security doors as the same appears at the 1922 home I restored in downtown Phoenix. Even with missing light fixtures and significant deterioration, this is still an impressive entry. Plus the front door does have wonderful opening sidelights for ventilation.

Willetta restoration during

After all the white aluminum siding was removed, we found the original clapboard in good condition. The columns need significant work as does the under roof of the terrace.

Front Door Color

Willetta Restoration After

Sometimes a simple can of paint can really change up the look of your front door. Previously painted white, the double front doors look fabulous in this color red. For a more in-depth review of the historic Willetta restoration, click here.

Numbers

Here is the before and after of a remodel I did on a small ranch house. In addition to changing the front door, the house siding and removing the brick planter, note the old house numbers.

Here is the after with lots of changes. But the personal touch I love on this house is the custom made gold plated number 32. Made by an artisan in Connecticut, this is a unique look in Phoenix.

In lieu of a screen door, the shuttered door allows in light and ventilation to a rather dark entrance.

A Front Walkway

Before

This is one of my first “for sale” remodels. There is a lot wrong with the entrance to this house. It needs a new door as the hollow core closet one makes no sense. The mixture of brick and stone confuse me. But because the house is so flat and linear, it desperately needs a welcoming walkway.

After

With a winding path of tumbled pavers, your eye goes directly to the front door (sorry for the quality of this old photo). The solar lights enhance the path at night.

Front Entry Decor

Each season I change up the decor on my front porch. A new wreath, pillows, a throw, new plants~anything to freshen it up for that time of year. To see more about this front porch re-do, click here.

Adding Pretty Elements

Before

It doesn’t take much to freshen up your front entry. Recently, I painted the exterior fixtures and mailbox to our guest cottage. A simple project like this produces big results. To learn more about painting both these items, click here.

Know Your Home’s Architecture

In a small gated community here in town, I found this sweet patio home. However, the entrance does not fit with the style of the house. Between the dated French provincial front doors and the alpine-like peaked roof, I felt like yodeling every time I entered. The light fixture is 1980s. Structurally it looks wonky.

The wooden spindles and beams are removed. Columns are added and receive a coat of stucco. New fascia board gives the roof some beef.

During

With a new front door with sidelights, an appropriate scaled light fixtures and new paint the front door becomes the focal point in this entrance.

After

Here are some pretty entry pictures I did find on the internet. I just love all the window panes around this door.

Better Homes and Gardens

In each photo, your eye is drawn to the front door…which is exactly what you want to achieve.

Houzz

I hope this inspires you to spruce up the entrances of your home! Happy Wednesday!

If you enjoy this post, please share on Pinterest.

This post shared with Between Naps on the Porch Metamorphosis Monday #648


Spring Front Porch Ideas

After putting up the new tulip wreath on the front door, the rest of the porch looks a bit tired after winter. If you missed yesterday’s post on how to make the front door tulip wreath, click here. Inspired by the pinks of this wreath, I am excited to come up with some new Spring front porch ideas.

Since I do not like to waste anything, many of the plants and colors from Valentine’s Day will continue on through the Spring. The pink geraniums and Latinia Rose cyclamen from Whitfill Nursery still look healthy and colorful. The stone rabbit will wear the pink polka dot ribbon for a few more months.

By the door, we have an iron bench and it is fun to place a blanket or pillow on it to soften the edges. The blue thrown has some of the same tones as the front door. Below, the Rose Bible by Reyford C. Reddell is one of my favorite rose reference books.

The two 5 foot cedar trees (artificial) flanking the front door are holding up well and require NO maintenance! I almost want to convert everything to faux plants because they are so easy! The quality is superb and can anyone really tell the difference?

Before you step up to the front door, the planting bed is looking exceptionally good this year. Only one plant didn’t survive the winter, but the rest are healthy and abundant with lavender, geraniums, scented geraniums and snapdragons.

If you have been following me for a while, you may recall the re-do of the rocking chairs on the porch. Repainting the chairs makes such a difference. Click here to see that post on sprucing up the front porch. It’s fun to see the before and after photos.

I was tempted to head to Target to buy some new spring pillows, but felt a bit lazy. Convinced I must have something here to use, I find these two sweet red/pink tulip pillows from my store. The colors are just perfect with the tulip theme. If you didn’t know I have a store, check out the Store tab at the top of the page.

The extremely heavy stone and concrete table is a yard sale find. Luckily we have two of them and they are weather-proof. And just big enough for a couple of cocktails and nibbles. Perfect for cashews are the fluted porcelain bowls by Epure, a recent treat in My Stylish French box subscription.

Scrounging the house and property for old items to put in new places is part of the fun. These two ducks have always been sitting by the front fountain….for years. Now they are integral pieces of the front porch spring decor!

So with minimal effort, I am able to transform the front porch from Valentine’s Day to Spring without any significant, additional cost. The wreath is less than $20 and the rest is just re-imagining my old stuff in new places.

Welcome Mat by Wayfair

This front door just makes me happy! I hope like my Spring-inspired changes.

It is typical of March to be warm one day and chilly and drizzly the next. Just when I pull out my first pair of shorts of the season, I am back wearing multiple layers. Crazy weather!

Have a wonderful Wednesday!

If you enjoy this post, please share on Pinterest.

This post shared with Farmhouse Friday Link Party #197, Between Naps on the Porch Metamorphosis Monday #635


How to Make a Tulip Wreath

If you recall, last year I added a new paint color to the front door. It is the perfect color for Spring and Summer. Surprisingly this shade of blue also works well for Autumn and Winter. Since tulips are currently blooming in the bulb garden, it seems appropriate to hang a tulip wreath on the front door. Join me today to make a tulip wreath. To see the front door color post for details, click here.

Michael’s is having a great sale on faux flowers and I scored 4 bunches of pink tulips for less than $20.00. See here. Initially the goal is to make an all pale pink wreath.

The challenge with our front door is that it is 48″ wide. Standard-sized wreaths tend to look a little dinky. So when I do create a wreath, abundance is the key. Naturally I did this DIY project out of order. It would make the most sense to start with your wreath frame and then determine the quantity of flowers you need. However, I didn’t want to buy another wreath frame and did some digging in the garage to find this 26″ grapevine one…..after I purchased the pale pink tulips.

My old glue gun

Supplies you need are simple: a wreath frame, flowers, glue gun and something to cut the flowers. For a nice selection of grapevine wreaths, click here.

Realizing that I may not have enough pink tulips to fill the wreath frame, I find some darker pink tulips that I had on hand from another project. With 4 bunches of light pink (14 stems each) and 2 bunches of dark pink (also 14 stems each), I have a total of 84 tulips. Before I start a project I want to make sure I do not run out of materials. Been there. Done that.

Using wire cutters makes this easier

Having wire cutters makes this job a lot easier to get through the plastic covering and the wire underneath. These are super affordable and you can order them through Amazon here.

Use glue when necessary

I start working on 1/4 of the wreath, knowing I can use 21 stems in that portion. This gives me a sense of what density of flowers will work. Most stems tuck easily and securely in between the grapevines.

Tucking in the flower stems

Don’t discard the leaves as they can be added to the wreath for fullness or just another pop of color. I hot glue the leaves randomly. Personally, I really don’t like using a glue gun because I tend to burn myself far too much. On this wreath, I use minimal gluing.

Adding leaves

As I am styling it, darker tulips are added for contrast. If you follow me on Instagram, I try to post a story daily and show these types of DIY projects in action.

As posted on IG

Continuing to add tulips around the entire wreath, I leave a space for a ribbon. Using the leftover bow from Valentine’s Day, I find that I don’t like it. The pink in the ribbon looks a little flat to me.

Bow or no bow?

Instead, I remove the bow and continue adding more tulips to fill in the gap. Much better!

So here is the finished tulip wreath! I think it looks so cheerful on the front door.

Since the wreath looks so nice, the rest of the porch looks a bit tired. Join me tomorrow to see how I spruced up the front porch to go with my new wreath!

Happy Tuesday! Spring has sprung and hopefully, everyone’s weather is improving. We are, of course, in the midst of our beautiful season so every day seems better than the one before.

If you enjoy this post, please share on Pinterest.