1

Making Rum Raisin Ice Cream

Rum raisin ice cream is one of my favorite summer treats. Since I don’t eat ice cream very often, my taste bud standards are very high. I want to make sure the calories are worth it. Since I started making my own ice cream, I am never disappointed when I find a recipe that is worth it. Here is a step-by-step tutorial on making what I consider to be one of the best rum raisin ice cream recipes.

The Ingredients

With simple, good quality ingredients of rum, raisins, milk, cream, sugar, cinnamon, eggs and vanilla, you, too can make this creamy, flavorful treat. We always have Gosling’s Bermuda Black rum on hand as this dark Bermuda rum is full of island flavor.

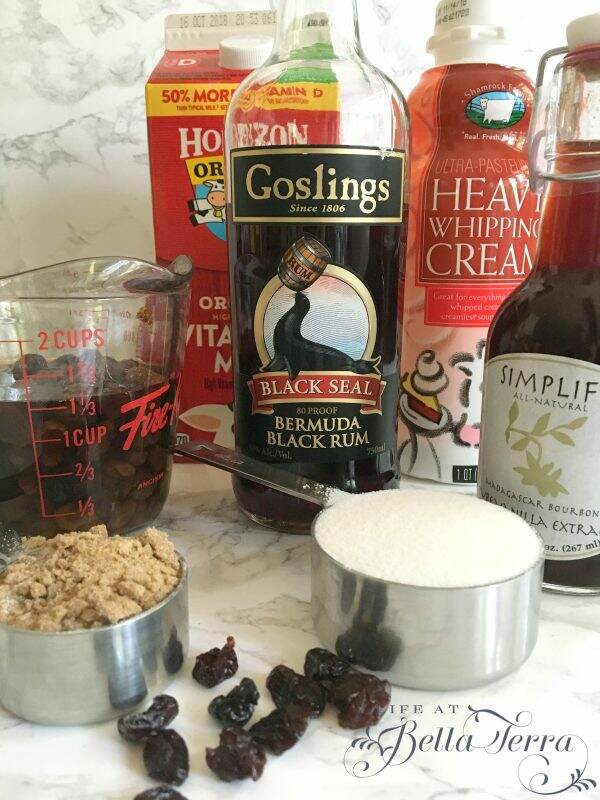
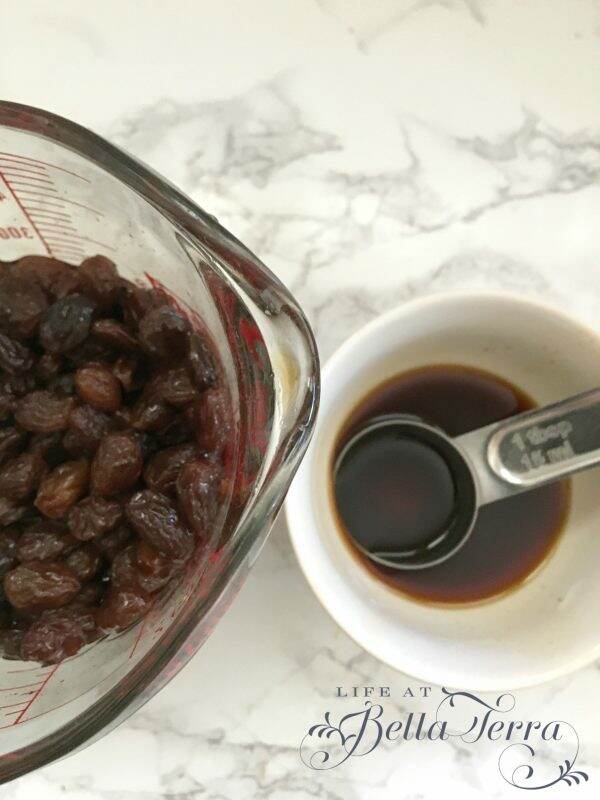
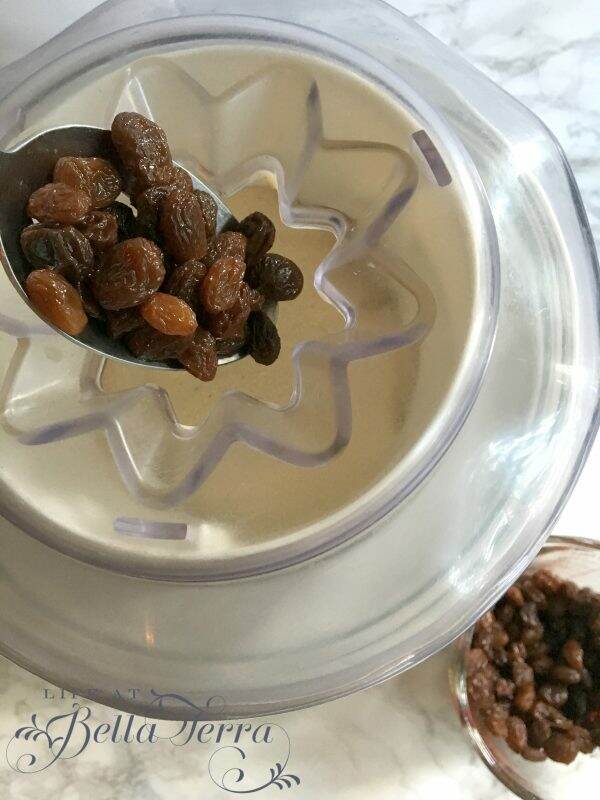
Soak the raisins in the rum at least overnight and up to 2 days. The first time I made this recipe, I did soak the raisins for 2 days. The next time making the recipe, the raisins are bathing in rum for 4 days. Oh la la!

Making the Custard

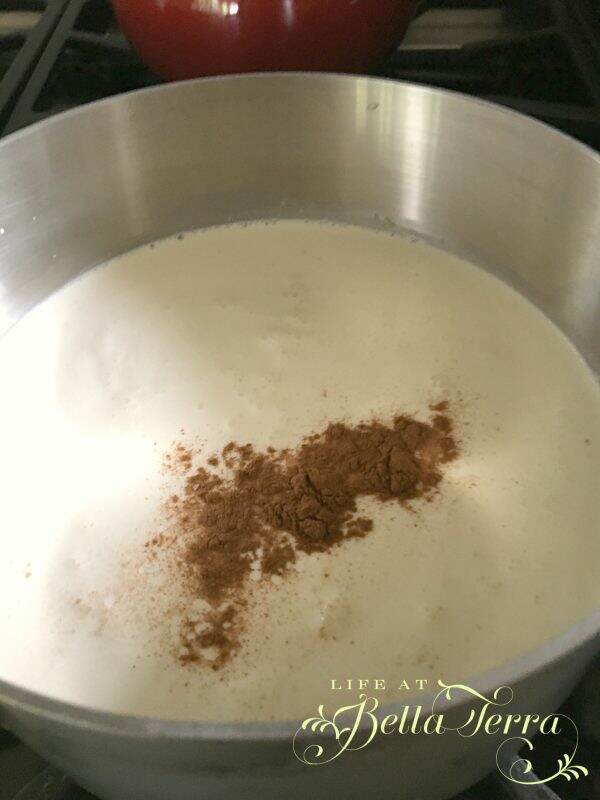
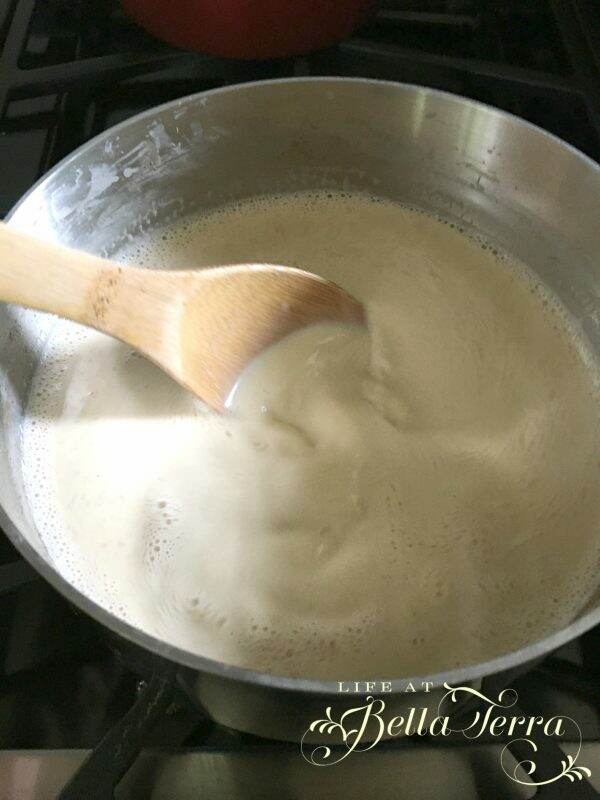
Combine the milk, cream, sugars and spices in a sauce pan over medium heat until mixture is steaming and sugars are dissolved.

Whisk the egg yolks and gradually add some hot milk mixture into the eggs. Be care not to “cook” the egg yolks.  Scrape the yolks back into the milk mixture and cook until thickened and the back of the spoon is coated. For me it was approximately. 9-10 minutes.  DO NOT BOIL.

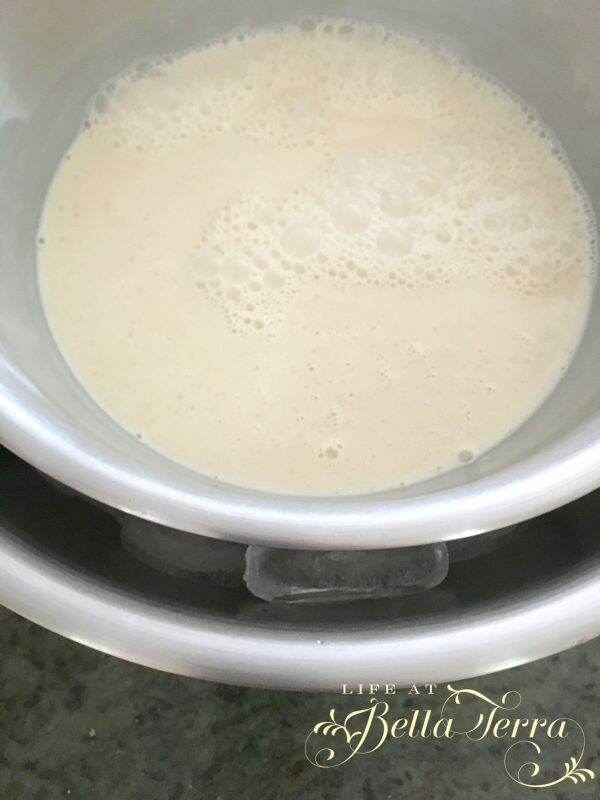
The recipe calls for straining the custard. This helps remove any part of the custard that may have cooked bits of egg in it.

Chill thoroughly.  To hurry this stage along, I put the custard into a bowl and set in into a large bowl with ice. Both are placed in the refrigerator.

Using the Ice Cream Machine

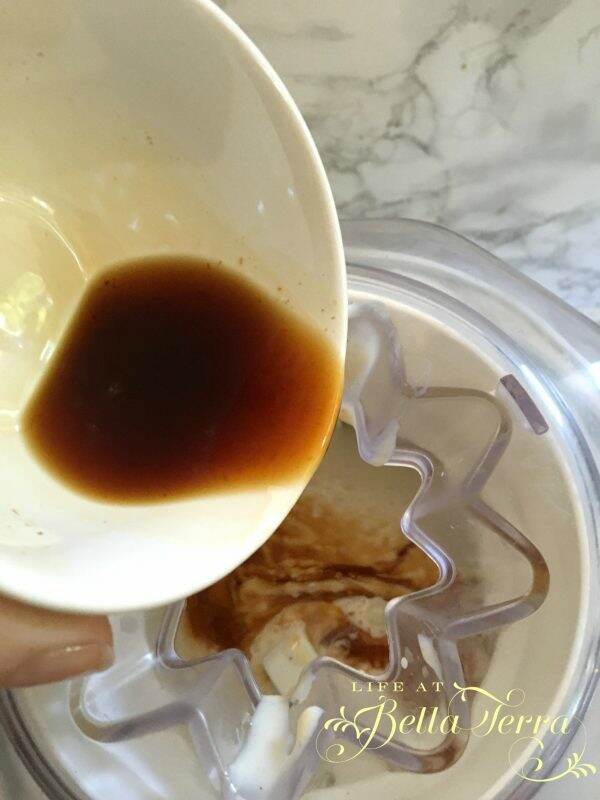
Add vanilla and 2 Tablespoons of rum (from the raisins) and process the custard mixture in an ice cream machine according to manufacturer’s instructions.

My ice cream makers is decades old and works very well. The Cuisinart 1.5 quart ice cream and yogurt maker is affordable and easy to use. I keep the double insulated freezer bowl in the freezer all the time so I can whip up homemade ice cream within 30 minutes or less. See it here.

Add the raisins at the end of the churning stage.

Remove to a freezer safe container and freeze for 24 hours.

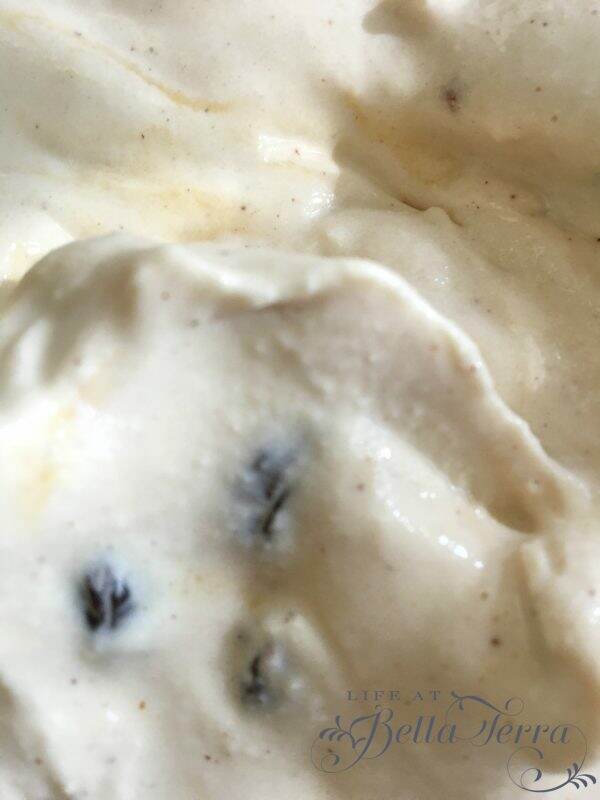
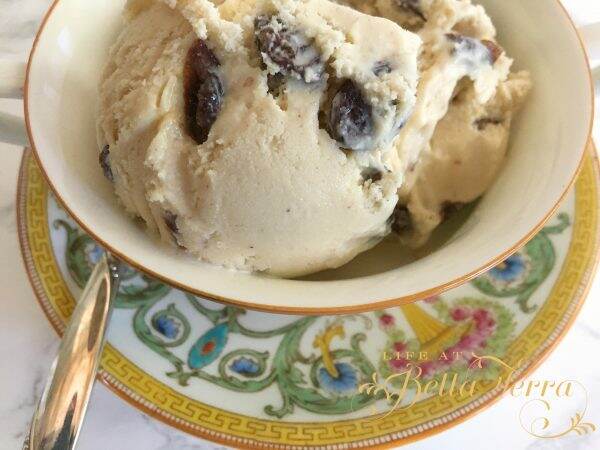
This ice cream was so dreamy, creamy, and yummy! It was chock-a-block full of plump rum-soaked raisins.

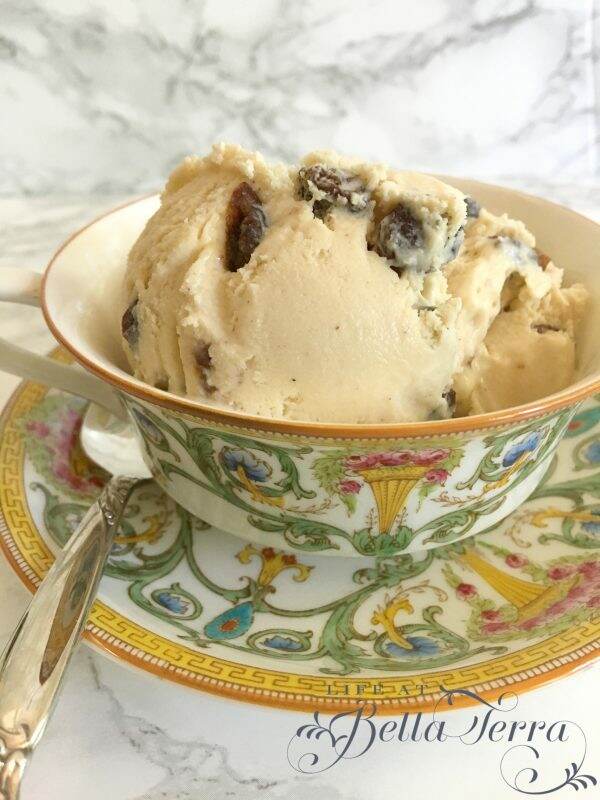
Now I will have to exercise twice as much this week after consuming both my pistachio and rum raisin ice cream!

If you enjoy this post, please share on Pinterest!

Rum Raisin Ice Cream Recipe from Serious Eats


Rum Raising

Raisins are soaked in dark rum for 2 days (longer if you'd like) and are blended in with this rich, vanilla ice cream with hints of cinnamon

  • Ice Chream machine
  • 1 cup raisins (dark or golden)
  • 1/2 cup dark rum
  • 2 cups milk (I used whole)
  • 2 cups cream
  • 1/2 cup granulated sugar
  • 14 cup dark brown sugar
  • 1/4 tsp cinnamon
  • Pinch salt
  • 4 egg yolks
  • 1/2 tsp vanilla
  1. Place the raisins in a container with a tight-fitting lid and add rum. Cover and shake to evenly coat the raisins in rum, let sit at room temperature at least overnight and up to 2 days. Drain excess rum from the raisins, reserving 2 tablespoons. Set aside.

  2. Combine milk, cream, sugars, cinnamon and salt in medium saucepan and place over medium heat, stirring occasionally, until mixture is steaming and sugars are dissovled. Meanwhile, whisk egg yolks in medium mixing bowl. Gradually whisk hot liquid into yolks, then scrape back into pan and cook over medium heat, stirring constantly, until mixture is thick enough to coat the back of a spoon. Strain and chill thoroughly.

  3. Add vanilla and reserved rum to base and process in ice cream machine according to manufacturer's instructions, adding raisins when almost fully churned. Remove to freezer-safe container and seal tightly. Freeze at least 24 hours before serving (allowing the rum to leach out into the ice cream).


Saturday Meanderings

Morning at the cabin

Can it be mid-August already? Am I seeing school buses again? This must be the fastest year ever as it feels like I am in fast forward mode ALL the time. As you read this, I am at our mountain cabin, inspiring to relax. My visions of dinner outside and cooler temps will hopefully come true. Welcome again to another Saturday Meanderings, where we chat about all good and wonderful things.

Curious Results

My friend, Rick’s tomato sauce results

My friends, Rick and Janie sent me a picture of their homemade tomato sauce. Hmmm. Rick, with 40 lbs. of tomatoes made 16 jars (pint) of sauce =32 cups of sauce. I, with 60 lbs. of tomatoes made 20 jars (pint) of sauce =40 cups of sauce. Wondering why my yield is less…Guessing that I probably reduced my sauce down more (but that much more?) could be the reason.

In my pantry

We’ve agreed to get together and do a taste test because if I can get the same flavor and consistency and more yield, I will note that for next year’s sauce making project. If you missed the post on the 4 Ingredient Tomato Sauce, you can see it here.

Holiday tea towels

Look at these cute vintage holiday tea towels! Hester & Cook has a great selection this year. I am not sure how I will use them, but perhaps as a gift wrap for some fresh baked goodies? I just love the nostalgic vibe-it reminds me of my childhood. Natural 100% cotton and priced at $16.00 each. They measure 19″ wide by 33 1/2″ long. You can find them here.

Easy Summer Dessert

Peach Galette from Serious Eats

Trader Joe’s frozen pie crust is a staple in my freezer. With the abundance of fresh fruit like cherries and peaches, you can make this easy dessert with just a few ingredients.

Occasionally, when I unroll the TJ pie crust, it breaks apart. But since they package it between two large sheets of plastic wrap, I just take a rolling pin and do a few swipes over the plastic. The crust comes together nicely and then it is ready to use.

Pile the fruit in the middle with the suggested ingredients, curl up the edges of the pie crust, brush with a bit of egg wash and you are ready to bake.

Cherry Galette

Your friends and family will be impressed with your galette and they never need to know how easy peasy it is. I have made this recipe with cherries, peaches, apricots and apples. For the peach galette, here is the recipe from Serious Eats. And this yummy Rustic Cherry galette recipe is from She Wears Many Hats.

DIY-Vintage Bottle Labels

the Secret to making your own DIY Faux Vintage Labels for Bottle.
Vintage Labels from The Ponds Farmhouse

With fall and Halloween right around the corner, my friend, Rachel from The Ponds Farmhouse has a great tutorial about making these labels for your fall decor. Aren’t they amazing? See it here.

Kitchen Love

Photo by The Scout Guide

I love looking at pictures of kitchens. Often I dream about designing a new kitchen (not that I don’t enjoy mine) and what elements to include. The Scout Guide just posted a fabulous article about creating a timeless kitchen. There is some really great information. See it here. Also, as an FYI, The Scout Guide has publications in individual cities and you can own a franchise too. Check it out here.

Home Renovation

My last home restoration

In 2004, I developed a home renovation/restoration business called Picket Fences, Inc. While pregnant with my third child and running errands, I had an ah-ha moment, pulled over to the side of the road, and quickly wrote down the beginnings of what would be a business plan for my company, Picket Fences. I love breathing new life into older properties and after many years in corporate America, this new adventure was right up my alley. Long before Fixer Upper or other HGTV shows became popular, I had a few home remodels under my belt.

Patio Home Renovation

The goal at that time was to buy one house per year in our mature neighborhood, improve it, sell it and make enough money to pay for the children’s tuition and one great family trip. It actually fulfilled my creative nature and allowed a flexible schedule while raising 3 children.

Entry to a historic home restoration

However, everyone started getting on the bandwagon and it became more and more difficult to find homes, at a reasonable price, and make a profit while maintaining my reputation and high standards. At first there was little to no competition. And then investment companies would pay more for properties, do really inferior work and “flipping” became the norm.

Butler’s pantry renovation

Here is an article from Apartment Therapy about 3 former house flippers who reveal why they quit flipping houses. If you think this is the occupation for you, please read this because it is filled with the realities of home flipping. It is not as glamorous as it seems. You can read it here.

To see the Before and After pictures of the restoration of a 1922 Jeffersonian home I did, click here.

Well, that wraps up another Saturday Meanderings. Thanks for joining me!

Have a wonderful weekend!


Fall Decor Ideas

Autumn in Simsbury, Connecticut

Though I am not ready to give up on summer yet, I feel I could easily welcome cooler Fall temperatures. It doesn’t get Fall-like here in the Valley of the Sun until late October. We seem to be hotter now with all the new growth and development, which is unfortunate. I recall cooler weather in mid-September when I first moved here. Fall decor is on the store shelves and typically, by the time I am ready to decorate everything is gone.

Front Porch decor

So today I would like to share some inspiration as we dream about apples, sweaters and falling leaves. The front porch is always a fun place to decorate and the wreath is the first item that goes up. Since our front door is wider than a standard size, our larger wreath is an investment. As a result, I store them carefully year to year. I love the rich fall colors and surprisingly, they do work with my light blue front door.

Fall wreath using natural grasses

Or you can make a wreath using some natural materials from nature. To see my blog post on this, please click here.

Adding fall plants like wild grasses or coleus creates an autumn tapestry of textures and shades.

Pillows and Blankets

Wool blanket and orange pillow

Pillows and blankets are an easy way to bump up your fall theme. This is a welcoming spot by the front door to sit and just relax. You can find great pillows on Etsy or Amazon here. And I love this blanket from Amazon too.

Fall DIY

DIY fall trees

Making fall trees (see post here) is a simple DIY utilizing all the fall foliage that can be found at Michaels or Hobby Lobby. Keep some of your outdoor branches and with a drill and glue gun you are good to go!

Freshly cut maple branches

Fresh cut branches with colorful autumn leaves in a large glass vessel can provide an instant change in season. Since we don’t really have these lovely deciduous trees here in Phoenix, I cut branches on our trip to the mountains each October.

Accessories

Spicy Apple candle by Rosy Rings

A few years ago, I discovered these amazing candles by Rosy Rings. They are works of art~beautiful to look at and smell great too. This autumn candle is Spicy Apple and you can see the slices of apple, cinnamon sticks, leaves and berries in the wax. You need one, right? See it here.

Painting by me

Adding a few pieces of seasonal art brings new color to any room. Here is a painting I did a few years back…my first pumpkin!

A California autumn by Lynn Winans (1897-1982)

Decorating Shelves

I love adding a bit of fall decor to each room, but one of my favorite spots is the antique Hepplewhite secretary from the late 1700s which sits in our living room. From my Johnson & Johnson plates to the pheasant soup tureen, everything about this vignette screams autumn.

Last year I made fabric pumpkins, to replace the ones damaged by creepy bugs. This DIY is really easy and if you can get your hands on real pumpkin stems, then the possibilities are endless.

We have a huge pine tree in our front yard and for the first time it is dropping big, gorgeous pinecones. I cannot wait to figure out what I am going to do with this pretty gifts from nature.

Bleaching pinecones

Last year I did bleach pinecones and the results are a bit different but perfect for a more monochromatic theme. And you can use them into the Christmas holiday too. See that project here.

Well hopefully I have your fall decor juices going. I think my focus this year will be on making some of the mantels truly spectacular.

Do you have a favorite fall theme or color? Are you more traditional in the shades of oranges, reds and browns? Please share any fun projects that you are doing.

Happy Wednesday!

I always appreciate it when you share my pins on Pinterest. Thank you!


Room by Room~Front Hall

View from the upstairs landing to the front hall

Welcome to the Room by Room series where I feature one room of our historic home in detail. Whether you call it a foyer, entryway or front hall, this is the area where you enter our home after you step through the front door. We are so blessed that this space is a good size ~ 12 feet by 16 feet.

The Front Door

Outside of Front Door

I do believe this door is original to our home which is nearly 110 years old. This 6 raised panel solid wood door is a generous 4 feet wide and has the original brass hardware and ball tip final hinges. Just a quick note that the topiary cypress trees are faux and can be found here.

Front door inside view-Valentine’s Dinner 2020

On either side of the door are side lights with 6 mullioned sections, which allows the eastern or morning sun into the front hall.

The Staircase

The staircase with sisal runner

Once you cross the front door threshold, you are directly across from the staircase. The front entry acts as the center of a wheel with spokes leading to the several different areas of the house. The staircase leads to the second story and bedroom quarters. The mahogany handrail is worn smooth by many trips up and down the stairs over the past 10 decades. Memories are embedded in that railing and often, when my hand glides down it in the morning, I think of all the other people who have touched it during their lifetimes.

The Living Room

View to the living room

Once inside the front hall, and on your left, the wide opening to the living room gives you a glimpse of many original features, like the coffered ceiling. To read more about our living room, click here.

The Dining Room

View to the dining room

Off to the right, opposite the living room, is the entrance into the dining room. During the home’s restoration, we discovered original pocket doors hidden in the walls. What a find!

Pocket Doors discovered during restoration

The Powder Room

Adjacent to the staircase are two 5 panel doors~one leading to the small powder room; the other to the hall closet.

Doors to powder room and hall closet

Before the restoration, this powder room was hardly functional. I recall a toilet seat with a celestial horoscope design on it and a full size vanity. It was impossible to sit without bumping your knees against the sink. However, we did keep the original push button toilet which allows for a nice hearty flush.

Since this room is so small, a tiny Kallista sink and custom scaled-down vanity is designed for the space.

A peek into the powder room

Hall Closet

The other door is the hall coat closet (funny as we rarely wear coats here in Phoenix) that serves as a storage closet for many of my linens.

Hall closet is storage for tablecloths/napkins

To see more fun storage tips and information on this closet, like a pulley system for lampshades, click on my post about this odd-sized closet here.

Hidden Storage

Hidden storage

Another very unique feature in the front hall is the hidden space under the staircase. Not only is there a large area to store all my pillows and table leaves, but there is easy access to the powder room plumbing. On a rope and pulley system, the raised panel slides down below the floor.

To see more about this unusual yet clever space, click here.

Hall Table

Petticoat or Pier table

The burl wood hall table with the mirror below is something I always refer to as a petticoat table. According to the Clermont State Historical Site, the reason behind referring to this as a petticoat table a myth. According the story, these mirrors are called “petticoat mirrors” and are installed to allow ladies to check to make sure that their petticoats were not showing beneath their skirts. Often located in hallways, where a woman would be entering or leaving a house, it seems sensible.

Mirror inserted in table

However, this is called a pier table. The purpose of the mirrors is decorative. Reflecting light around a room on highly-polished surfaces, including mirrors, glass, crystal pendants on chandeliers, or fine wood surfaces, was a way of demonstrating wealth. 

Regardless whether it is a petticoat or pier table, I have never seen another one like it and I have no idea how old it is.

Other Unique Features

Original brass vents

Our home did not have any central air conditioning, but we did utilize the existing heating vents to retrofit the house with a modern heating and cooling system. The beautiful heating grates had been painted over in dated shades of pastel blue and pink. In order to bring them back to their original beauty, we found a resource to brass plate them.

The hardwood floor is original Canadian beech and is so solid and sturdy.

Architectural details

There are some interesting architectural details only found in the front hall. Angular corbels and trim detail delineates the transition from the hall and staircase unique.

New light fixture

Much to our dismay, the previous owners took all the original light fixtures. Selecting the right scale and style is a bit challenging, but this one works. The crystals tie into the much more elegant chandelier in the adjacent dining room. I cannot recall the resource for this.

Cross Stitch Prayer

Hard to believe that I did this cross stitch over 43 years ago…yikes. It hangs in our front hall, where we strive to open our doors to joy and love.

Front Hall table; flowers from @thebouqs.com

In the center of the front hall is a carved antique small drop leaf table. Typically I like to have fresh flowers and candles on this table. Our house rule is that the first 3 rooms (living room, dining room and front hall) of the house remain clean at all times. The rest of the house is fair game!

Thank you for joining me today for another episode of Room by Room. Have a happy Wednesday! Today I am picking up 60 lbs. of Roma tomatoes~you know what I’ll be doing this weekend!


Dividing Irises

Bearded Iris

In our USDA planting zone (9b), the best time to divide iris rhizomes is this time of year. Established plants need to be divided every third or fourth year or whenever the clumps become crowded and flowering decreases. This is best done in August after flower stalks have died back. I can honestly say that dividing iris in the summer heat is not a fun thing to do.

Bearded Iris

As you know, once you buy a property it is fun to go through the seasons to see what will bloom in your yard. Since our property was a major restoration construction site for 3 years, large portions of the landscaping have been re-designed. However, many plants/trees that were planted by previous owners over the last 100+ years still remain.

An Overgrow Bed of Irises

The front bed is dense with iris

A section of our landscaping bed nearest the street is chock-a-block full of a smaller white iris. I have no idea who or when these irises were planted. Since we have been living here for 20 years, this iris bed is in dire need of attention. It is a cluttered mess.

Since the original rhizome (the “mother”) will produce several offshoot rhizomes you can only imagine how entangled this planting bed is currently. Dividing them gives them space to grow and flower.

My bulb garden

If you are new to my blog, two years ago I did create a separate bulb garden on the south side of our parcel. The hope is to divide these irises and place some of them in the newer bulb garden. To see my bulb garden project, click here.

Tools You Will Need

Time for a better pitchfork like this one

It’s impossible to garden here without a hat, water bottle and since we’ve had so much rain, a mosquito repellent. I place a tarp down so I can sort and separate the rhizomes.

Using a pitchfork to gently lift the rhizomes and roots, I quickly realize that this will be a difficult project. As stated earlier, dividing irises should take place every 3-4 years. Since nothing has been done in the past 20 years, these rhizomes are firmly embedded, so much so, that I bend the tine of the pitchfork.

Parts of the Iris

You will quickly see the rhizome protruding from the bottom of the iris fan. The roots hang freely below. In the picture above you can see how long the rhizome has grown.

Digging up rhizomes

Condition of the Rhizome

After carefully releasing several iris, I am ready to prepare them for replanting. First I check the condition of the rhizome. If any parts are rotted or showing signs of extensive infestation, I will not replant. However, if just the end or tip has decay, you can cut off the bad areas.

Rotted parts of the rhizome

In order to determine the condition of the rhizome, I place them in a bucket of water to wash off the excess dirt. Here I can evaluate the condition, length and hardiness of the rhizome.

Washing rhizome

Many of the rhizomes are in big clumps and others are just long and linear. Separate these rhizomes from the mother with a sharp knife and discard of the mother, as it will no longer produce blooms. You can break apart the clumps and trim the rhizome to approximately 3-4 inches, using a sharp, clean knife or garden shears (found here).

Cut the rhizome to 3-4 inches in length

For the rhizomes you decide to keep, cut the leaf fans back so they’re about four to six inches long. This helps the plant focus on growing roots before winter.

Trim the fan to 4-6 inches

Replanting

To plant, dig a shallow hole and create a mound in the middle where the rhizome will sit. Place the rhizome on the mound with the roots in your hole. Cover the roots and then place a thin layer of soil over the rhizome. You want the rhizome itself to sit just below the surface, lightly covered in soil. Push any errant roots under the soil with your finger.  

It’s easy to make the mistake of planting irises too deeply. The rhizomes of these plants should be partially exposed to the elements, or thinly covered with soil in hot climates. If they’re buried too deeply, they won’t do well.

Newly planted iris

Since the long overdue extraction of the rhizomes is rather difficult, I still have half a bed to go. But several are now clean and freshly planted in the ground. While digging up the rhizomes, I also discover many miscellaneous bulbs. I am not sure if they are freesias or paperwhite narcissus so it will be fun to see what comes up in the Spring.

My bulb garden in 2021

Irises in Phoenix bloom around Easter time. I plan to fertilize all my bulbs and rhizomes in January, February and March. Hopefully I will have an abundant crop of spring blooms to share with you. Check your area to see when it is the ideal time for you to plant and divide irises.

Happy Gardening! Make sure you keep reading to see what my other gardening friends are up to this month. It is such fun to see their gardens in other parts of the country!

I would love for you to follow me on Pinterest. Please share this pin if you enjoy my post!

Now Off to the Gardening Blog Hop

Well, since my cutting garden is a bit of a failure, I am excited to read Kim from Shiplap and Shells post about 9 Common Cut Flower Garden Challenges and Solutions. See it here.

Shiplap and Shells

Chas from Chas Crazy Creations is sharing When to Harvest Your Garden Vegetables here.

Chas Crazy Creations

Stacy from Bricks and Blooms is enjoying her flower garden and let’s us peek into Gardening Zone 6a Summer Flowers here.

Bricks ‘n Blooms


Ways to Look and Feel Younger

Gardening is therapeutic

Let’s face it. We all get older. But don’t you find it interesting that there are people in their 70s that have more energy and joie de vivre than some people in their 40s? What is the secret to living life to its fullest and looking good in the meantime. I certainly don’t have all the answers but here are some ways I try to look and feel younger. Making an effort to improve your health, attitude, appearance and spiritual connections will enhance your life.

Posture and Shrinking

Working on your posture is W.O.R.K. However, if you do not, you will eventually be stooped over, look shorter and older.

There are several reasons why a person may lose some height as they age: osteoporosis, flattening of the feet, dehydration (which can cause our spinal discs to compress), stooped posture due to loss of core muscle strength.

The good news is that you can improve your posture and slow down shrinkage by exercising and eating right. Calcium and Vitamin D are key to building strong and healthy bones – but vitamin C and vitamin K also play an important role in bone health.  Strength exercises are a must, whether lifting weights, playing tennis, running or jogging, as they all contribute to bone health.

Bad habits. Photo from 123RF

Bad habits that contribute to shrinking include slouching, a lack of physical activity, smoking, drinking alcohol or caffeine excessively, extreme dieting, taking steroids and poor nutrition.

Two years ago I had my first bone scan and I was surprised to find out that I have some bone density loss. Actually, it made me mad because at that time I was working out 6 days per week. So I consulted with my chiropractor, started using bone building supplements and changed my workout routine. The latest bone density scan test results show a big improvement~much to the surprise of my doctor.


Please check with your doctor before taking any supplements. I take one Strontium every morning and 2 Bone Builder Forte at night.

Sitting is the New Smoking

Photo from Posturite.co.uk

Get up and move. I try to limit the time I spend at my computer writing this blog, and I am always trying to practice good sitting posture. When I walk, I squeeze my shoulders together and engage my gluts, while holding in my abdomen. This very hard task isn’t something I am yet to retain throughout my walk, but I keep trying!

My Pilates instructor, Heather at Maximum Pilates

I cannot say enough about Pilates as I take a one hour class twice a week. This gets me to move in ways I typically wouldn’t and it is part of my weekly exercise program. Pilates keeps your core very strong which also helps with your posture. And it’s a wonderful community of like-minded women, who are trying to age the best way we can.

Keep Hydrated

Pretty ways to help me drink more water

Dehydration negatively affects the body in several ways. It is the main cause of heat exhaustion. It also leads to a loss of strength and stamina. Chronic dehydration will lead to kidney problems. For some reason, I have not been drinking enough water. Please join me in trying to drink half your body weight in ounces every day. There is a quick way to tell if you are not drinking enough. Check your urine. It should be a light straw color. And being hydrated plumps out the wrinkles!

Care for your skin and hair

Petting dogs lowers your blood pressure

Dry skin and dull hair just makes you looks older. There are so many products available at all different price points. Invest in a good haircut. Keep yourself groomed. It only takes a few minutes to tidy yourself up if your are going out in public. You will feel better and as a result, look better too. To see my skin care rituals, click here. Haircut by Roscoe at Pucci Salon.

Are you Happy?

We all look much better if we are smiling. Are you happy? If not, what can you do to add happiness to your life. Though life can certainly throw you curve balls, happiness is a choice.

My friend, Chloe recently sent me this quote from Pavana Reddy. “Your soul is attracted to people the same way flowers are attracted to the sun. Surround yourself only with those who want to see you grow”.

Quite honestly, dump those people in your life that are energy vampires. Life is too short to be robbed of your spiritual essence. Be happy. Keep smiling. To see my post about the Importance of Smiling, click here.

Limit your Media time

Photo from TMS Center, Lehigh, PA

I no longer watch the news. It is the best thing I have done this year to promote positivity in my life. And I don’t care if I am not informed. So much of the news isn’t really news, but opinions and if something is monumental, I will hear about it. The benefits are enormous as I am no longer spending a few hours a day watching television and getting frustrated. Now, if I do watch television at the end of the day, it’s something happy before I head to bed.

Getting off of my smartphone is another goal of mine. There are some benefits with checking in a few times a day but if you find yourself spending hours watching other people’s lives, then it may be time to put the phone down and use that time for yourself. Studies show a correlation between social media and depression. For more information on this, click here.

Care for Others

Photo from Benchmark One

If you focus your efforts on helping others, it’s amazing how good you will feel. Pick up the phone and call a friend. Help a neighbor or an animal. Get involved in your community. So many people need a helping hand and doing so will take your mind off your own problems and give you a sense of well being.

There are so many things we can do to increase our happiness and health. One of my top blog posts of all time, 10 Tips on Aging Well is full of even more information. See it here.

I am constantly trying to be a better, kinder, and more interesting person. My goal is to be active and as healthy as I can be until the day I die. Please share any tips you have on staying young at heart. We need to keep motivating each other!

Happy Wednesday, sweet friends!

If you enjoy this post, please share on Pinterest.