How to Clean a Crystal Chandelier
The crystal chandelier in our dining room has traveled with me from house to house. Found in an antique store and electrified, I love the elegance and beauty of it. Not too gaudy, but just enough sparkle to make the dining room extra special. Once a year, every December, I clean the chandelier by hand. Since I am participating in a blog hop that involves lighting, this seems like the perfect opportunity to accomplish this task and share with others. Make sure you check out the other bloggers and their lighting tips and tricks at the end of this post!
The Before

I look at the chandelier and say, “does it really need to be cleaned?” Probably me just trying to talk myself out of this task. Even though it looks nice, you’d be surprised how much dust and dirt land on these crystals and arms.
Prepping the Work Space

Every year I seem to try a new method. But before I even begin, I lay several beach towels over the dining room table. Not only to protect the table, but the first year I didn’t do this and 3 crystals fell…..and shattered. At least if they fall on the towels, they have a soft place to land.
The first year I cleaned the chandelier I sprayed the entire fixture with vinegar and water. The towels help protect the table from all the drips if you choose to clean the crystals this way.

Pulling back the upholstered chairs ensure you don’t accidentally stain those either.
Select Your Cleaning Product

This year, I decide to use a foam glass cleaner, as I have good results with it on windows and glass table tops. I believe we buy this at Costco as I tend to have several cans of it. Or you can find it online here.
Be Safe

Make sure you use a sturdy step stool to prevent any falls or injuries. Not only do I use the step stool, but also kneel and stand on the table while I’m cleaning.
Start Cleaning

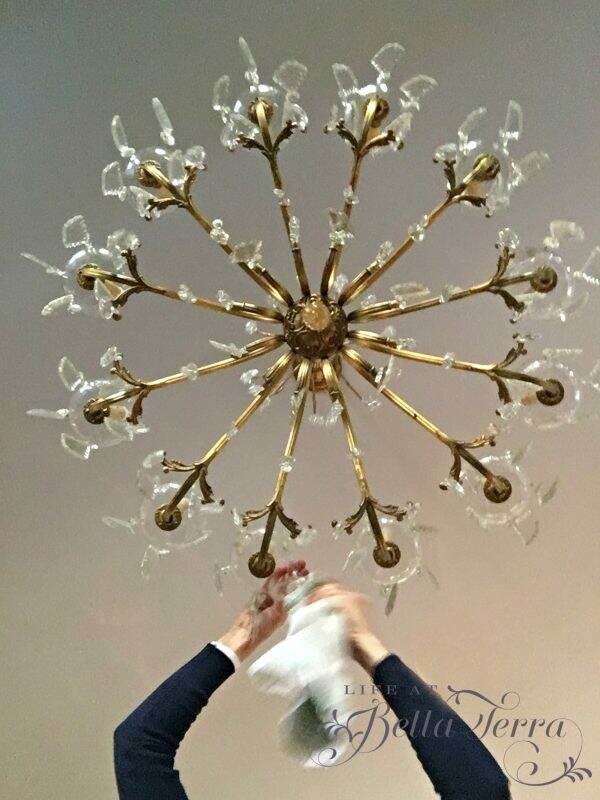
Saturating a microfiber rag with the foam, I start on the saucers under the candles. The minute I wipe both sides with the foam rag and wipe it again with a clean dry rag, I can see a difference in sparkle already.

Here is where most dust settles. In doing this, the chandelier really moves around increasing the chances of a crystal falling or breaking, so be extra careful. Look at the dirt collected in just a few of the saucers.

Repair and Replace
I do have an assortment of extra crystals in case one breaks. They are kept in an old cigar box for safe keeping. Someday I will turn the unmatched ones into ornaments for the tree. You can find additional crystals in antique and thrift stores. Unique ones can be found on eBay or sourced on the internet.

This is also a good time to make sure the wires attaching the crystals are secure. I pinch them closed so they will not fall off with all the swinging associated with cleaning the chandelier.

After doing the saucers, I start in the center of the chandelier and work out. Don’t forget to wipe down the arms or any other surface that collects dirt and dust.

These long 3-sided crystals are difficult to find so I take extra care in wiping them down.

Use Scissors for Snags
Occasionally the microfiber gets caught on the wire between the crystals. Do not pull to separate it but use a small set of scissors. Any tugging on the crystals can cause them to dislodge and drop. I’d rather ruin the rag than the crystal.

The project doesn’t take very long and it’s actually rather soothing to do this. Plus the end result is a sparkling, clean chandelier that will just glow for the holidays.

Replace the Bulbs
I step back to admire my work and notice a light bulb is out. Fortunately I do have a few extras on hand because this particular bulb is not easy to find locally. The bulbs are covered in a silicone material that look a bit like a flame. Naturally, they are available on Amazon here.

Even though this bulb is slightly larger than the dead bulb, no one will notice.

I keep any additional chandelier related items nearby in the buffet so I am not searching for them every December.

So now the chandelier cleaning is finally completed! Remember if you have issues with height, use a good ladder or have someone else do this for you. After looking up for a period of time, it is easy to get dizzy.

While I had the ladder out I also cleaned the foyer chandelier, which took only a few minutes because it is much smaller.
Hopefully this post will inspire you to clean any chandeliers or glass globe pendant lights. It is amazing how something this easy makes a subtle but dazzling difference around the holidays.
Thanks for joining me today and now for other lighting ideas, please keep reading.

This post shared with Between Naps on the Porch Metamorphosis Monday #622


Niky from The House on Silverado shares her Cozy Lighting Tips and Tricks.

Kristin from White Arrows Home has 3 Christmas Lighting Projects.

Kim from Shiplap and Shells teaches you how to make a Mercury Glass Lamp Base with a Twist.

Andrea from Design Morsels show us how to Paint a Chandelier.

Amy from Health Home and Hearth demonstrates how to add wireless under cabinet lighting.

Chas from Chas Crazy Creations makes this adorable lampshade makeover.

Tarah from Grandmas House DIY creates a moody speakeasy with Basement Lighting.

Kippi from Kippi at Home makes these pretty DIY Wooden Lanterns.

Thank you for joining me. Please remember that all of us love your comments and feedback!