1

Making Madeleines

I am addicted to the Great British Baking Show.  The 5 seasons on Netflix are hosted by Mary Berry and Paul Hollywood (swoon~~ah those blue eyes!).  Amateur bakers face off in a 10-week competition whipping up their best dishes hoping to be named the best in the U.K. The show is so informative-who knew the British had so many different cakes, breads, puddings, and pastries! Watching all 5 seasons is inspiring me to do more baking and today, I am making lemon flavored Madeleines.

Madeleines are a very traditional French breakfast or tea cake.  Perfect madeleines should have a nice hump at the top, indicating a good rise and a lightness in texture. The thinner edges should be golden brown, caramelized and crunchy. According to this recipe, a madeleine pan is nice but not necessary. You can also use a miniature muffin pan.

Ingredients and Recipe

This recipe for madeleines is from Dessert University by Roland Messier, executive pastry chef at The White House for 25 years. I took a class from Roland years ago and finally dusted off his cookbook. You can find it here.

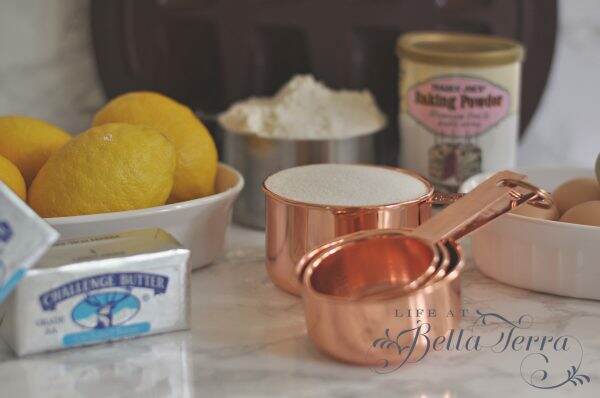
Ingredients are rather simple~~flour, baking powder, lemon, sugar, eggs and lots of butter!

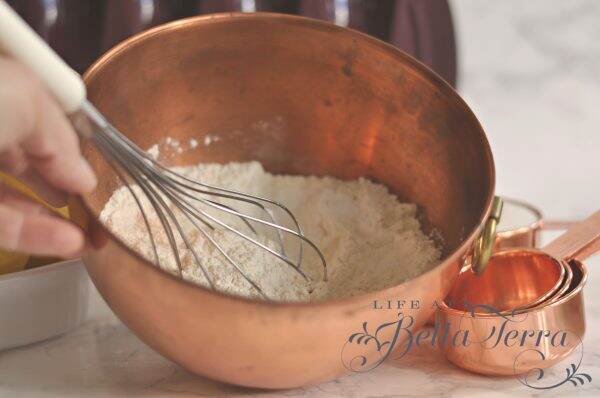
Blend the flour and baking powder together.

Zest the lemon~~later the fruit will be juiced for the lemon glaze. This is my favorite zesting tool here.

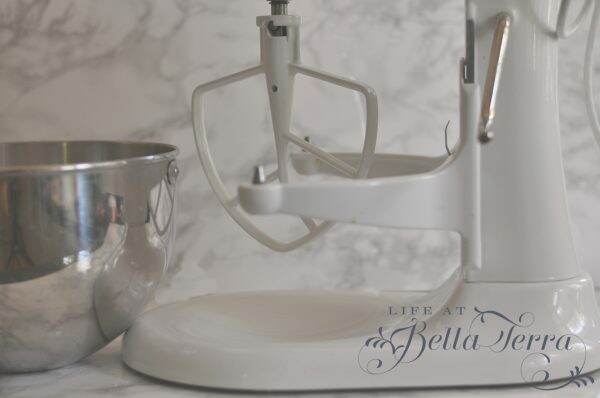
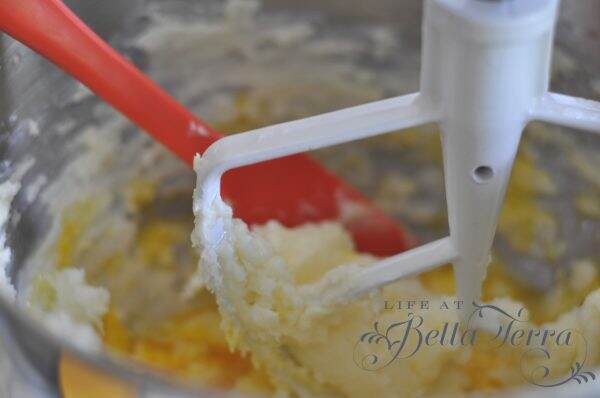
Using the paddle attachment on your mixer, blend the sugar, butter, lemon zest and salt.

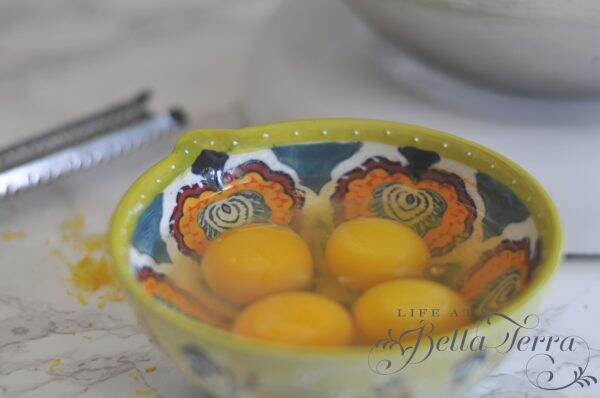
Be careful not to over beat. With the mixer on low, add the eggs and then the egg yolk until well combined.

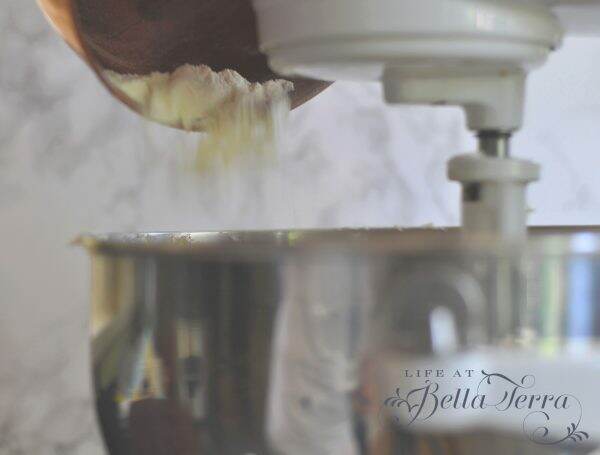
Stir in the flour mixture and mix until dough is smooth.

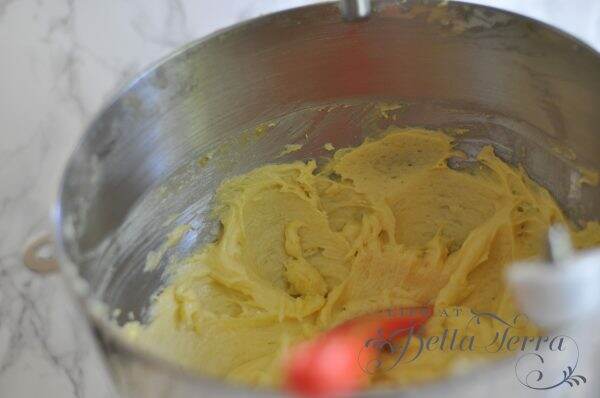
Cover the bowl and refrigerate for at least 1 hour.

Baking Preparation

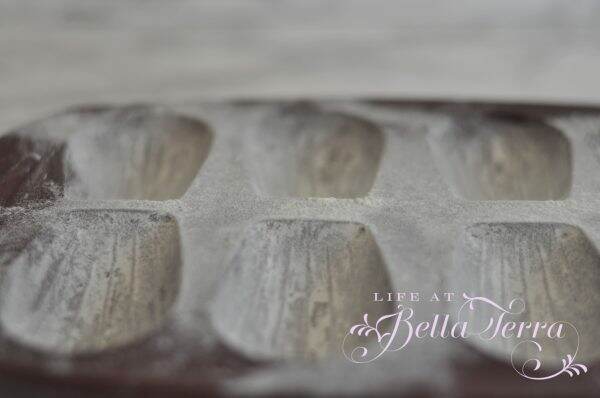
Butter and flour the madeleine pan.  The only one I have is a Tefal silicone one with 8 cakes. Though the recipe stated there isn’t a need to butter and flour the non-stick pan, I did so to prevent any sticking. Updated note: I do not like this silicone pan. It buckles in the oven and prevents the batter from laying evenly. See other pan resource here.

Fill the cups 3/4 full.  The batter is almost cookie dough-like and it’s hard to tell when it’s 3/4 full. My first batch produced rather large madeleines.  I measured the batter in the second batch (a low heaping tablespoon) and the madeleines were a more normal size. Below is a picture of the first batch pre-oven.

I have a convection oven so I set the temperature at 400 degrees (recipe calls for 425 degrees) and baked them for approximately 8 minutes.  That time varied depending on the quantity of the batter.

Finishing Touches

After baking, remove the madeleines immediately from the pan.  Mine popped out nicely.  Brush each one with the lemon glaze. This silicone basting brush works very well with the delicate cakes (see here).

This is only the second time I’ve made madeleines and I really loved this lemon recipe.

These were a big hit with my family!  I wonder what Paul Hollywood and Mary Berry would say 🙂

If you enjoy this post, please share on Pinterest.


Madeleines

  • 1 1/2 cups plus 2 tablespoons all-purpose flour
  • 2 1/4 teaspoons baking powder
  • 1 cup (2 sticks) unsalted butter, softened
  • 1 cup granulated sugar
  • 1 teaspoon grated lemon zest
  • Pinch salt
  • 4 large eggs
  • 1 large egg yolk

For the lemon glaze

  • 3/4 cup confectioners sugar
  • 2 tablespoons strained fresh lemon juice
  • 1 teaspoon grated lemon zest
  1. Place the flour and baking powder in a medium bowl and whisk to combine.

  2. Combine the butter, sugar, lemon zest and salt in the bowl of an elecric mixer fitted with the paddle attachment, and mix until smooth. Be careful not to over beat. With the mixer on low speed, add the eggs, and then egg yolk, one at a time, scraping down the sides of the bowl as necessary, and mix until well combined. Stir in the flour mixture and mix until the dough is smooth, 1 minute. Cover the bowl with plastic wrap and refrigerate for at least 1 hour or up to 3 days. The dough will keep in an airtight container, or portioned out in zipper-lock bags, in the freezer for up to 1 month.

  3. Preheat the oven to 425 degrees. Make the lemon glaze; Combine the confectioners' sugar, lemon juice, and lemon zest in a medium bowl and whisk to dissolve the sugar.

  4. Butter the madeleine or muffin pans and flour them. (If you are using nonstick pans, there is no need to butter and flour them). Spoon the batter into the pans until each cup is about 3/4 full. Bake until risen and golden, about 8 minutes. Remove the pan(s) from the oven, immediately turn the madeleines out of the pans, and brush them with the lemon glaze if desired. Madeleines are best eaten on the day they are baked.


Our Master Bath

Our master bathroom is my sanctuary.  It is hard to even remember the original layout. Bathrooms have come a long way since the early 1900s.

The original master bath looked like this~~love the dizzying wallpaper. The unique cast iron tub was moved to our daughter’s bathroom. We completely refigured and enlarged the space.

Here is the same perspective today. We replaced the window with two larger casement ones and added a Kohler soaking tub. We designed the tub enclosure so one of the raised panels in front can be removed if the plumbing needs attention.

There are two doors leading from the master bedroom into the bath/closet area. Perfect for privacy when the bathroom is needed for early morning use.

My sister, who is a master at sewing, made me a set of Bella Terra towels~~such a wonderful gift! The candle was another gift (lucky me!) from my friend, Lisa.

The tub has a wide marble shelf on all sides that is perfect for displaying my shell collection and providing easy access to candles, bath salts and towels. The large glass jars/containers are made by Simon Pearce.

My husband and I have separate sinks (yay!). The framed mirror is a medicine cabinet from Robern.

My cabinet was designed to have a make up table, but I never use it.  Instead, I covered the opening where a seat would have been, with a curtain.  This has become a great place for storing toilet paper and other supplies.  The curtain is changed out with the seasons, as are the towels and bath mats.

Everyday make up supplies are kept in French glasses on a small cake pedestal.  The older I get the less makeup I wear, so having a few things handy is very convenient.  Raised and off the counter, keeps things looking neat. A large brass tray holds everything from hairspray to mouthwash.

Sorry for the shift in light, but the natural light changed during these photos.  Begrudgingly I had to use overhead lights for some of these shots. 🙁

Cubbies were built into the wall for towels, bottles of water and more of my shells! The framed sheet music, “Oh! What A Pal Was Mary” was a gift from my dear friend, Gwen.

The walk-in closet is tucked beyond the pocket door.  A separate room houses the toilet and bidet.

Near the tub, behind the art, is a hidden television. I used acrylic vs. glass in the picture frame (for a lighter weight and to prevent any glass hazard). With a piano hinge on one side, the frame easily opens to expose a small  t.v. on an articulating arm.

Most older homes have small bathrooms and limited closet space. By reimagining this space, we were able to create an indulgent spot just for us. The tub is a perfect place for my weary bones after hours of gardening.  Separate sinks, a large shower with 2 shower heads and a private water closet provides all the niceties one needs when beginning or ending the day.


Large glass jars/container made in the USA:  Simon Pearce

Soaking bathtub, sinks, toilet, bidet and faucets by Kohler

Cabinets were custom made

Paint color (walls):  Cochise by Dunn Edwards SP2560 in eggshell

Paint color (trim): Dunn Edwards Cottage White SP 113 in semi-gloss

Medicine cabinets by Robern

Windows by Marvin

Window sheer by Pottery Barn


The Concept of Home

Since my visit last weekend to Patina Farm for the book signing by French Country Cottage, I’ve been pondering the concept of home. Brooke and Steve Giannetti spent countless hours planning and designing their home, making it unique and special to them. Courtney Allison’s home is filled with romance in the French country style.

It’s hard not to return to Phoenix and look at our home with a more critical eye. What does home mean to you? I posted a part of this on Instagram earlier this week.

Home ~~For me, it is a soft place for our children to land. Where they can be themselves under any and all circumstances.  Where their friends are always welcomed. Where they know they are unconditionally loved.

A home that is filled with animals that wag their tails and greet you happily at the door.

Where warm and wonderful smells pour out of the kitchen.

A place you can wear decades old sweat pants with holes and no one is judging.  (No picture here, folks!)

A creative outlet for expressing my own style, collecting cherished items and finding comfort in the every day routine.


Where tears are wiped and boo-boos are kissed.

Where I can find solitude when I need it…..

and the company of family and friends at all other times.

Home is where things grow and change, sometimes successfully and sometimes not. Where learning and living is one big experiment.

Is our home perfect? No.

Is it magazine ready? Definitely no!

But life here is genuine and real with a goal to find the sunny side of life.

A sanctuary from the madness in the world.  Where simple, lovely, sincere, and elegant feed my soul.

Life at Bella Terra is our treasure chest of memories~~a place we call Home.  

What about your home? How is it special and unique to you?


Book Signing at Patina Farm

This past weekend, I was fortunate to attend the book signing of one of my favorite bloggers, Courtney Allison of French Country Cottage.  I’ve never met Courtney and just started following her this year. However, she has inspired me to learn more about photography because every single thing she posts is stunning.

The photos in her first book are truly drool worthy.  It was such an opportunity to meet her since being a relatively new blogger, there is so much I don’t know.  I am always grateful when others share their knowledge. Having the book signing at Patina Farm was an extra special gift!

On our drive in to the farm from Santa Barbara, we passed a sign that said, “Flowers Ahead”. We pulled over to this sweet unmanned flower stand and purchased a few bunches of lilies to give the hosts. They were only a $1.00 per bunch and the money was left in a box ~~simply on the honor system.

Here we are at the entrance of the event. Janie is a dear friend who is an artist and an expert in anything to do with home decor and antiques. Janie also has the best jewelry!

Patina Farm is the home of Brooke (@velvetandlinen) and Steve Giannetti (@stevegiannetti)~~a design/architect duo that continues to impress the design world.  Their 5 acre farm was designed and built by them~~including cherished pieces they have collected around the world. The color palette is neutrals and soft pastels both in the home and garden.

This area, just off the kitchen, is the cover photo of their book, Patina Farm.

Fresh flowers were in every room.

Here are more house details. It is very apparent why they call their lovely home “Patina” farm. There is an abundance of textures and finishes.

Bowls of fruits and vegetables were in abundance.

Courtney was signing her book in the shade of an enormous oak tree.

I cannot recommend her book enough.  Drawn to a French country look, Courtney’s home is filled with wonderful decorating ideas and stories.

The property at Patina Farm is on different elevations.  Pebbled paths lined with lavender and rosemary lead you to secret spaces.

These fun wooden mushroom statues can be purchased from the Giannetti Home store or giannettihome.com

Steps lead you down to the donkey barn, greenhouse, shed, vegetable garden, rose trellis and lavender maze.

The guest cottage is set above the small pond and boat dock.

Brooke and Steve Giannetti were such gracious hosts.  They served light appetizers and lavender lemonade, with or without sparkling wine.

I was so happy to finally meet some of the bloggers I just know through the internet~~Karen from Sanctuary Home Decor.  I am disappointed to know I missed meeting Julie Blanner and Slim Paley, but respect and admire all the work they do.  It was also such a pleasure to meet the agent who provided all the guidance to both books~~Jill Cohen.

Being with others who love beauty and simplicity fed my soul.  We also met a group of 5 women (Debra, Cindy, Beth, Melissa and Tori) who traveled from Northern California together in celebration of Cindy’s birthday. Within minutes, we became fast friends and I hope we keep in touch!

It was a very civilized way to spend a Saturday afternoon.  Rubbing elbows with a house filled with talented individuals is inspiration at its best!

Even the cat seemed to enjoy it!

Have a wonderful week!


P.S. All the photos were taken by me….I think I see some improvement!


Making Fall Trees – DIY

The first day of autumn is September 22nd. However, now that we are nearing that date, I can finally embrace fall decor, in spite of the heat here.

In August I visited a store filled with fall decorations. They had artificial fall trees that were quite attractive.  I miss the beautiful autumn colors of New England and wanted to purchase two of the trees….until I saw the price tag ~ a whopping $350 each! So what does a typical Yankee do? Take lots of pictures and try to re-create them for far less money.

We’ve had several storms here in the last few months and lost many tree branches.  I picked through the debris pile and found these.

I trimmed off the side branches.

And ended up with six trunks. This view is the back of the old original barn-looks like it’s time to repaint!

Using a fast drying cement, my husband secured the branches into two buckets. Cement is a good choice for the bucket because it will secure the branches, but also weight them so they don’t tip over.

Look at the ingenious way he stabilized the branches while the cement dried.  This short piece of decorative railing was left over from my last historical restoration. I hope to use it somewhere in our yard or garden.

The bases were sprayed with black paint. Remember to tape off the trunks with blue painter’s tape so they remain a natural color.

I purchased a few bunches of fall leaves from Michaels when they were having a buy one get one free sale. Unfortunately, I wasn’t paying much attention to the leaf style so I ended up getting both maple and oak leaves. I suppose you could mix them on the same tree but I chose to be a purist and make one maple and one oak tree.

Using a small drill bit, drill holes into the trunks.

Remove the stems from the artificial bunches using wire cutters and expose the bottom of the wire.

Insert the stems into the holes that were drilled in the trunks.

Keep repeating until the trunks are filled with leaves.  We used a liquid glue to secure the branches.

After the glue dries, the branches will easily bend to the position you want. We used some blue tape during the drying process on those branches that were floppy.

When the top was finished, I used moss and a few artificial leaves to soften the base.

Here is my maple tree:

And here is the oak:

I can’t wait to share with you how I will incorporate these fall trees into my autumn decorating! I know the trend is to decorate with monochromatic colors (white pumpkins, white gourds), however, I LOVE the oranges, reds and browns that this season brings.

Happy Fall Decorating!


Chicken Mole ~ the easy way!

What is mole (MO-LAY)?  Mole is a rich, velvety, deeply complex sauce that is slightly sweet, smoky, and subtly spicy. Conceived centuries ago to serve dignitaries, it is widely considered Mexico’s national dish.  To this day, preparing mole is a ritual in Mexican households, one that’s often tackled over multiple days and reserved for special occasions.

There are plenty of published recipes to choose from and many are incredibly labor-intensive. As a result, I have steered clear of making this in the past. I have had it only 3 times in my life and each time I have savored the dish and wished I knew how to make it.

My friend, Rick shared his recipe which he makes in an electric pressure cooker.  My son, who recently moved to Washington, DC, used Rick’s recipe for his very first dinner party.  It was time for me to try my hand at it.

Please know that I am not very familiar with an electric pressure cooker, often referred to by the brand name Insta-pot.  But I purchased this 6 quart Faberware one several months ago and have only taken it out of the box a handful of times.

There are 16 ingredients, but nearly all are commonly found.  Canned adobe chiles or adobo chili paste can be found in the ethnic food aisle of most grocery stores.

The beauty of today’s electric pressure cookers is that they perform multiple functions from sauté to slow cooking. The first step is to cook the wonderful spices (cinnamon, cocoa, cloves), garlic, and chilies in the oil.

Stir in the chicken broth, tomatoes, raisins, and peanut butter and cook for 5 minutes.

Puree the sauce in a blender until smooth.

Generously season the chicken with salt and pepper.

Using the same pot in the cooker, sauté the onions in oil until soft. Stir in the pureed sauce and add the chicken to the pot. Look at the rich color of the sauce!

Here is where the pressure cooking comes in.  Cook under high pressure for 25 minutes.  My Faberware electric cooker does not have a high pressure setting, but it does have a chicken setting-which I used. The cook time was very similar.

It’s important to know how to release the pressure before opening the lid.  My pot has a release knob and I waited until all the steam/pressure was gone before I proceeded.

Remove the chicken to a cutting board, let cool and then shred.  Set aside.

Strain sauce through a medium sieve.

Return sauce to pressure cooker and bring to simmer.  Add red peppers and cook until tender. I do not have a simmer function on my pot so I defaulted to the vegetable button.  After 10-15 minutes, the bell pepper was cooked.

Return the shredded chicken to the pot and add cilantro.

The aroma filled the kitchen.  The sauce was so flavorful.  Typically you would serve this over rice or in a tortilla.  However, my husband and I are watching our grain/bread intake so I experimented with serving it over spiralized sweet potatoes.  I cooked the sweet potatoes in sesame oil for a few minutes and lightly salted them.

Here it is!

Many thanks to Rick for sharing his recipe (which was adapted from Cooks Illustrated Pressure Cooker Perfection). This recipe is a keeper!

Enjoy!


Electric Pressure Cooker Chicken Mole

[amd-zlrecipe-recipe:27]