1

Peony-Themed Luncheon

Teaming up with Kristin from White Arrows HomeAndrea from Design Morsels, Tarah from Grandma’s House DIY and Chas from Chas’s Crazy Creations for our DIY Blog Hop this month with projects for our dining rooms! (Make sure and check out all of the dining room projects following this tutorial) 

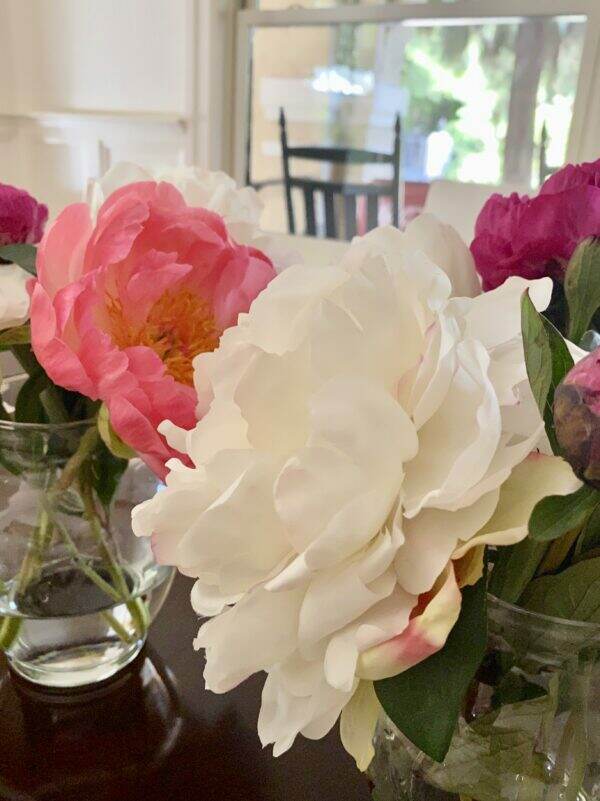
Many of my friends are still hunkering down due to the virus, but I long to have them over for a meal. I dream about entertaining again and since it is June, it is peony season. Unfortunately we cannot grow these beauties in Phoenix~~way too hot. Getting peonies at the store is unpredictable due to lack of inventory or poor quality.

But I love this ruffly, delicate flower and I wish I could just go outside and cut them. Instead, I get to create the atmosphere of peony abundance in our dining room and thankfully there are items that can help.

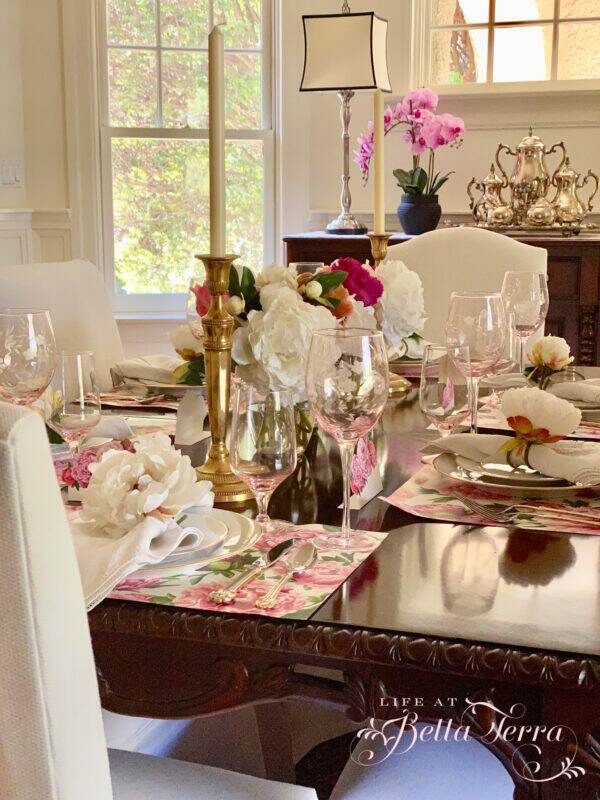
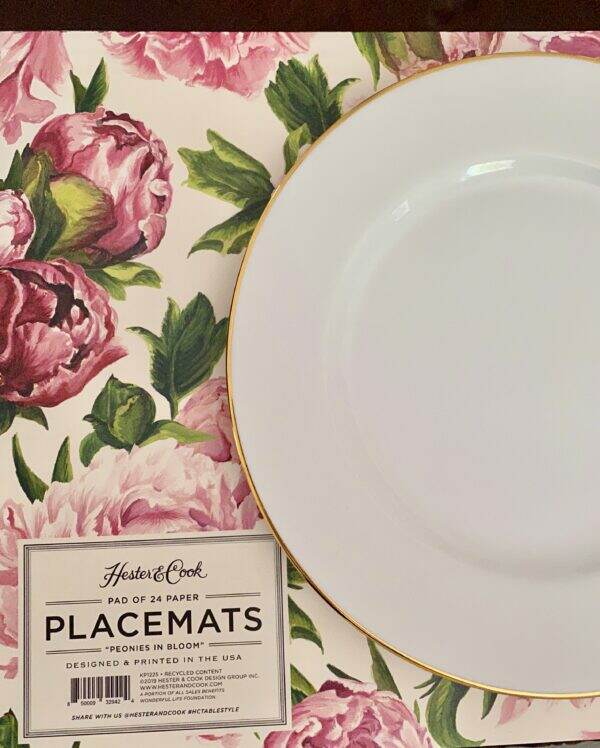
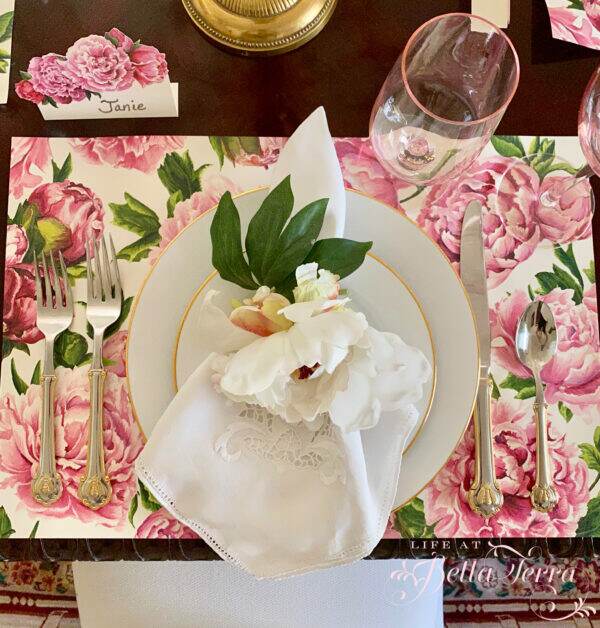
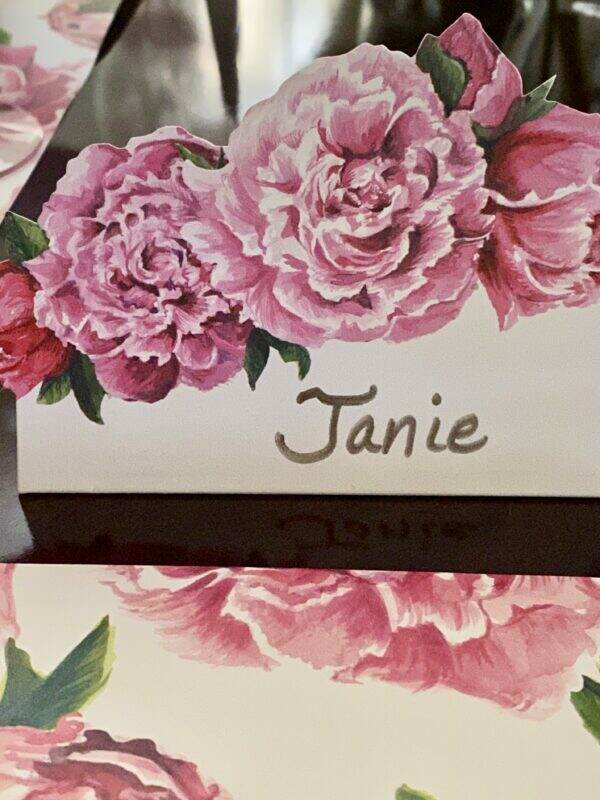
Hester & Cook sells “Peonies in Bloom” placemats, wrapping paper and place cards. The placemats are in a pad of 24 and they are designed and printed in the USA. I love the size~~12 1/4″ x 18 1/4″ ~~large enough for a full place setting.

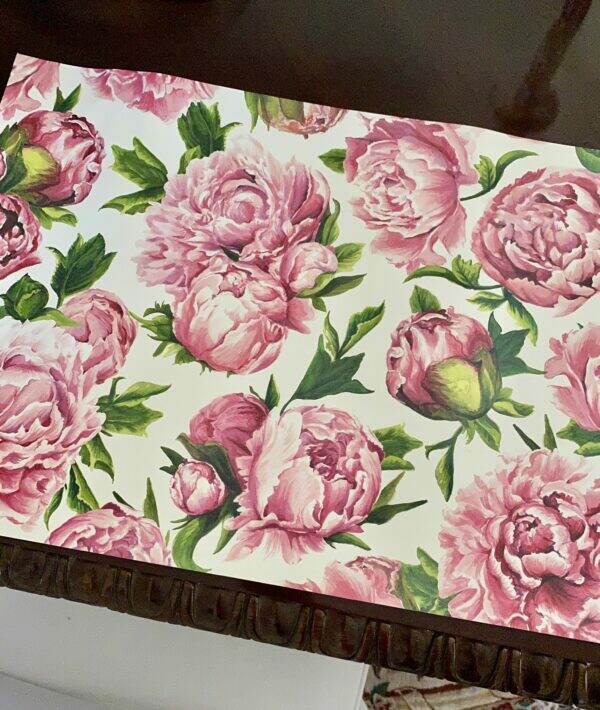
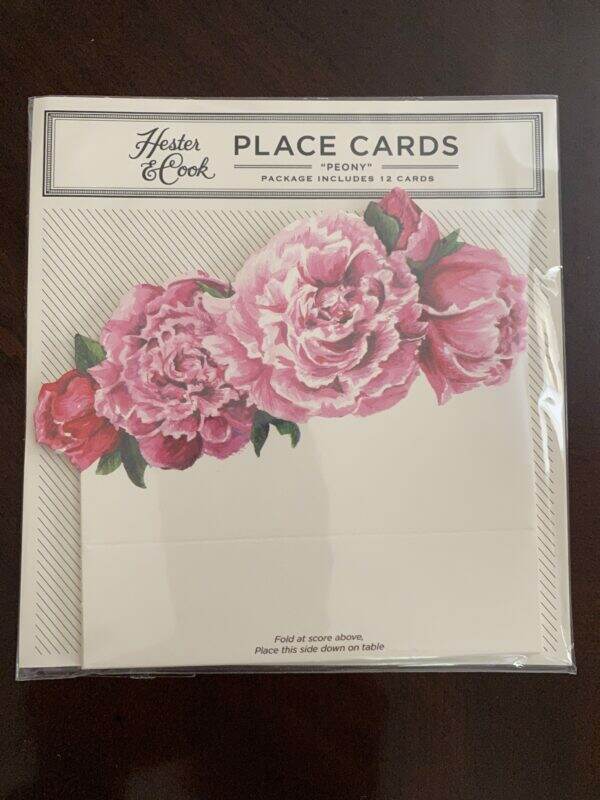
Their coordinating wrapping paper is perfect for small guest gifts or to use as a runner down the center of the table. The place cards come in a pack of 12.

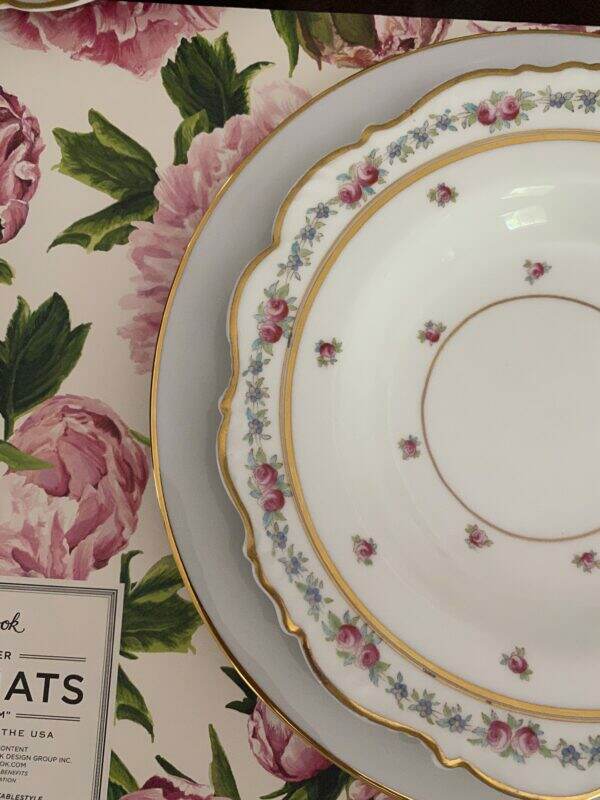
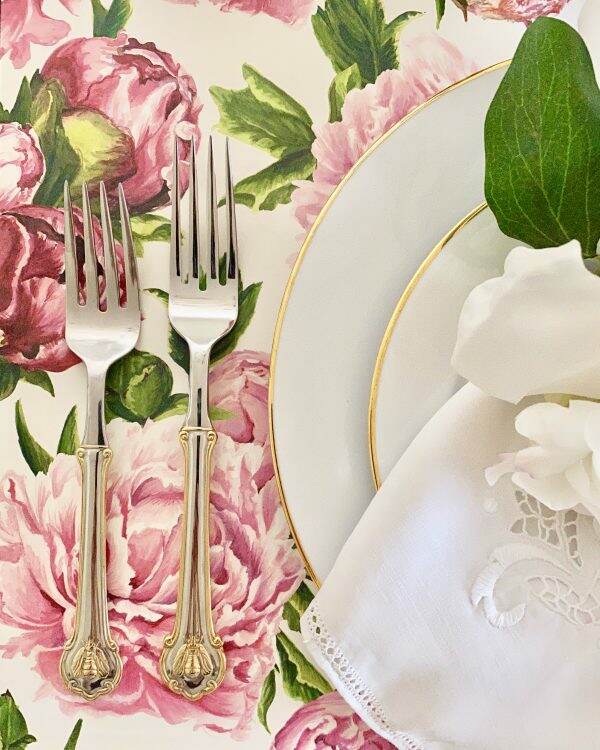
I tend to over think the dishes I will use. Selecting a plain white plate (from Pottery Barn) with a simple gold edge doesn’t compete with the beautiful peony pattern.

Organizing my china storage with photo labels

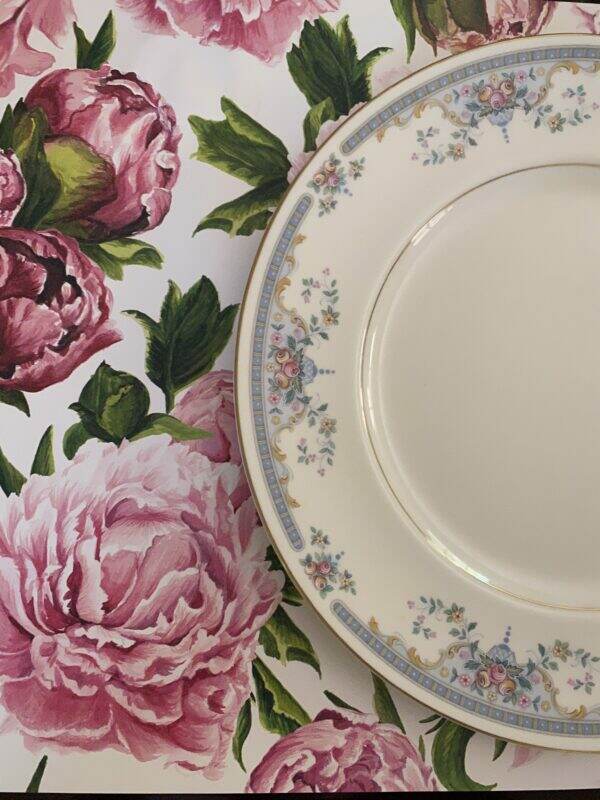
Though the dishes are a bit whiter than the placemats, I like them better than a creamier pattern. After trying multiple combinations of different china, I stick with my first choice. To see how I organize my china, please click here.

Once the dishes are selected, the table is able to come together rather quickly.

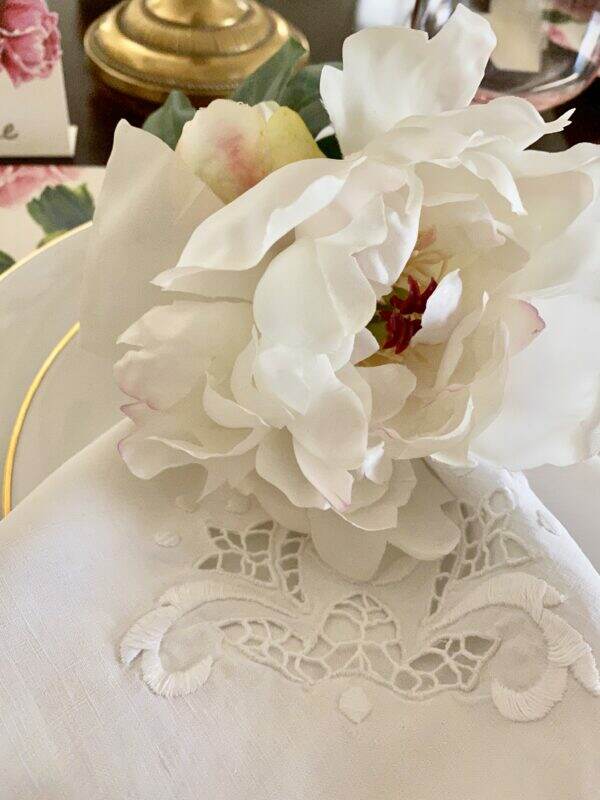
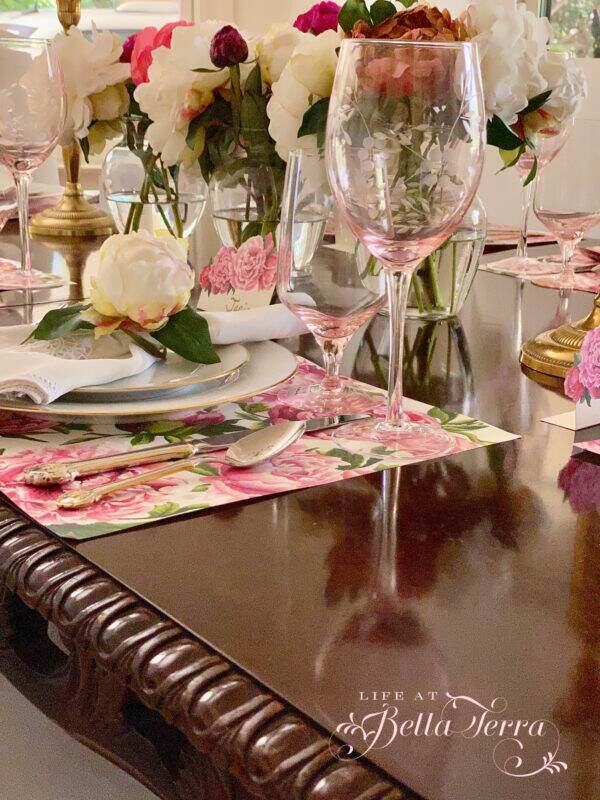
Using artificial white and blush peonies, I make simple napkin rings by wrapping the stem in a circle. These silk peonies are from The Enchanted Home.

Faux peony napkin holder with antique napkins

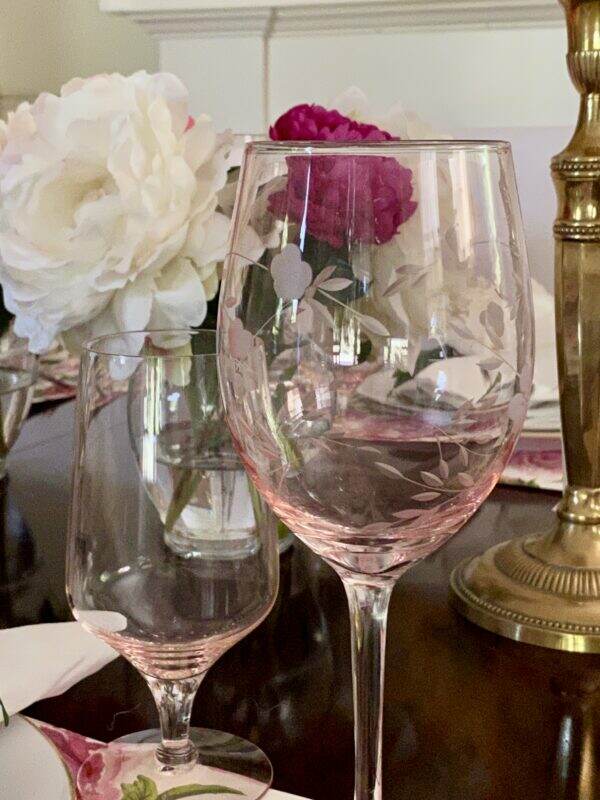
The pink stemware is a combination of new and old. The wine glass is a Pier 1 Imports purchase, while the water glass is a vintage shop find.

Wine glass from Pier 1

The flatware is from Horchow and I find it so versatile because of the combination of gold and silver. The bee motif complements the flower theme. It appears that Horchow is out of stock but you can get this flatware through Wayfair.

The peony place cards fold and stand by themselves.

The dining room table is set for 6. The floral arrangements are a combination of fresh and faux peonies, cut low enough for conversation.

I like the colorful placemats against the mahogany table. I may not be able to grow fresh peonies here in the Valley of the Sun, but this happy, colorful and floral setting is perfect for a June luncheon.

So now that I have the table all set, my family will get the chance to enjoy it this weekend. I hope everyone can enjoy some peace and quiet this weekend. Have a blessed weekend.

This is my first “link” party and here is some information about the other participants.

Andrea from Design Morsels has such an eye for great design. Check out her custom dining room bookcases!

Kristin from White Arrows Home has a fabulous lakeside log cabin in Wisconsin and I love her mountain style.

Summer outdoor tablescape with buffalo plaid pillow

Chas from Chas’s Crazy Creations is so innovative! She can turn just about any thrift store item into something delightful!

I painted each candle holder with Folk Art White Wood Tint using a chip brush going for a Farmhouse look. I painted on 2 coats and let them dry completely.

Tarah from Grandma’s House DIY lives in a 1915 farmhouse in Minnesota and is constantly sharing her renovations and inspirations.

May 2020 was a far less freaky month for me than April was - I guess I adapted to the pace of quarantine. The farm here bleeding heart spring photo gallery

Now if you would like to share your dining room projects or ideas, please click on the link below.

This Post Shared With


You are invited to the Inlinkz link party!

Click here to enter


Picking, Making and Baking

You know how much I love gardening, and I am far from complaining. But everything is reaching its prime at the same time. The peaches, apricots, tomatoes, figs, artichokes, fennel, sorrel and soon to be apples are being harvested now.

Tomatoes

But unlike store bought produce, my homegrown fruits and vegetables don’t last days on end. They need to be utilized immediately or they decay. The windowsills are full of tomatoes and there are bowls and bowls of apricots….coupled with a recent grocery store run where someone purchased several pounds of fresh strawberries!

The kitchen windowsill this morning

I don’t like wasting anything so I have been making and baking all week. I prefer to space out my food blog posts because not everyone likes to bake or cook, but this task of produce management is dominating my week. It is food triage~~the items that spoil first get the attention.

Keeping up on the picking of the cherry tomatoes is nearly impossible. The neighbors are getting bowls of them but there are still so many of these ruby gems on the plants!

We just made a huge cookie sheet of roasted cherry tomatoes with mint and garlic. It is hard to describe what the mint does to the roasted tomatoes, but it tastes nothing like mint. I did post this recipe quite some time ago and it is still one of my favorite easy appetizer recipes using cherry tomatoes.

Spread a crostini with goat cheese and top with these warm (or cold) roasted tomatoes, and it is heaven! To get the recipe and see the original post, click here. Truly, if you have cherry tomatoes, you will love this!

Apricots

The best way to consume fresh apricots is eating them right from the tree, still warm from the sun. With the others, I made an Almond Apricot Tart with Whipped Cream last night. To see this Martha Stewart recipe, click here.

The crust is made with ground almonds and the custard layer has Amaretto as one of the ingredients. I love the combination of flavors coupled with the sweet, juicy apricots.

Though the recipe does call for whipped cream, we enjoyed it sprinkled with confectioner’s sugar. Today I will need to research more apricot recipes as we still have another whole tree to pick!

Strawberries

Now onto the strawberries! So far the recipes include Strawberry Rhubarb crisp and Strawberry Rhubarb pie! I like to experiment with different pie crusts, but my latest find is the All Butter pie crust from the book, Bravetart. If your kitchen is 74 degrees or more, the pie crust becomes more challenging and is difficult to manipulate. My basketweave pattern is a little wonky because the dough became so soft. But it is delicious anyway!

If anyone has another rhubarb recipe, please share as there is still several stalks in my refrigerator.

Peaches

The peaches are winding down and as I breathe a peach sigh of relief, I want to share another recipe that I previously posted. I hadn’t made this salad in quite sometime and forgot how good it is (and easy to make). It is a combination of the wonderful flavors of peaches, tomatoes, fresh corn, feta cheese, cilantro and a honey vinaigrette. Just perfect for the summer months.

Today, I hope to make tomato sauce and pico de Gallo. I can now see why farmers need to rest over the winter.

Charming Homes and Gardens Link Party

If you are visiting from the Charming Homes & Gardens link party, welcome! There are so many talented people sharing their lovely homes, gardens and inspirational ideas. I am so happy to be a part of it!

I hope you have a day filled with hope and promise! Just a reminder, if you are not following me on Instagram, please check me out @lifeatbellaterra. I am finally learning how to do Instagram Stories! Wonders never cease!

This post shared with Pretty Things and Thursday Favorite Things


Making Easy Fig Preserves

The garden is literally bursting at the seams. With the heat, the ripening has exponentially increased. But it’s a good thing, as being in the garden is calming for me, especially in today’s chaotic world. To see my post on Gardening 101, please click here.

It is that time of year again when the fig tree is producing fruit. The fig tree is part of the mulberry family (I had no idea). They are low in calories and have no fat. A large fig has approximately 47 calories making it a great healthy snack. Our fig tree produces twice a year, but this latest crop is producing figs on steroids. The fruit is HUGE and fleshy and sweet.

My neighbor’s fig; my fig.

I have many books on making preserves, jams and jellies to reference.

But the easiest recipe and one I had not tried before, is from the Williams Sonoma, The Art of Preserving book.

Really, this recipe is so easy. First trim the figs.

Since I am using a combination of our gargantuan figs and a few smaller ones from my friend and neighbor, Anne, I cut the figs to more or less the the same size.

The figs will cook in a combination of orange and lemon juice. We still have some remaining oranges on one of our trees but you can also use store-bought fresh juice.

Add sugar to the orange/lemon juice combo. Bring to a boil and stir to dissolve the sugar.

Add the figs, reduce the heat to medium, cook and stir gently for 5 minutes.

Using a slotted spoon, remove the figs to a bowl. Add orange zest to the syrup and cook, uncovered until reduced by one-third, 2-3 minutes. I inadvertently added the zest when I added the sugar, but I don’t think it affected the taste of the syrup.

Return the figs to the pan and cook for one minute to heat through.

The oven is my choice for sterilizing the jars and lids. After washing them in hot soapy water, I put the jars in the oven on a cookie sheet for at least 30 minutes at 250 degrees. I then fill them with the hot figs, leaving 1/4″ at the top. Any sticky syrup on the rim is wiped away before I add the lid.

After being severely burned using the hot-bath canning method, I now do all my fruit processing in the oven. (Note: please research this if you are canning meats or other foods that require different sterilization). After the jars are filled and the lid snugly secured, I replace the jars in the oven for 15 minutes or so to ensure that are completely sterilized.

I let the jars cool overnight to set. They will seal as they cool.

Once the jar is opened and the seal is broken, the figs will last for 30 days in the refrigerator. The fig preserves can be used on chicken or pork. Or spread on warm bread or toast. Or just eaten with a spoon!

One of my favorite uses is a crostini appetizer with goat cheese and figs.

The syrup on this recipe isn’t as thick as a jam or preserve, but is very flavorful. All in all, a quick and easy recipe to make. And a way to enjoy figs until the next production cycle!

On a separate note, I know these are troubling times. I want my blog to be a place where you are welcomed, perhaps learn something along the way, and to celebrate the simple beauty in everyday life. Nearly a year and a half ago, I wrote a post on Kindness. It was difficult to share some personal moments with you, but the message remains the same. Kindness is free and the rewards are tremendous. And it is something we all can practice. If you would like to read this post again, click here. More than ever, we need each other.

Sending all my loving energy your way.


Easy Fig Preserves

This easy recipe will work with any variety of fig.

  • 3 lbs figs (such as Mission, Adriatic, or Brown Turkey)
  • 4 cups sugar
  • 1 1/4 cups fresh orange juice
  • 3/4 cup fresh lemon juice
  • Grated zest of 1 orange
  1. Have ready, hot, sterilized jars and their lids

  2. Trim the fig stems, leaving a little of the stem attached to each fig.

  3. In a large nonreative saucepan, combine the sugar and orange and lemon juices. Bring to a boil over medium-high heat, stirring to dissolve the sugar. Add the figs, reduce the heat to medium, and cook, stirring gently for 5 miniutes.

  4. Using a slotted spoon, transfer the figs to a bowl. Add the orange zest to the syrup and cook, uncovered, until reduced by one-third, 2-3 minutes. Return the figs to the pan and cook for 1 minute to heat through.

  5. Using the slotted spoon, divide the hot figs evenly among the jars. Ladle the syrup over the figs, leaving 1/4 inch of headspace. Remove any air bubbles and adjust the headspace, if necessary. Wipe the rims clean and seal tightly with the lids.

  6. Process the jar for 10 minutes in a boiling water bath. The sealed jars can be stored in a cool, dark place for up to 1 year. If a seal has failed, store the jar in the refrigerator for up to 1 month.


Happy Memorial Day Weekend!

Greetings from the White Mountains of Arizona. We are up at our cabin and the weather is 60 degrees this morning with sunny, clear blue skies.

The community in Pinetop-Lakeside is small, with limited shopping and resources. Other than a few local grocery stores, you need to drive to the next largest town, which is Show Low for a Walmart or a Home Depot.

True confessions first. I am not a shopper. It is one of my least favorite things to do. Given the choice between spending the day shopping or cleaning toilets, I would choose the toilets. However, there are bloggers I follow who seem to discover hidden gems at WalMart so yesterday I decided to muster up the courage and go.

Trip to Walmart

With the Memorial holiday upon us, Walmart has an aisle display with their seasonal items. Here is where I found Ree Drummond’s The Pioneer Woman line of products.

Ree Drummond is a blogger, author, food writer and television personality who lives on a working ranch in Oklahoma. Her style is mix and match, flea market and everything handed down from your grandmother.

Quite honestly, I don’t know much about her but I like her charming brand. She apparently has a line of dishes and other products there which I didn’t seek.

Please note that I am not fond of paper anything as I would much rather use dishes. But these dinner plates are 11” wide and 1.25” deep and do not feel flimsy.

The ruffled edge has such a vintage feel and look. The coating on the plates gives some substance to the paper, vs. styrofoam or plain paper plates.

The Buffalo check tablecloth is 60” x 84”, slightly smaller than our outside primitive pine dining table, but I like some of the wood showing on the ends. It is a light weight fabric but it does the trick!

The napkins have a cute pale blue dot and a gingham decorative edge. I like how they feel patriotic without being obvious.

Inside the napkin there is a recipe printed for Ree’s Spicy Dr. Pepper Shredded Pork, which serves 18! Cute idea.

The Centerpiece

With no fresh flowers and outdoor plants limited to pine trees, I found artificial geraniums and ivy in the garage. Using an old wooden dough bowl as the base, I spread the geraniums out and stuck flags and pinwheels in for color and theme.

All in all, I am pleased with The Pioneer Woman products! They certainly provide a festive, patriotic theme for this Memorial Day weekend and at an affordable cost.

What are your plans for this weekend? I plan on spending some time today painting on a canvas and just enjoying the peace and quiet of the pines. We went out to dinner to a real restaurant last night~~the first time in months! It is so joyful to be able to carefully socialize again.

Let us pause to reflect upon the selfless men and women who have honorably served our nation and made the ultimate sacrifice to allow us our freedom. We pay tribute to their memory and remain forever indebted to them for their service. Happy Memorial Day!

Tablecloth $14.99

Napkins- 20 count $2.98

Dinner Plates 8 count $2.98

Salad Plates 12 count $2.98

Pinwheels $0.98 each


When It Rains It Pours

I am always curious as to why there are times in life where “things” happen in multiples. And not good things. Well, I seem to be in one of those downpours lately. As I mentioned in Saturday’s blog post, the 75 gallon water tank in the basement split and flooded two rooms. A plumber, two helpers and $1200 later, the problem is fixed. But my nice, neat organized basement spaces are in a state of disarray as everything needs to be put back in its place.

Yesterday, I stepped into another flood of water coming from our dishwasher. Yep! All over the hardwood floor in the kitchen. This appliance didn’t drain and I removed a few gallons of standing water with a turkey baster. Sigh.

Last night, my daughter came home from a week at our mountain cabin and let us know the clothes dryer stopped working. The burnt rubber smell part of the story is concerning. Sigh again.

For me, I guess I am a believer of things happening in threes. So hopefully this will be the end of all things breaking down for awhile. But this is the nature of owning an old home, or living in a home for a long time. My guess is that our dishwasher finally needs replacing as does the belt to the clothes dryer at the cabin. Just wish it all didn’t happen at the same time. Cha-ching.

Does this happen to you, too? Do you believe in things happening in threes?

Onto Other Things

On a brighter note, as I am the eternal optimist, it is 62 degrees outside this morning! Whaaat?? A few days ago it was over 100 degrees, however, the forecast for the next few days is perfect Spring weather with highs in the 70s. Crystal clear blue skies, sunny and very cool evenings. Lovely.

We are supposed to head up to the mountains for Memorial Day but I almost don’t want to leave this gorgeous weather. Do you have plans for Memorial Day weekend? I’ve been so distracted with this pandemic it’s hard to believe it is the holiday weekend already.

Update on the Back Staircase Project

We are slowly removing the gross glue and old paint from the stairs. There are some disappointing surprises. One of the treads is broken and one of the risers has been poorly patched. A few setbacks but there are four more steps to uncover so who knows what we will find. Lately, nothing seems to be going as planned.

All Things Peaches

We are still picking peaches off the trees. The peach pie I made is truly one of the first ones that wasn’t swimming in juice with a soggy bottom crust. I blended two recipes~~the all butter crust is from Stella Parks New York Times Bestseller, Bravetart. The filling is from the Country Peach Pie recipe from the Food Network Kitchen. By far, one of the best peach pies yet!

Elisabeth is on a homemade ice cream kick. Last week it was fresh strawberry ice cream.

This week, fresh peach ice cream. With the leftover peach puree from the peach ice cream recipe (yes, we are getting fat over here!), we are enjoying peach margaritas!

Front Porch is Finished!

The new welcome mat from Wayfair arrived yesterday. The mat is 24″ x 36″, substantially larger than the previous one. It is non-slip, made from coconut fibers and is an elegant addition to the spruced up front entry. All for $43.99. This project is finally DONE.

Vegetable Consumption

We are eating so many good things from the garden. This is the first year I planted shishito peppers. Flash frying in hot olive oil, served with salt and a squeeze of lemon, these peppers are just delicious. If you haven’t had these peppers before, check to see if your grocery store carries them. I know Safeway does and this is a very quick, yummy appetizer. Occasionally you may get a hot one, but the all the ones from our garden have a mild flavor.

Artichokes are ready to harvest too. We typically par-boil them, cut them in half and basted them on the grill with olive oil and garlic. The Houston’s Restaurant recipe with remoulade sauce is a family favorite.

Hoping your Wednesday is filled with joy and beautiful weather! Pray that no more appliances break this week!


Crackers and Edible Flowers

I have never made homemade crackers in my life. Over the last few days, I’ve been experimenting with discarded sourdough starter. When I feed my sourdough starter every week, I keep a small amount and toss the rest. Seems so wasteful, so I’ve been searching for recipes utilizing this discard.

One way to use discarded sourdough starter is to make crackers. My first attempt at creating crackers occurred a few days ago. Here is the online recipe from King Arthur. I was able to get the dough only so thin with a rolling pin. They are tasty, though, with seasonings of garlic powder, rosemary and sea salt. Just a tad bit too thick. But a worthy recipe to try again.

The very next day, I saw a post on Instagram demonstrating cracker making using a pasta machine! How brilliant is that! And timely, as my sweet in-laws just sent me their hand-cranked pasta machine and all the attachments. Thank you, Bruce and Janiece!

Imperia Pasta Machine

This may be my new weekly addiction as the newly made batch of flatbread was E.X.C.E.L.L.E.N.T! The person responsible for the pasta machine/cracker making idea is Aimee from Twigg Studio. Her Instagram feed is @twiggstudios.

Aimee is a food and photography lover based in Devon, UK and I have made a few of her recipes. Visiting her website is a mini-vacation for me as I love her style and photos. And so does the rest of the world as she has 119,000 followers! In a previous post I shared one of her cakes and it was truly delicious. Click here for her vegan pineapple, lime and ginger cake.

wild garlic foraging
Aimee picking wild garlic

Here is another photo of her potato and leek pie using edible flowers in the crust. Not something I would have ever considered!

pressed flower pie
Twigg Studios garden pie ~~my next project?

Her flatbread recipe suggests using edible flowers and herbs and her crackers are truly a work of art. Feeling ambitious, my daughter Elisabeth and I thought we would try this flatbread recipe.

The ingredients are so simple~~sourdough starter, water, olive oil, flour, salt and fresh herbs/flowers.

Hope and Bubbles, my sourdough sisters

Combine the starter, water, and oil in a bowl and mix to combine. Add the flour and salt and bring together into a soft dough.

Knead the dough for a few minutes and then let it rest for 1 hour.

While the dough is resting, I search the yard for edible flowers. I was unaware how many flowers can be eaten~~from snapdragons to sunflowers. There is an extensive list of flowers on Aimee’s website. Click here for the list. Naturally, be careful not to include flowers that may be toxic or ones treated with pesticides.

My bounty consists of fresh basil, sage, nasturtium, pansy, primrose, chamomile and chive flowers and roses. After some research, I discovered an additional list of edible flowers online~~I had no idea hollyhocks are edible or I would have added them.

After the resting period, the dough is now ready for the pasta machine.

The dough is soft and pliable. Using more flour during handling prevents sticking. Starting with the widest setting, the dough is fed through the machine.

With each pass through the pasta machine, the setting is lowered. Roll the dough until very thin. Add the flowers and herbs to one half of the length and fold it over to cover it.

Turn the machine back up a few notches and roll the dough through again until it is as thin as possible.

Isn’t this dough beautiful??!!!

Take the second half of the dough and repeat. Cut the dough into 4 long crackers.

Place the dough on parchment paper on a cookie sheet and brush with olive oil.

You can use any salt, but I sprinkled smoked Maldon flaked sea salt on the dough, with some more fresh herbs, dried rosemary and additional flowers.

Bake for 10-12 minutes until golden and crispy.

Naturally, trying something new is a bit challenging. But in retrospect, I would make these flatbreads every week. They are delicious and think of all the seasoning possibilities~~parmesan, garlic, gruyere.

The pasta machine is the perfect solution to getting the dough nice and thin vs. hand rolling (at least for me).

In addition to learning how to use the pasta machine, it was helpful having Elisabeth assist on this. The dough is long when it comes out of the machine so extra hands were needed. If you have a pasta attachment to your KitchenAid mixer, I am sure that would work well too. If not, just try to roll the dough as thin as possible with a rolling pin.

Here is the second piece of dough and you can see where the flowers have been stretched throughout. It will take some practice to get this as picture perfect as Twigg Studios, but the flavor was so good regardless.

It is fun to be challenged by a recipe and then have good results! Now that I have the hang of it, the process will not be so daunting.

Aimee’s flatbreads are so inspirational as well as beautiful.

floral sourdough discard crackers
Twigg Studios flatbread crackers

I tend to get into a baking rut, so I love trying a new recipe that forces me out of my comfort zone. If you have a challenging recipe, send it my way. I am always excited to try something new!

Hope you are having a terrific Tuesday. Can you believe Memorial Day is this coming weekend?

Happy baking!


Sourdough Starter Crackers

thin crispy crackers, a great way to use some sourdough discard. decorated with edible flowers and herbs

  • 1/3 cup sourdough starter (unfed from the fridge)
  • 4 tbsp water
  • 2 tbsp olive oil
  • 1 cup plain flour
  • 1 tsp salt
  • flaked salt, pepper, basil, rosemary, flowers

To make the dough

  1. Add the starter, water and oil in a bowl and mix together to combine.

  2. Add the flour and salt and mix in and bring together into a soft dough. If you need a drop more water, you can add a little more. (different brands of flour absorb differently and some starters have more water than others to it cannot be exactly precise, the dough needs to be firm, but pliable.)

  3. Knead dough for a few minutes until it is smooth and roll into a ball. Cover it and leave it to rest at room temperature for 1 hour.

  4. Take the dough and flatten it. You can cut it in half and roll two pieces or roll one large piece.

  5. Using the pasta machine on the widest setting, start rolling the dough. After the first roll, fold in half and roll through again. Then turn the setting down and roll through the dough. Keep rolling and lowering the setting each time. Roll the dough until it is very thin.

  6. Add the flowers and herbs to one half of the length of the dough and fold over the other half to cover it. Turn the pasta machine back up a few notches and roll the dough through again. Roll it through again until it is as thin as possible.

  7. Preheat oven to 180c/350f

  8. Line two baking trays with baking paper. Cut the dough into four long crackers, or to fit the size of the baking tray. Brush each one with oil, then scatter over more herbs, flowers and some flaked salt and freshly ground pepper.

  9. Bake for 10-12 minutes or until golden and crispy.