1

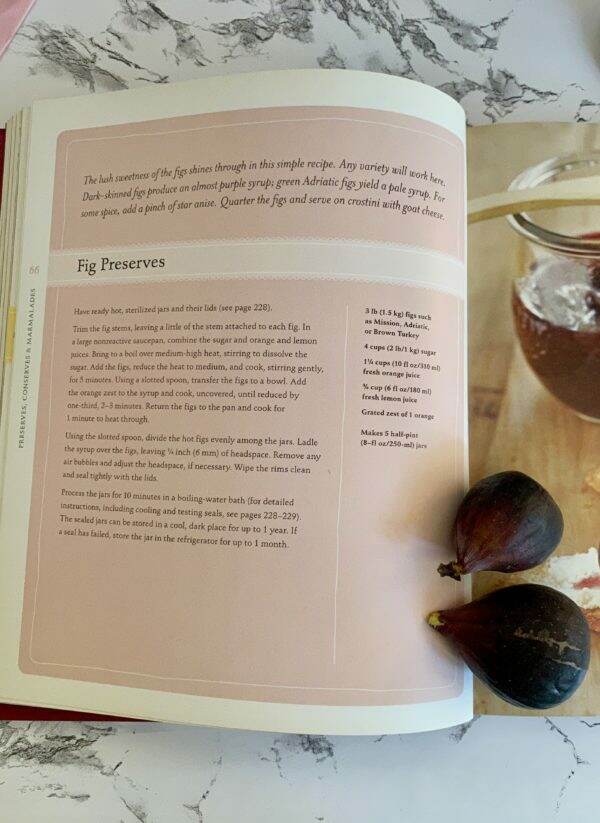
Making Easy Fig Preserves

The garden is literally bursting at the seams. With the heat, the ripening has exponentially increased. But it’s a good thing, as being in the garden is calming for me, especially in today’s chaotic world. To see my post on Gardening 101, please click here.

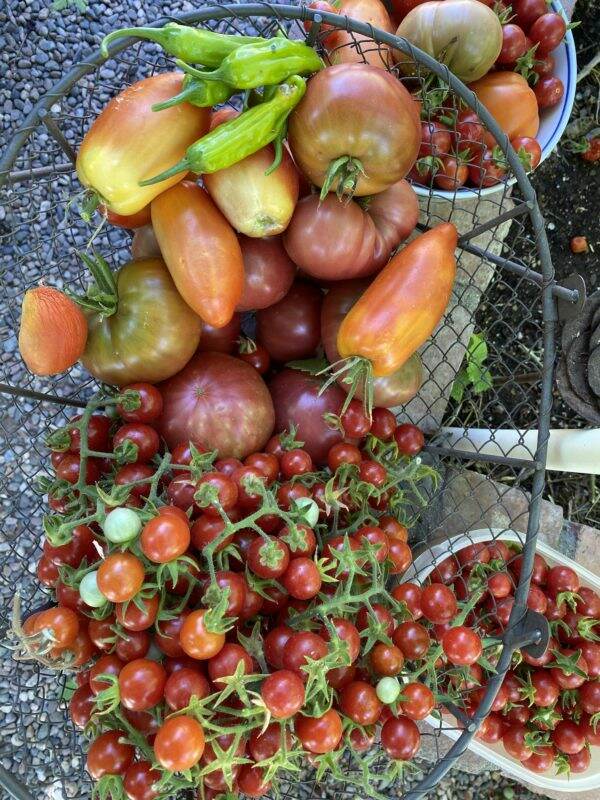
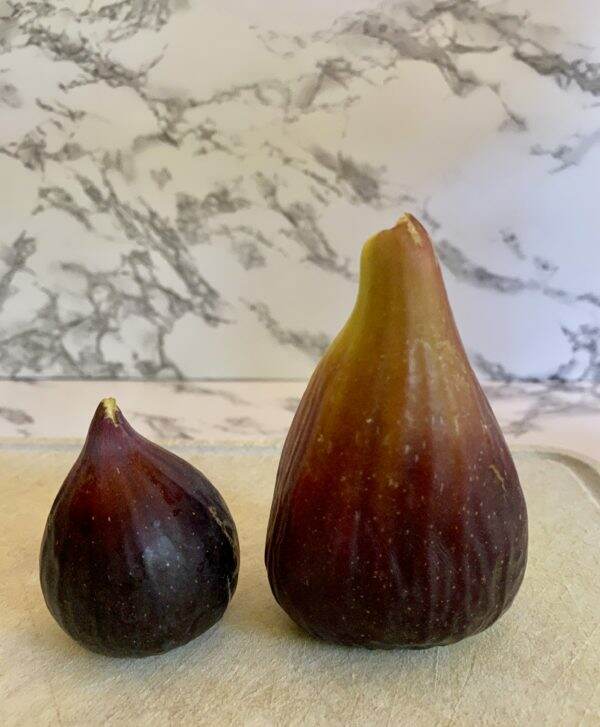
It is that time of year again when the fig tree is producing fruit. The fig tree is part of the mulberry family (I had no idea). They are low in calories and have no fat. A large fig has approximately 47 calories making it a great healthy snack. Our fig tree produces twice a year, but this latest crop is producing figs on steroids. The fruit is HUGE and fleshy and sweet.

My neighbor’s fig; my fig.

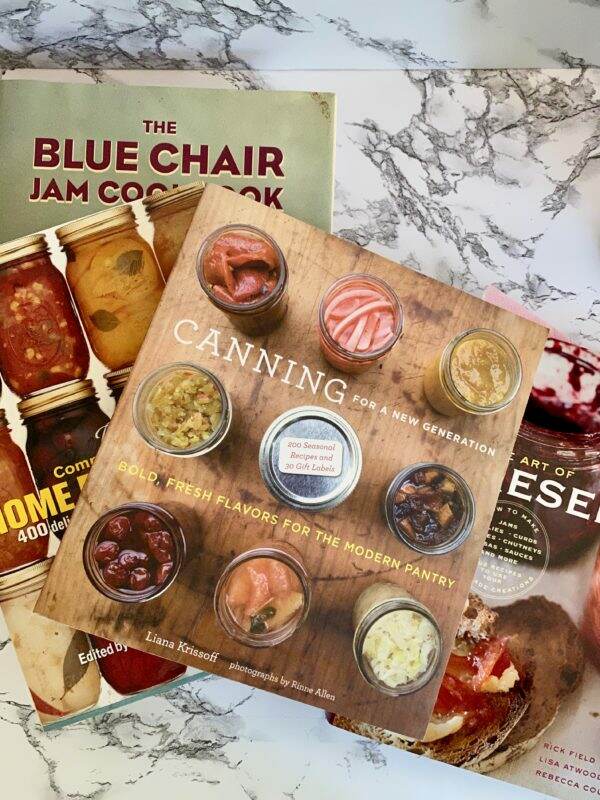
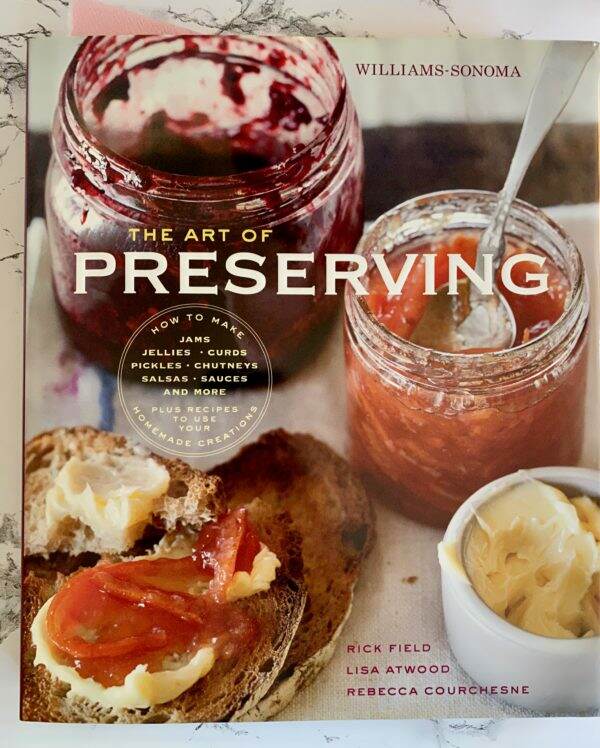
I have many books on making preserves, jams and jellies to reference.

But the easiest recipe and one I had not tried before, is from the Williams Sonoma, The Art of Preserving book.

Really, this recipe is so easy. First trim the figs.

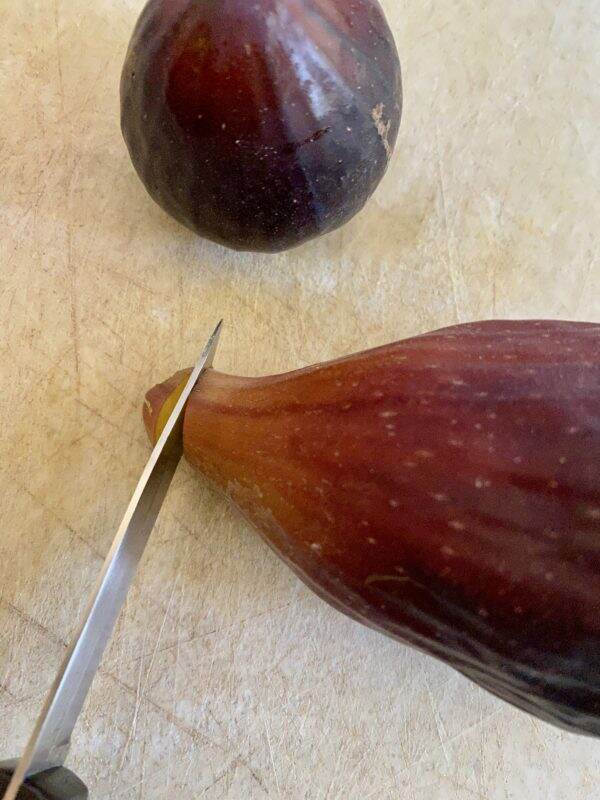
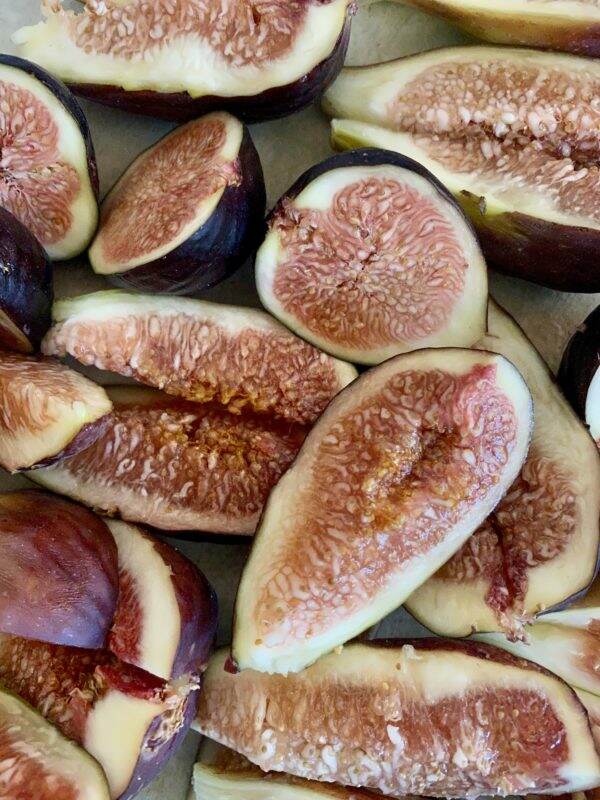
Since I am using a combination of our gargantuan figs and a few smaller ones from my friend and neighbor, Anne, I cut the figs to more or less the the same size.

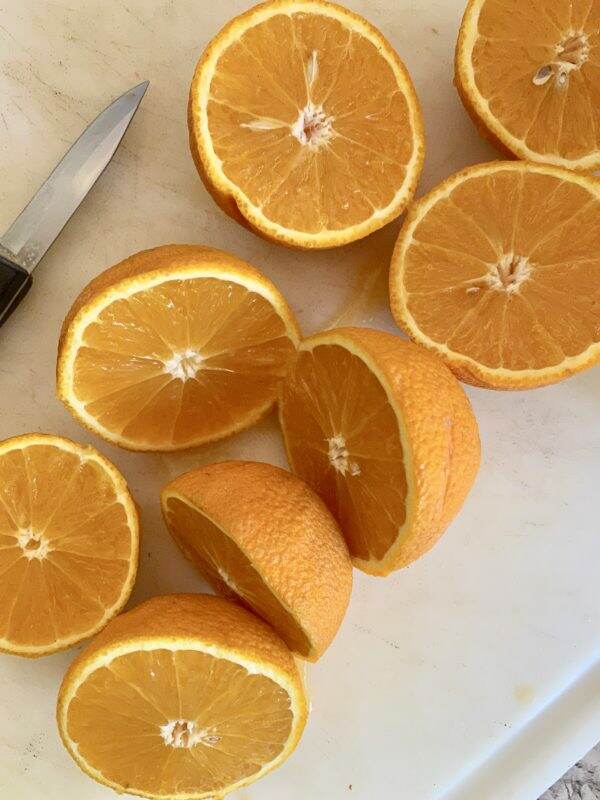
The figs will cook in a combination of orange and lemon juice. We still have some remaining oranges on one of our trees but you can also use store-bought fresh juice.

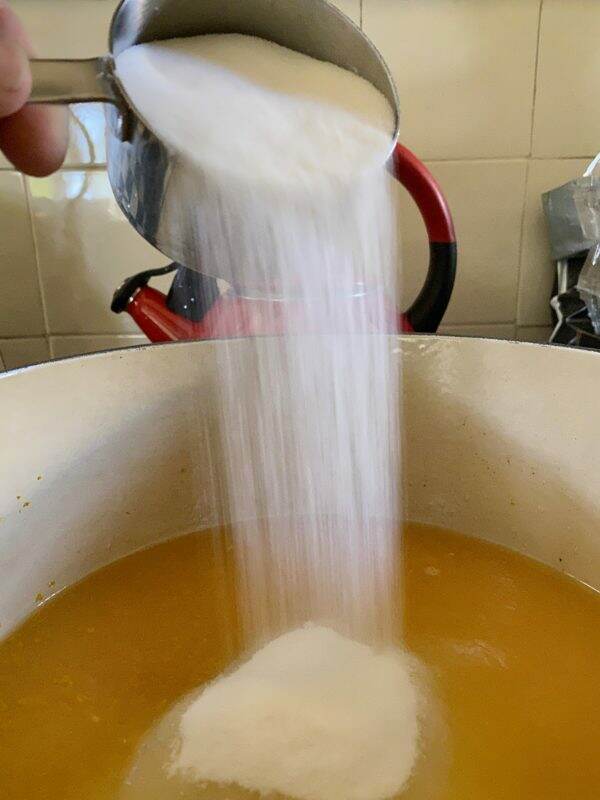
Add sugar to the orange/lemon juice combo. Bring to a boil and stir to dissolve the sugar.

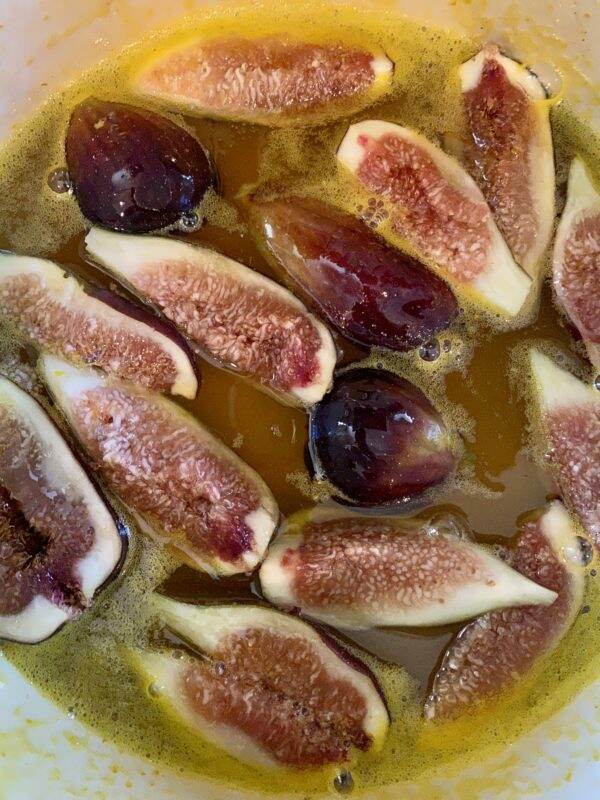
Add the figs, reduce the heat to medium, cook and stir gently for 5 minutes.

Using a slotted spoon, remove the figs to a bowl. Add orange zest to the syrup and cook, uncovered until reduced by one-third, 2-3 minutes. I inadvertently added the zest when I added the sugar, but I don’t think it affected the taste of the syrup.

Return the figs to the pan and cook for one minute to heat through.

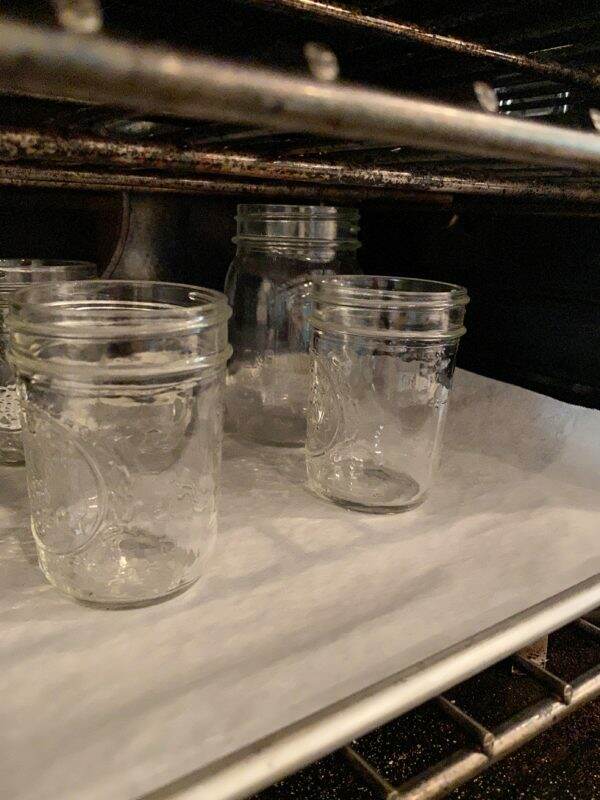
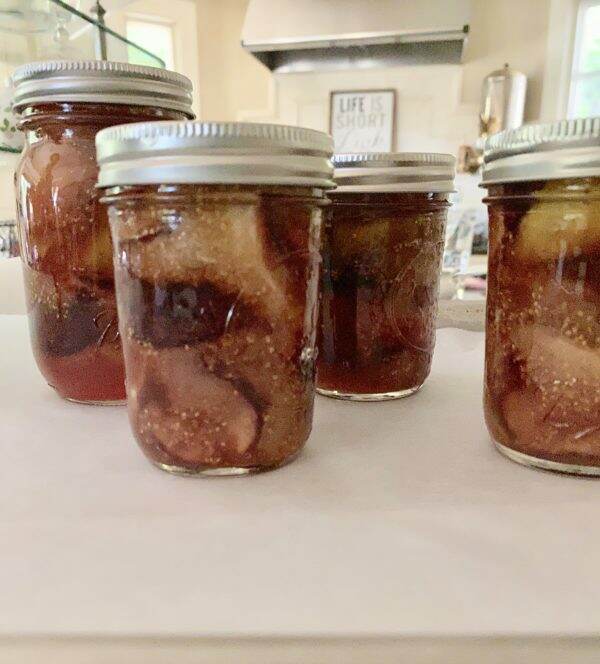
The oven is my choice for sterilizing the jars and lids. After washing them in hot soapy water, I put the jars in the oven on a cookie sheet for at least 30 minutes at 250 degrees. I then fill them with the hot figs, leaving 1/4″ at the top. Any sticky syrup on the rim is wiped away before I add the lid.

After being severely burned using the hot-bath canning method, I now do all my fruit processing in the oven. (Note: please research this if you are canning meats or other foods that require different sterilization). After the jars are filled and the lid snugly secured, I replace the jars in the oven for 15 minutes or so to ensure that are completely sterilized.

I let the jars cool overnight to set. They will seal as they cool.

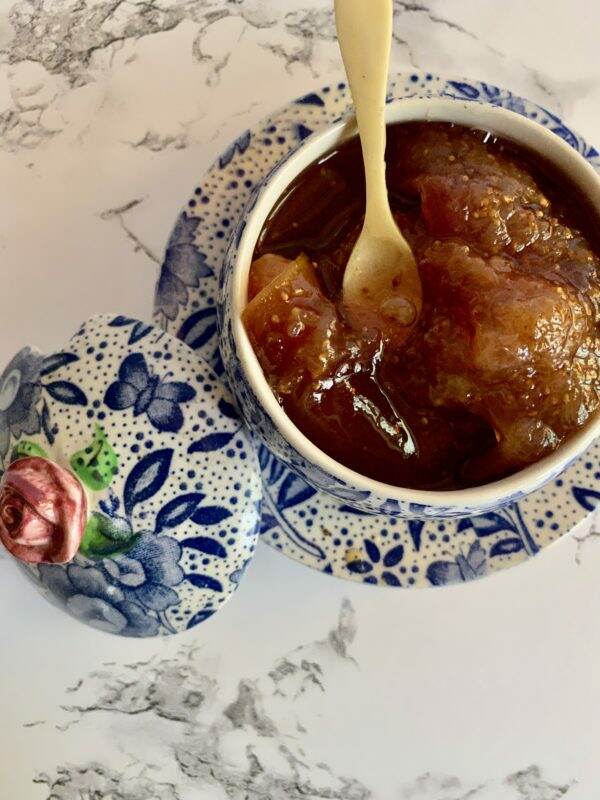
Once the jar is opened and the seal is broken, the figs will last for 30 days in the refrigerator. The fig preserves can be used on chicken or pork. Or spread on warm bread or toast. Or just eaten with a spoon!

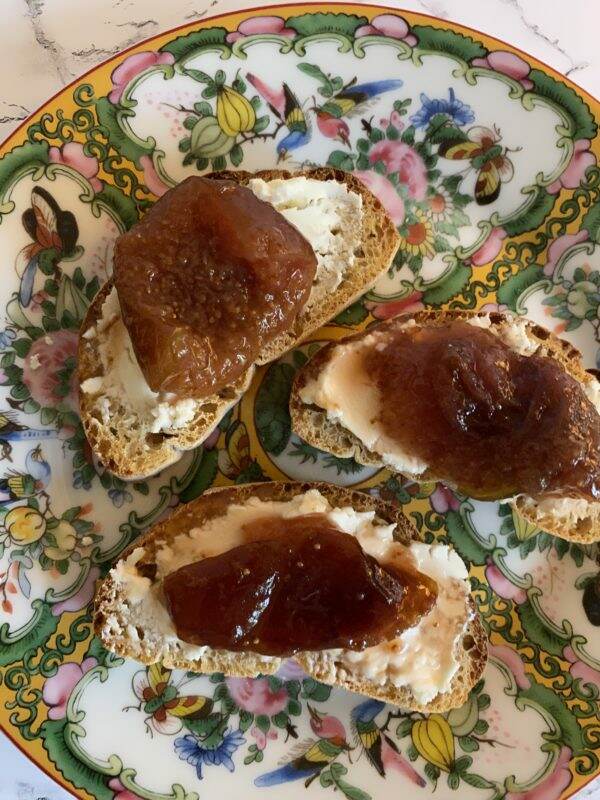
One of my favorite uses is a crostini appetizer with goat cheese and figs.

The syrup on this recipe isn’t as thick as a jam or preserve, but is very flavorful. All in all, a quick and easy recipe to make. And a way to enjoy figs until the next production cycle!

On a separate note, I know these are troubling times. I want my blog to be a place where you are welcomed, perhaps learn something along the way, and to celebrate the simple beauty in everyday life. Nearly a year and a half ago, I wrote a post on Kindness. It was difficult to share some personal moments with you, but the message remains the same. Kindness is free and the rewards are tremendous. And it is something we all can practice. If you would like to read this post again, click here. More than ever, we need each other.

Sending all my loving energy your way.


Easy Fig Preserves

This easy recipe will work with any variety of fig.

  • 3 lbs figs (such as Mission, Adriatic, or Brown Turkey)
  • 4 cups sugar
  • 1 1/4 cups fresh orange juice
  • 3/4 cup fresh lemon juice
  • Grated zest of 1 orange
  1. Have ready, hot, sterilized jars and their lids

  2. Trim the fig stems, leaving a little of the stem attached to each fig.

  3. In a large nonreative saucepan, combine the sugar and orange and lemon juices. Bring to a boil over medium-high heat, stirring to dissolve the sugar. Add the figs, reduce the heat to medium, and cook, stirring gently for 5 miniutes.

  4. Using a slotted spoon, transfer the figs to a bowl. Add the orange zest to the syrup and cook, uncovered, until reduced by one-third, 2-3 minutes. Return the figs to the pan and cook for 1 minute to heat through.

  5. Using the slotted spoon, divide the hot figs evenly among the jars. Ladle the syrup over the figs, leaving 1/4 inch of headspace. Remove any air bubbles and adjust the headspace, if necessary. Wipe the rims clean and seal tightly with the lids.

  6. Process the jar for 10 minutes in a boiling water bath. The sealed jars can be stored in a cool, dark place for up to 1 year. If a seal has failed, store the jar in the refrigerator for up to 1 month.


Happy Memorial Day Weekend!

Greetings from the White Mountains of Arizona. We are up at our cabin and the weather is 60 degrees this morning with sunny, clear blue skies.

The community in Pinetop-Lakeside is small, with limited shopping and resources. Other than a few local grocery stores, you need to drive to the next largest town, which is Show Low for a Walmart or a Home Depot.

True confessions first. I am not a shopper. It is one of my least favorite things to do. Given the choice between spending the day shopping or cleaning toilets, I would choose the toilets. However, there are bloggers I follow who seem to discover hidden gems at WalMart so yesterday I decided to muster up the courage and go.

Trip to Walmart

With the Memorial holiday upon us, Walmart has an aisle display with their seasonal items. Here is where I found Ree Drummond’s The Pioneer Woman line of products.

Ree Drummond is a blogger, author, food writer and television personality who lives on a working ranch in Oklahoma. Her style is mix and match, flea market and everything handed down from your grandmother.

Quite honestly, I don’t know much about her but I like her charming brand. She apparently has a line of dishes and other products there which I didn’t seek.

Please note that I am not fond of paper anything as I would much rather use dishes. But these dinner plates are 11” wide and 1.25” deep and do not feel flimsy.

The ruffled edge has such a vintage feel and look. The coating on the plates gives some substance to the paper, vs. styrofoam or plain paper plates.

The Buffalo check tablecloth is 60” x 84”, slightly smaller than our outside primitive pine dining table, but I like some of the wood showing on the ends. It is a light weight fabric but it does the trick!

The napkins have a cute pale blue dot and a gingham decorative edge. I like how they feel patriotic without being obvious.

Inside the napkin there is a recipe printed for Ree’s Spicy Dr. Pepper Shredded Pork, which serves 18! Cute idea.

The Centerpiece

With no fresh flowers and outdoor plants limited to pine trees, I found artificial geraniums and ivy in the garage. Using an old wooden dough bowl as the base, I spread the geraniums out and stuck flags and pinwheels in for color and theme.

All in all, I am pleased with The Pioneer Woman products! They certainly provide a festive, patriotic theme for this Memorial Day weekend and at an affordable cost.

What are your plans for this weekend? I plan on spending some time today painting on a canvas and just enjoying the peace and quiet of the pines. We went out to dinner to a real restaurant last night~~the first time in months! It is so joyful to be able to carefully socialize again.

Let us pause to reflect upon the selfless men and women who have honorably served our nation and made the ultimate sacrifice to allow us our freedom. We pay tribute to their memory and remain forever indebted to them for their service. Happy Memorial Day!

Tablecloth $14.99

Napkins- 20 count $2.98

Dinner Plates 8 count $2.98

Salad Plates 12 count $2.98

Pinwheels $0.98 each


When It Rains It Pours

I am always curious as to why there are times in life where “things” happen in multiples. And not good things. Well, I seem to be in one of those downpours lately. As I mentioned in Saturday’s blog post, the 75 gallon water tank in the basement split and flooded two rooms. A plumber, two helpers and $1200 later, the problem is fixed. But my nice, neat organized basement spaces are in a state of disarray as everything needs to be put back in its place.

Yesterday, I stepped into another flood of water coming from our dishwasher. Yep! All over the hardwood floor in the kitchen. This appliance didn’t drain and I removed a few gallons of standing water with a turkey baster. Sigh.

Last night, my daughter came home from a week at our mountain cabin and let us know the clothes dryer stopped working. The burnt rubber smell part of the story is concerning. Sigh again.

For me, I guess I am a believer of things happening in threes. So hopefully this will be the end of all things breaking down for awhile. But this is the nature of owning an old home, or living in a home for a long time. My guess is that our dishwasher finally needs replacing as does the belt to the clothes dryer at the cabin. Just wish it all didn’t happen at the same time. Cha-ching.

Does this happen to you, too? Do you believe in things happening in threes?

Onto Other Things

On a brighter note, as I am the eternal optimist, it is 62 degrees outside this morning! Whaaat?? A few days ago it was over 100 degrees, however, the forecast for the next few days is perfect Spring weather with highs in the 70s. Crystal clear blue skies, sunny and very cool evenings. Lovely.

We are supposed to head up to the mountains for Memorial Day but I almost don’t want to leave this gorgeous weather. Do you have plans for Memorial Day weekend? I’ve been so distracted with this pandemic it’s hard to believe it is the holiday weekend already.

Update on the Back Staircase Project

We are slowly removing the gross glue and old paint from the stairs. There are some disappointing surprises. One of the treads is broken and one of the risers has been poorly patched. A few setbacks but there are four more steps to uncover so who knows what we will find. Lately, nothing seems to be going as planned.

All Things Peaches

We are still picking peaches off the trees. The peach pie I made is truly one of the first ones that wasn’t swimming in juice with a soggy bottom crust. I blended two recipes~~the all butter crust is from Stella Parks New York Times Bestseller, Bravetart. The filling is from the Country Peach Pie recipe from the Food Network Kitchen. By far, one of the best peach pies yet!

Elisabeth is on a homemade ice cream kick. Last week it was fresh strawberry ice cream.

This week, fresh peach ice cream. With the leftover peach puree from the peach ice cream recipe (yes, we are getting fat over here!), we are enjoying peach margaritas!

Front Porch is Finished!

The new welcome mat from Wayfair arrived yesterday. The mat is 24″ x 36″, substantially larger than the previous one. It is non-slip, made from coconut fibers and is an elegant addition to the spruced up front entry. All for $43.99. This project is finally DONE.

Vegetable Consumption

We are eating so many good things from the garden. This is the first year I planted shishito peppers. Flash frying in hot olive oil, served with salt and a squeeze of lemon, these peppers are just delicious. If you haven’t had these peppers before, check to see if your grocery store carries them. I know Safeway does and this is a very quick, yummy appetizer. Occasionally you may get a hot one, but the all the ones from our garden have a mild flavor.

Artichokes are ready to harvest too. We typically par-boil them, cut them in half and basted them on the grill with olive oil and garlic. The Houston’s Restaurant recipe with remoulade sauce is a family favorite.

Hoping your Wednesday is filled with joy and beautiful weather! Pray that no more appliances break this week!


Crackers and Edible Flowers

I have never made homemade crackers in my life. Over the last few days, I’ve been experimenting with discarded sourdough starter. When I feed my sourdough starter every week, I keep a small amount and toss the rest. Seems so wasteful, so I’ve been searching for recipes utilizing this discard.

One way to use discarded sourdough starter is to make crackers. My first attempt at creating crackers occurred a few days ago. Here is the online recipe from King Arthur. I was able to get the dough only so thin with a rolling pin. They are tasty, though, with seasonings of garlic powder, rosemary and sea salt. Just a tad bit too thick. But a worthy recipe to try again.

The very next day, I saw a post on Instagram demonstrating cracker making using a pasta machine! How brilliant is that! And timely, as my sweet in-laws just sent me their hand-cranked pasta machine and all the attachments. Thank you, Bruce and Janiece!

Imperia Pasta Machine

This may be my new weekly addiction as the newly made batch of flatbread was E.X.C.E.L.L.E.N.T! The person responsible for the pasta machine/cracker making idea is Aimee from Twigg Studio. Her Instagram feed is @twiggstudios.

Aimee is a food and photography lover based in Devon, UK and I have made a few of her recipes. Visiting her website is a mini-vacation for me as I love her style and photos. And so does the rest of the world as she has 119,000 followers! In a previous post I shared one of her cakes and it was truly delicious. Click here for her vegan pineapple, lime and ginger cake.

wild garlic foraging
Aimee picking wild garlic

Here is another photo of her potato and leek pie using edible flowers in the crust. Not something I would have ever considered!

pressed flower pie
Twigg Studios garden pie ~~my next project?

Her flatbread recipe suggests using edible flowers and herbs and her crackers are truly a work of art. Feeling ambitious, my daughter Elisabeth and I thought we would try this flatbread recipe.

The ingredients are so simple~~sourdough starter, water, olive oil, flour, salt and fresh herbs/flowers.

Hope and Bubbles, my sourdough sisters

Combine the starter, water, and oil in a bowl and mix to combine. Add the flour and salt and bring together into a soft dough.

Knead the dough for a few minutes and then let it rest for 1 hour.

While the dough is resting, I search the yard for edible flowers. I was unaware how many flowers can be eaten~~from snapdragons to sunflowers. There is an extensive list of flowers on Aimee’s website. Click here for the list. Naturally, be careful not to include flowers that may be toxic or ones treated with pesticides.

My bounty consists of fresh basil, sage, nasturtium, pansy, primrose, chamomile and chive flowers and roses. After some research, I discovered an additional list of edible flowers online~~I had no idea hollyhocks are edible or I would have added them.

After the resting period, the dough is now ready for the pasta machine.

The dough is soft and pliable. Using more flour during handling prevents sticking. Starting with the widest setting, the dough is fed through the machine.

With each pass through the pasta machine, the setting is lowered. Roll the dough until very thin. Add the flowers and herbs to one half of the length and fold it over to cover it.

Turn the machine back up a few notches and roll the dough through again until it is as thin as possible.

Isn’t this dough beautiful??!!!

Take the second half of the dough and repeat. Cut the dough into 4 long crackers.

Place the dough on parchment paper on a cookie sheet and brush with olive oil.

You can use any salt, but I sprinkled smoked Maldon flaked sea salt on the dough, with some more fresh herbs, dried rosemary and additional flowers.

Bake for 10-12 minutes until golden and crispy.

Naturally, trying something new is a bit challenging. But in retrospect, I would make these flatbreads every week. They are delicious and think of all the seasoning possibilities~~parmesan, garlic, gruyere.

The pasta machine is the perfect solution to getting the dough nice and thin vs. hand rolling (at least for me).

In addition to learning how to use the pasta machine, it was helpful having Elisabeth assist on this. The dough is long when it comes out of the machine so extra hands were needed. If you have a pasta attachment to your KitchenAid mixer, I am sure that would work well too. If not, just try to roll the dough as thin as possible with a rolling pin.

Here is the second piece of dough and you can see where the flowers have been stretched throughout. It will take some practice to get this as picture perfect as Twigg Studios, but the flavor was so good regardless.

It is fun to be challenged by a recipe and then have good results! Now that I have the hang of it, the process will not be so daunting.

Aimee’s flatbreads are so inspirational as well as beautiful.

floral sourdough discard crackers
Twigg Studios flatbread crackers

I tend to get into a baking rut, so I love trying a new recipe that forces me out of my comfort zone. If you have a challenging recipe, send it my way. I am always excited to try something new!

Hope you are having a terrific Tuesday. Can you believe Memorial Day is this coming weekend?

Happy baking!


Sourdough Starter Crackers

thin crispy crackers, a great way to use some sourdough discard. decorated with edible flowers and herbs

  • 1/3 cup sourdough starter (unfed from the fridge)
  • 4 tbsp water
  • 2 tbsp olive oil
  • 1 cup plain flour
  • 1 tsp salt
  • flaked salt, pepper, basil, rosemary, flowers

To make the dough

  1. Add the starter, water and oil in a bowl and mix together to combine.

  2. Add the flour and salt and mix in and bring together into a soft dough. If you need a drop more water, you can add a little more. (different brands of flour absorb differently and some starters have more water than others to it cannot be exactly precise, the dough needs to be firm, but pliable.)

  3. Knead dough for a few minutes until it is smooth and roll into a ball. Cover it and leave it to rest at room temperature for 1 hour.

  4. Take the dough and flatten it. You can cut it in half and roll two pieces or roll one large piece.

  5. Using the pasta machine on the widest setting, start rolling the dough. After the first roll, fold in half and roll through again. Then turn the setting down and roll through the dough. Keep rolling and lowering the setting each time. Roll the dough until it is very thin.

  6. Add the flowers and herbs to one half of the length of the dough and fold over the other half to cover it. Turn the pasta machine back up a few notches and roll the dough through again. Roll it through again until it is as thin as possible.

  7. Preheat oven to 180c/350f

  8. Line two baking trays with baking paper. Cut the dough into four long crackers, or to fit the size of the baking tray. Brush each one with oil, then scatter over more herbs, flowers and some flaked salt and freshly ground pepper.

  9. Bake for 10-12 minutes or until golden and crispy.


It is Peach Season!

Peaches always ripen here the first few weeks in May. The original peach tree died a few years ago, but we quickly replanted another. This year the fruit is abundant and delicious even though the tree is rather small. Picking is a daily obligation as one day a peach is hard and the next day, I am fighting the birds for it.

We call these our “bend over and eat peaches”. They are so juicy and so sweet. Many a shirt has been ruined with peach juice. And these peaches have FUZZ! Why don’t store-bought peaches have fuzz?

We have two peach trees. Depending on the size of the crop, there are many peach recipes that are favorites at our home.

This year the first dessert we made is peach crisp. I use the recipe from one of my favorite cook books. If you are not familiar with Susan Branch, she is an author, watercolorist and designer. Though born in Southern California, she lives in an 1849 home in Martha’s Vineyard.

Her cookbooks are works of art with handwritten copy. One of my favorites is The Summer Cookbook. The peach crisp recipe is based on the Peach & Plum Crisp one in this book. You can tell I use this recipe a lot as the page is a bit dog-eared! I believe this book may be out of print, but Amazon has it here.

You can’t go wrong with anything crisp~~apple, peach, pear, and cherry. I use this recipe for all fruits because the “crisp” part is the perfect topping. I adjust the recipe by increasing the quantity of one fruit vs. two. Click here for the recipe.

What is interesting about picking fresh fruit, is that it doesn’t last very long. So I need to use the fruit within a few days. As a result, yesterday we made peach salsa.

I didn’t really follow a recipe this time. This batch is made with tomatoes (cherry ones from the garden), yellow and orange bell pepper (as I didn’t have any green or red), peaches, cilantro, red onion, jalapeño peppers, lime juice, and salt.

This salsa is perfect with chips, but also goes well with fish or chicken. If you would like to get the recipe from a previous post on Peach Salsa, click here. There are two other blog posts with peach recipes~~Tomato, Peach and Corn Salad (which is delicious!) and homemade Peach Pie.

We will be picking more peaches today and maybe peach ice cream this afternoon? At some point, my family will tell me they are “peached out”. That is my cue to preserve the rest of the harvest.

Have a peachy Tuesday!


Hello Tuesday Morning!

Taking advantage of the beautiful weather to do laundry on the line

Unlike most bloggers, I do not write my posts weeks in advance. Sometimes I just make my cup of coffee and start writing on the morning of sending it out to you. Especially now, when we are all living in a one day at a time scenario. Today is one of those days where I need to take my own advice, from the post last week on Ways to Navigate Life Now. I am feeling a bit like I’m walking through concrete. But then I scold myself because we are blessed with good health and a safe place to be.

So today I will share what I have been doing to keep busy and focused. Over the weekend, and with the new recommendations about wearing a mask in public, I tried a few different patterns on making masks. It is impossible to find elastic here and though I searched my sewing items, I didn’t find any. What I did find was a terrific collection of fabric! Many of my friends don’t have a sewing machine, but my husband made one without it, just using 2 sheets of paper towels, elastic bands and a stapler.

In searching the internet, there are many choices, but the first one to pop up is The New York Times pattern. In my opinion, it is not well written and when I printed it out, the pictures accompanying the instruction were so small and difficult to read.

This pattern did, however, have 4 long ties on their style mask. I understand health care professional prefer this so they can use it over their N95 masks. The mask’s top ties do not stay on the top of your head, especially if you have straight hair. You must hook them over the top of your ears and tie them behind the base of your skull. The lower ties do help secure the bottom of the mask and these tie behind your neck.

The easiest and best fitting pattern I found online with Hobby Lobby. The video is short, walks you through the steps, gives you pleat dimensions and makes a mask that has an opening on the back to add a filter. I understand a coffee filter or a paper towel works. Click here for the video.

For the ear loops I used thin ribbon. I have very small ears and anything thicker did not stay in place. The dimensions of the mask fit my face perfectly, but was too small for my husband.

With some slight adjustments, I was able to make him a well-fitting mask. Once I get some elastic (ordered it online with a delivery date of next week), I believe this mask will work well for most. Also, I am happy to make masks for anyone who needs them. Hoping it won’t come to that, but I feel better if we are prepared.

I also added pipe cleaners in the top seam that fits against your nose. It was an easy way to bend the mask and make it conform to your face.

Easter is on Sunday and I hope to get an energy boost to do a lovely table. It will only be the four of us, but Easter is one of my favorite holidays. Last Sunday, on Palm Sunday, we missed getting our palm crosses from church.

Being in the DIY mode, I searched the yard and found that palm trees are not equal. Since I needed a certain length of palm frond, the fan palm was the only one that would work. Date palm fronds were too short.

It was a bit of a revelation as I had never REALLY looked closely and noticed the different kinds of palm trees we have. The things we learn during this crisis! It’s all part of being resourceful and creating a new norm in time of need.

I’ve been trying a few new recipes. My daughter, Elisabeth stated she wanted to learn to cook more. A happy benefit for me to spend more time with her in the kitchen. This vegan pineapple, lime, coconut and ginger cake from Twigg Studios is a relatively easy cake to make. Click here for the recipe.

The texture of the cake is more dense, like a carrot cake, and the canned pineapple provides plenty of moisture and flavor. I skipped the part that suggests making pineapple flowers out of fresh pineapple. The icing is a simple blend of coconut cream, confectioner’s sugar and lime juice. Really quite tasty. Happily shared most of it with our neighbors.

On a vegetable note, we also made Baked Parmesan Zucchini sticks from Damn Delicious. They are easy to make and so tasty. Click here for the recipes.

Baked Parmesan Zucchini - Crisp, tender zucchini sticks oven-roasted to perfection. It's healthy, nutritious and completely addictive!

I am still working on washing windows. It’s taking longer than I’d like. In addition to washing windows, I am also cleaning the rooms as I go along. Hoping that accomplishing tasks keeps me moving in the right direction. Being in a funk just isn’t fun.

Thought I would share this picture of Cooper. He’s our first line of defense and does such a great job patrolling the yard and checking out the area. He takes his job seriously, even though he has a sweet temperament.

And you can see another project getting done~~wall repair!

Paws on the 6′ perimeter wall

What do you have planned for the week? Best wishes for a Tuesday filled with joy and simple pleasures.