1

Refinishing Outdoor Furniture

Thanks for joining me today for our DIY Monthly Blog hop. This month our focus is something to do with seating. Over four years ago, I did a DIY project where I repainted our outdoor furniture. Fast forward to today, and the pieces look as new as ever! Here in the Arizona sun, our outdoor furniture takes a beating. It is rewarding to know that this technique is still producing gorgeous results. Let me share how easy it is to refinish outdoor furniture.

The Before

Lounge chair with oxidized frame

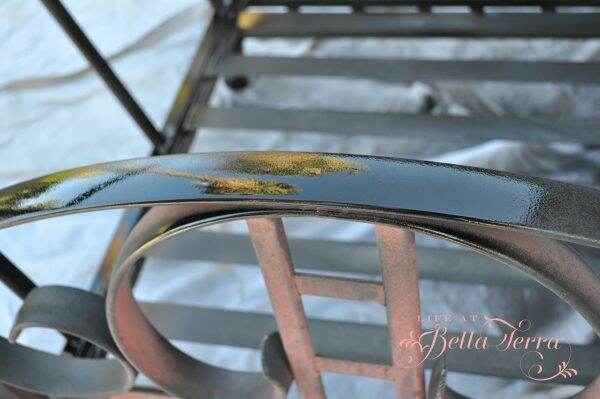
Here you can see the metal frame of the lounge chair in its oxidized condition. Instead of being a dark, rich brown, the finish almost looks purple.

Notice the variation of color

The pieces that need work are a lounge chair, a regular chair, a large ottoman and a round table. All these pieces are on our deck outside the master bedroom. The seating is rubber straps that do not require any work.

4 pieces that need refinishing

Supplies

I purchase 5 cans of Metallic Oil-Rubbed Bronze spray paint from Rust-oleum. There is something about the depth of this color that I love for outdoor furniture. You can find it here

If you have ever done a lot of spray painting, you will know how challenging and tiring it is on your index finger. With this handy attachment, spraying is so much easier.

Best tool for spray painting

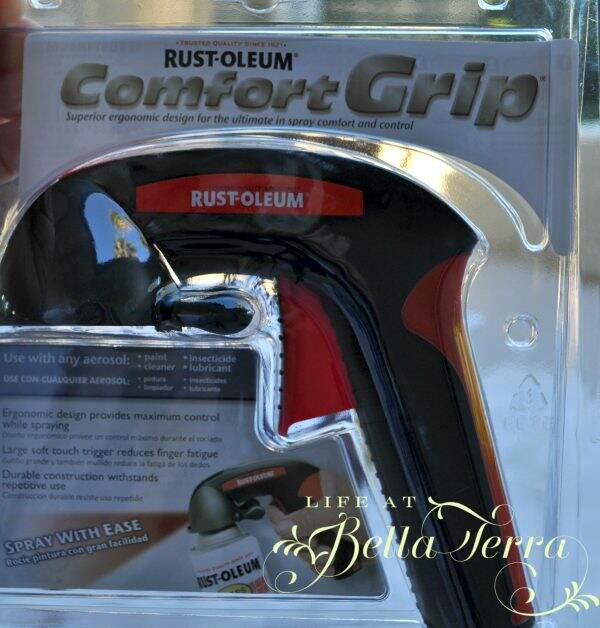
The Comfort Grip attaches to the top of the can and the handle helps to apply the paint evenly. It is so inexpensive and well worth it! You can find it here.

After wiping down the seating frames with a damp cloth, I am ready to paint. Using large drop cloths, I lay the furniture down and spray the bottom sections first. I tend to spray paint my feet (or socks) so be aware of where the paint is landing!

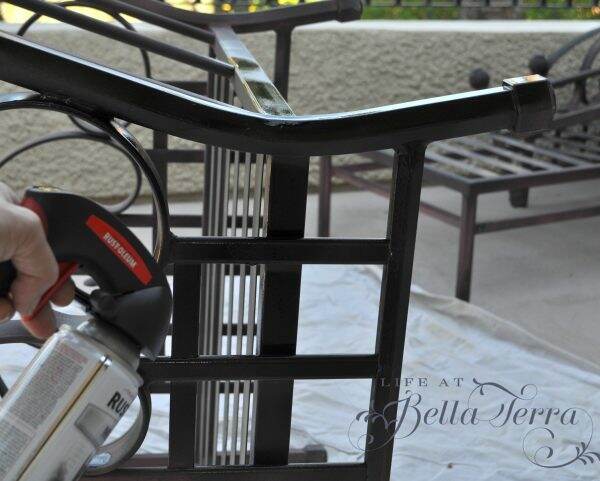
You can see in this photo the huge improvement from a new coat of paint.

Big difference!

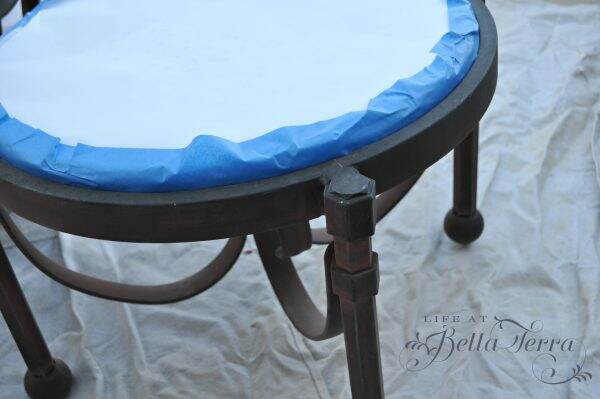
Since the stone top of the table is not removable, I carefully tape the edges with painter’s tape and make sure not to overspray the top.

Protecting the stone top

Allow to dry according to the manufacturer’s instructions. Also make sure you look around the furniture for missed painting spots.

The After

Here is the furniture 4 years ago. Doesn’t it look clean and new?

Furniture is finished!
Looks like new!

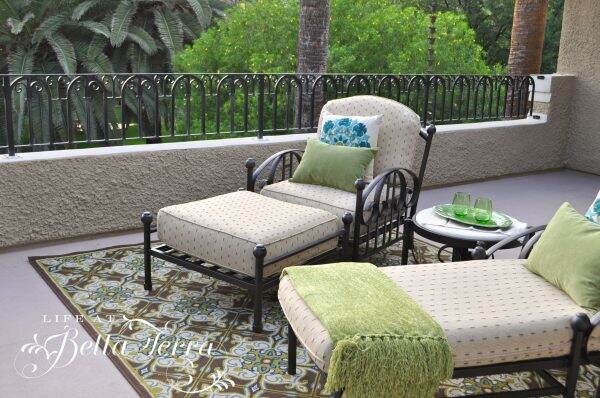
Now here is the same furniture today. We did move the pieces to a different location on the covered portion of the deck. But even after 4 years of being outdoors in the Arizona weather, all the seating pieces still look good!

Lounge chair today

The spray paint did hold up beautifully. Actually, the only thing that has changed is the pillows are a bit faded now from the sun.

Paint is still looking good!

Outdoor furniture can be pricey but with a bit of maintenance they can last you a long time.

Now onto the DIY Blog Hop

Thanks for joining me today. Now onto the other bloggers who will share their seating projects!

Andrea from Design Morsels shows how to cover your office chair here. I need to check this out as my office chair is looking a bit skanky.

Allison from Darling and Dapper Life creates a DIY Farmhouse Bench here.

Chas from Chas Crazy Creations gives us a great tutorial on How to Clean a Sofa.

Tarah from my Grandmas House DIY has two favorite rocking chairs that she has updated. You can see it here.

If you enjoy this post, please feel free to share on Pinterest.

This post shared with Between Naps on the Porch Metamorphosis Monday #649.


Saturday Meanderings

My patriotic charcuterie tray

As I am writing this I am in the mountains of Arizona and out of the insufferable Phoenix heat. The only downside to owning a second home is there is always some maintenance problem to tackle. But I’m not complaining, as it is cool, green and gorgeous here. So let’s get started on our chat about all good things this past week. Thank you for joining me for Saturday Meanderings on this July 4th holiday weekend.

Speaking of home maintenance..

Dead A/C and dead lawn

Upon our return from our 10 day trip to Nantucket, the air-conditioning unit servicing the kitchen, mud room, and library died. Fortunately, our HVAC person is able to quickly respond and get us a new one. OMG! When did the price of air conditioners skyrocket? But after a full day of installation, the kitchen is now nice and cool.

Painting the deck railing

Our cabin has decks made of wood. One of these days, I know we should go to the expense to replace them with a composite material, like Trex. But that too is expensive and anything to do with construction materials is difficult to get right now. Well, I just couldn’t stand the blistering surface of the top of the deck railing by the front door. So a couple of quick passes with a belt sander and a few coats of Behr’s Weatherproofing All-in-One stain and sealer, and it’s a temporary fix for now.

Isn’t Nature Interesting?

As you may recall, we bring our big pots of geraniums up to the mountains for the summer. They LOVE the cooler weather and occasional rains. One of the first things I do when I get to our cabin, is dead head the plants and water them.

However, yesterday, a bird did not appear happy that I was near the plant. It was chattering at me looking quite disturbed. Sure enough, look at the beautiful nest I found buried in all the foliage. But why 3 blue eggs and a speckled one?

Why is a cowbird egg in someone else’s nest?

Cowbirds are brood parasites, which means females lay their eggs in the nests of other birds and let the other mother bird do all of the rearing.

The cowbird will wait for a resident bird to leave her nest and then will usually damage or remove one or more eggs and replace that one or more eggs with her own.

The foster parents unknowingly raise the young cowbirds. Who knew? Thanks to my son, Benjamin for sending me this information.

Update on Furniture damage

Thanks to many of you who shared their remedies for repairing the damage to the dining room table. I did try mayonnaise, but to no avail.

Once we return home, I may try a few more times, but in the meantime, are also seeking knowledgeable furniture repair specialists.

Grilling

It’s that time of year for lots of barbecuing and I cannot recommend these grill mats enough. Not only do they minimize clean up, but the grill marks still occur and the food tastes the same. Recently, we did grilled peaches and they were perfect!

I like the fact that you don’t have a messy grill when you are finished cooking. The mats clean up easily and are reusable. You can find them here.

My Garden

Pedilanthus macrocarpus, Lady Slipper. Image Green Meadow Growers

The high summer heat does fry many of the plants in the garden. Surprisingly some plants are actually blooming, like the Lady Slipper, a succulent that looks a bit prehistoric to me. The thin, lime green, leafless stems, create wavy, straight or arched clustered growth.

Lady Slipper in bloom

Right now, they are flowering with delicate pink blossoms that look like a lady’s slipper. Sorry the photo is a bit blurry.

Pumpkins in July? I just picked two pumpkins from the garden. One of these years, I am going to get the timing right. Last time I grew Fairytale pumpkins they were done by mid-June. But aren’t the stems wonderful?

Beautiful Pillows

Pillow sham from My Stylish French Box

One of the beautiful items I received in the May box from My Stylish French Box, is this gorgeous pillow sham. The colors are perfect for our master bedroom (see the master bedroom here). Not only is the quality very good, but I am able to order another one through the website. The second pillow sham arrived and don’t they look fabulous on our bed? Here is the link to the pillow sham.

Saint-Tropez

Apparently the theme for the August box will be Un Weekend à Saint-Tropez. To learn more about this box, click here. These boxes make perfect gifts too.

Happy Independence Day!

Patriotic table

Wishing you all an enjoyable, safe and happy holiday. Remember to celebrate the true meaning of July 4th~our freedom and the signing of the Declaration of Independence.

Thank you again for following me and sharing all your stories, inspirations, and recipes. I am so grateful to all of you!

If you missed any of my posts this week, you can find them below.

DIY Patriotic Wreath
A Trip to Nantucket


DIY Patriotic Wreath

I confess that I am not a good DIY-er. My optimistic and ambitious nature often leads me into a false sense of “I can do this”. Yesterday, I got a bee in my bonnet to use up some of the numerous ribbon I have and decide it might be fun to make a ribbon wreath. If you have any red, white, and blue ribbon or even fabric, you too can make this DIY patriotic wreath.

Since we always celebrate July 4th at our mountain cabin, I realize that I have very little July 4th decor here in Phoenix. So the combination of getting rid of excessive ribbon and my silly belief that I can do anything, I ambitiously set forth and seek my materials.

Generally to be successful, one needs a positive attitude, fortitude and hopefully a bit of aptitude. I definitely possess the first two, but for some reason DIY projects do not come naturally to me. However, I plow through them and occasionally I will have a success.

The Materials

Starting with a single wire 14″ wire frame (I did not use the green one in the photo above) and lots of leftover ribbon, you will also need floral wire and scissors. I would imagine you can make this with any wreath frame you may have on hand.

Making the Bows

Now I proceed to make bows, lots of them. The more you fold the ribbon, the more fluffy the bow will be. I use floral wire around the middle.

Tightening the wire will pinch the center of the ribbon. Pull the layers of ribbon apart for fullness.

My first mistake is that the bows are a bit too small. Making bigger and more abundant bows will make this project go by much faster. Once I realize this, I add larger bows next to the smaller ones.

Affixing to the Frame

Twisting the wire around the frame secures the bows, but does not keep them from rotating. The more bows you add, eventually they will pack together and not spin around. Again, think bigger bows! Less work!

Mix up the colors and patterns of the ribbons. This is a great way to use up all the scraps of ribbons I collect (does anyone else do that?)

For the 14″ wire frame, I made approximately 32 bows. To fill in, I also add single ribbons that are tied to the frame to add more color and interest.

Couple of things to note:

The larger the frame, the more bows you will have to make. This would actually look cute in a smaller size too. I wonder if you could just tie strips of fabric onto the frame and tie bows, but I’m not sure how time consuming that would be.

Here is the finished wreath. I suppose you could squish more bows onto it if you’d like. But at this point, I am ready for it to be done!

If I were to do this again, I would make much fuller bows and I bet you would be able to reduce the bow-making task significantly.

How Long?

The entire project did take me about 2 hours, with some interruptions. I think this would also be cute as a table wreath with a vase of flowers or perhaps a tray of cookies in the middle? If I were to use this outside, I would spray the ribbon with a UV protectant spray like this.

If you are not a DIY person, here is a very cute wreath on Amazon that is quite affordable. Patriotic ribbon can be found here and wreath frames here if you don’t have any on hand. Floral wire can be found at Michaels or any craft store or here.

Happy Wednesday, my friends! The air conditioner has been replaced and now it is cool and comfortable in my kitchen!!

For more July 4th ideas, check out these previous posts.

If you enjoy this post, please share on Pinterest!

This post shared with Between Naps on the Porch Tablescape Thursday #666


A Trip to Nantucket

Source: Where Is Map

Even with 30 years on the east coast, I never visited Nantucket Island in Massachusetts. Nantucket is an island about 30 miles from the coast of Cape Cod. The name “Nantucket” is adapted from an Algonquian name meaning “faraway land or island”. Recently, our entire family took a trip to Nantucket.

Nantucket is a tourist destination and summer colony. Due to tourists and seasonal residents, the population of the island increases to at least 50,000 during the summer months (from 10,000 during the rest of the year). Very affluent, the average sale price for a single-family home is approximately $2.3 million.

Why Nantucket?

Beach walking to Great Point lighthouse

We won a charitable auction item to spend a week here, only to find out that the accommodations belong to our friends. What a pleasant surprise as not only are they lovely people, but they did happily share everything we need to know about Nantucket….and allowed us to extend our visit to 10 days.

Ship in Nantucket Harbor

With the children growing up and heading in different directions, my goal is to create an annual fun family vacation somewhere in the world where we can all gather. Naturally I am delighted that all three children could make time in their schedule. Also joining us on this trip is my son’s girlfriend, Delaney and Julianna’s dog, Hemingway.

How to Get There

Sweet cottage in Sconset

Being an island, you can fly or take a ferry. Nantucket is served by Nantucket Municipal Airport (ACK), a three-runway airport on the south side of the island. The airport is one of the busiest in Massachusetts and often logs more take-offs and landings on a summer day than Boston’s Logan Airport. This is due in part to the large number of private planes used by wealthy summer inhabitants, and in part to the 10-seat Cessna used by several commercial air carriers to serve the island community.

Hemingway at Essex Airport

Once we landed in Newark, we traveled to the Essex airport where our hosts flew us on their private plane to Nantucket. And then they spent the next few days showing us all the wonderful island spots. Lucky us!

The Ambiance

Eagle Cottage

Cobblestone streets, window boxes filled with colorful flowers, and the classic shake siding are abundant here. The Nantucket rose is frequently seen climbing up a trellis, adding shades of pink to the rather gray exteriors.

House snooping on my walk

Everyone’s home is uniquely named and properties range from sweet cottages to sweeping estates.

Lots of shops and interesting restaurants are common, but depending on the time of year, it may be difficult to get reservations.

Beaches and the Water

On our way to the ferry

Being an island, there are many places to enjoy the water, either by boat, car or on foot. You can even drive on the beach with the proper permit!

Having lunch at the beach

My brother and his wife brought their boat from Rhode Island to the harbor for a few days~an extra bonus is being able to spend time with them too!

The Weather

Morning coffee

Coastal fog is typical this time of year~similar to the June gloom on the west coast. Perfect for quiet mornings on the deck with a cup of coffee. We are surprised to find that different parts of the island have their own unique weather patterns, in spite of the small geographic area.

Things to Do

A quick shopping trip on a rental bike

Besides boating, beaching, exploring, and eating, you can rent bicycles (which I highly recommend). There are numerous bike paths throughout the island. In addition a visit the Whaling Museum, Shipwreck Museum or the display of Nantucket baskets sheds light on the history of this island.

Hiking to Great Point Lighthouse

There are 3 lighthouses on the island, which are also fun to see. After biking 12 miles in the morning, we did a 3.5 mile hike in very soft sand to the Great Point lighthouse. My calves are still aching.

Hemingway at Sankaty Lighthouse

Our 10 day Nantucket adventure was made extra special by our hosts and having our entire family together once again. I can honestly say that traveling by air is a bit challenging as the airports are packed and the flights full. But just seeing these beautiful pictures and creating new family memories made the journey worthwhile.

Nantucket sunset from the deck

I am back home only to discover a failed air conditioning unit in the kitchen/mudroom/library area that will need complete replacement. Cha-ching. As I am writing this it is 90 degrees in my workspace, but better than the 107.5 degrees outside. It’s hard not to desire for those chilly mornings in Nantucket right now.

Happy Tuesday! Hope you are either on vacation or planning to take one soon.

If you enjoy this post, please share on Pinterest.


My Favorite Tomato Recipes

tomatoes from my garden

We are right in the middle of tomato season here in Phoenix. My garden isn’t producing as many tomatoes as the very successful season I had last year, but homegrown is the best. However, the ones that are growing are absolutely delicious freshly picked from the vine, warmed by the sun and eaten with just a sprinkle of salt. Here are a few of my favorite tomato recipes. Warning: Lots of red photos ahead!

Appetizer

On the vine

Just writing this makes me drool over this flavorful recipe. I tend to love easy recipes with fabulous results and this is certainly one of them.

Only 4 ingredients

With only 4 ingredients that toss together ~cherry tomatoes, garlic, fresh mint and olive oil (Salt and pepper), this appetizer dish comes together in a few minutes.

Such pretty colors

Bake in a square casserole dish for 45-50 minutes and you will thank me for the smell in your kitchen. For some reason the combination of tomatoes and mint roasted is just plain magnificent.

Roasted

On lightly toasted French bread slices, spread goat cheese and dollop these roasted tomatoes on top. Pretty phenomenal. To see the full recipe, click here. To get a similar spreading knife with the cute tomato handle, click here.

Super yummy

Salad

If you need a refreshing and tasty salad this summer, you must try my Tomato, Peach and Corn Salad. Using the fresh seasonal ingredients, this salad will enhance anything you pull off the grill.

Corn fresh off the cob

It takes 20 minutes to make this and I promise you will love it. Tomatoes, peaches, corn, feta cheese and a homemade honey vinaigrette is all it takes. I add fresh cilantro to mine to enhance the flavor and add a touch of green.

Beefsteak tomatoes

Doesn’t this look like the most refreshing salad ever? Perfect for a hot summer day.

All tossed together
Tomato, Peach and Corn Salad

To get the recipe and see more detailed instructions, click here.

Tomato Sauce

Home grown San Marzano tomatoes

Last year I made many jars of tomato sauce from those tomatoes grown in our garden. In late July, I also purchased 50 pounds of tomatoes from a farmer to make even more sauce. Those jars did last until April of this year so it is time to make another big batch of sauce. Honestly, having fresh tomato sauce in the middle of the winter is such a treat.

50 lbs. of Romas

You do need some equipment if you are canning. Also, it is important to understand the food safety issues around preserving food. But anyone can do it~the first time is always a bit scary.

Have the right equipment

But people have been doing it for centuries and after living through the weird last year, there is something comforting about having jars of your food in your home pantry.

Using Rick’s tomato sauce recipe

My philosophy about canning is that it does take time, so why not do a lot of it at once? It also helps to have another set of hands.

Hot sauce into jars

If you haven’t canned or preserved food, I strongly suggest you give it a try. The work is worth it and the results can provide you with homemade goodness for many months. To get the recipe and to see more on how to process Tomatoes, click here.

Sauce for the year

Whether you grow your own tomatoes or have a local fresh resource for them, enjoy this delicious botanically defined fruit. At no time should we settle for a tomato that looks like a tomato but is tasteless. Take avantage of the summer season and get all the tomatoes you can!

If you enjoy this post, please share on Pinterest.


Ways to Enhance Your Entry

Like every first impression, the entrance to your home says alot about you. Is it welcoming? Warm? Impressive? Easy to find? Often we take the entries of our homes for granted, because we are in and out of them frequently. So it’s time to step back and ask yourself the question, how can I create an impressive entrance?

Front Entry Update

Getting ready for our pre-renovation party 1999

Sometimes your entry needs a major facelift. This photo is our house prior to the extensive restoration. It is the only picture I found of the front door that shows the bare light bulb on the front porch. And back then, there were security bars on all the windows and doors.

Front Entrance today

With new house paint, removal of the security door and bars, new front door paint color, new light fixtures we transform the scary front of our home into something much more welcoming. Adding plants and a bench do add to the notion that we actually want you to enter the house and stay awhile.

Bella Terra

To read a detailed version of the restoration of the front of our home, click here.

Willetta Restoration before

I must be attracted to home with security doors as the same appears at the 1922 home I restored in downtown Phoenix. Even with missing light fixtures and significant deterioration, this is still an impressive entry. Plus the front door does have wonderful opening sidelights for ventilation.

Willetta restoration during

After all the white aluminum siding was removed, we found the original clapboard in good condition. The columns need significant work as does the under roof of the terrace.

Front Door Color

Willetta Restoration After

Sometimes a simple can of paint can really change up the look of your front door. Previously painted white, the double front doors look fabulous in this color red. For a more in-depth review of the historic Willetta restoration, click here.

Numbers

Here is the before and after of a remodel I did on a small ranch house. In addition to changing the front door, the house siding and removing the brick planter, note the old house numbers.

Here is the after with lots of changes. But the personal touch I love on this house is the custom made gold plated number 32. Made by an artisan in Connecticut, this is a unique look in Phoenix.

In lieu of a screen door, the shuttered door allows in light and ventilation to a rather dark entrance.

A Front Walkway

Before

This is one of my first “for sale” remodels. There is a lot wrong with the entrance to this house. It needs a new door as the hollow core closet one makes no sense. The mixture of brick and stone confuse me. But because the house is so flat and linear, it desperately needs a welcoming walkway.

After

With a winding path of tumbled pavers, your eye goes directly to the front door (sorry for the quality of this old photo). The solar lights enhance the path at night.

Front Entry Decor

Each season I change up the decor on my front porch. A new wreath, pillows, a throw, new plants~anything to freshen it up for that time of year. To see more about this front porch re-do, click here.

Adding Pretty Elements

Before

It doesn’t take much to freshen up your front entry. Recently, I painted the exterior fixtures and mailbox to our guest cottage. A simple project like this produces big results. To learn more about painting both these items, click here.

Know Your Home’s Architecture

In a small gated community here in town, I found this sweet patio home. However, the entrance does not fit with the style of the house. Between the dated French provincial front doors and the alpine-like peaked roof, I felt like yodeling every time I entered. The light fixture is 1980s. Structurally it looks wonky.

The wooden spindles and beams are removed. Columns are added and receive a coat of stucco. New fascia board gives the roof some beef.

During

With a new front door with sidelights, an appropriate scaled light fixtures and new paint the front door becomes the focal point in this entrance.

After

Here are some pretty entry pictures I did find on the internet. I just love all the window panes around this door.

Better Homes and Gardens

In each photo, your eye is drawn to the front door…which is exactly what you want to achieve.

Houzz

I hope this inspires you to spruce up the entrances of your home! Happy Wednesday!

If you enjoy this post, please share on Pinterest.

This post shared with Between Naps on the Porch Metamorphosis Monday #648