1

King Cake

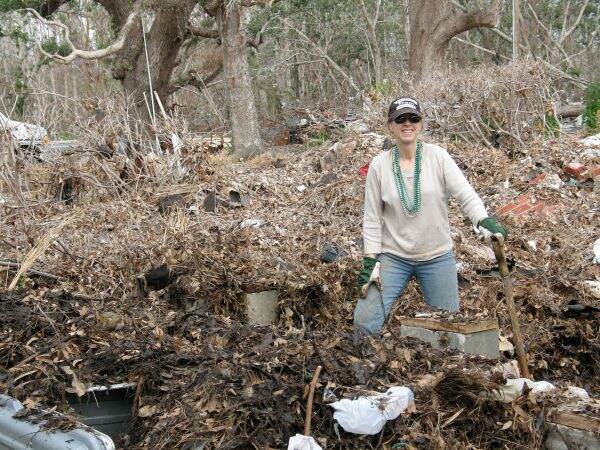
In January 2006, I went to Mississippi as part of a work crew to help with the aftermath of Hurricane Katrina. It was a big ask to take 7 days away from my young family to volunteer, but my husband and children were supportive. The opportunity presented itself through our church and it felt like the right thing to do.

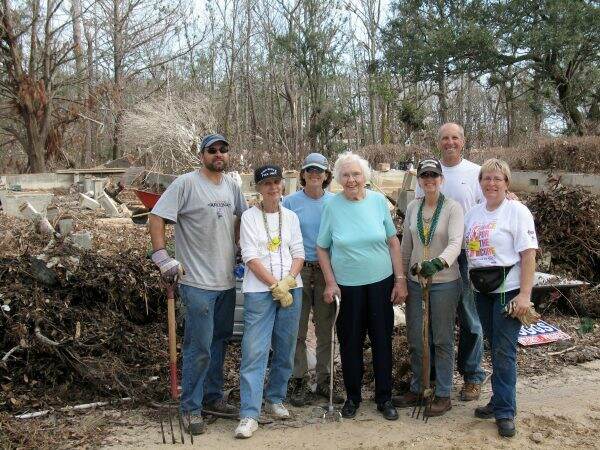
I was one of 12 volunteers and I didn’t know anyone before the trip. We all became fast friends and found joy in helping others.

Hearing they had a need for forklift drivers, I quickly got my license to operate one before my departure!

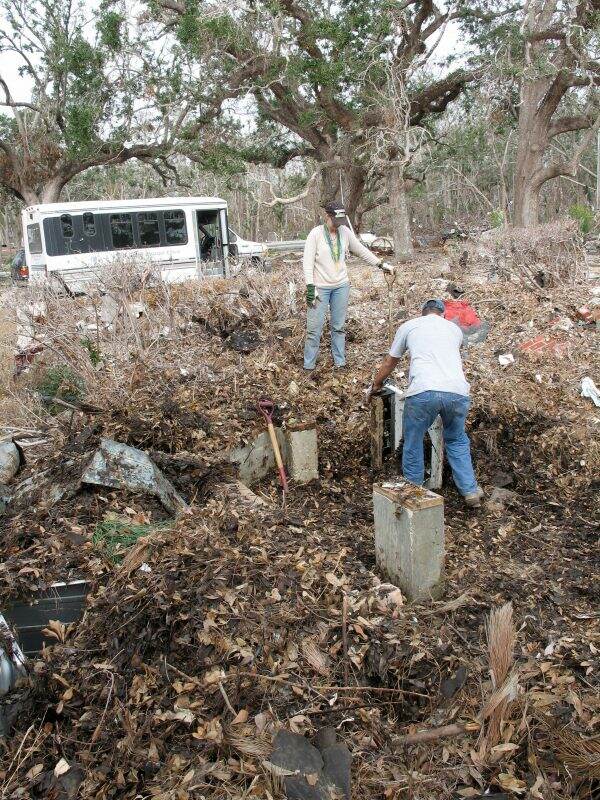
It was hard and dirty work. Each morning we would get our assignment, fill up the church van with rakes, chain saws, shovels and literally spend the entire day tearing out moldy drywall, or cleaning up someone’s property.

One of our first projects was to help gut someone’s home. It was 4 months after the hurricane and black mold had set in. All their drywall needed removing. The property owner was so grateful and thankful for our work it made my heart burst.

On this project we were clearing out 4 feet of debris. Underneath was the foundation to someone’s family home which had been “scraped” by the storm.

She was in tears and had nothing to give us except a King Cake. I had never heard of a King Cake but we happily accepted it (as the food at the school where we slept was minimal). I am unable to locate a picture of all of us with this wonderful woman and her King Cake but it remains a fond memory of mine.

The woman with the cane is Claire Morrison, newscaster Cokie Roberts’ grandmother. Her entire family compound was destroyed in the hurricane.

When I returned home to Phoenix, I was so moved by this incredible experience. Our work was simple, yet rewarding. Making a King Cake each year is now tradition in our home.

The King Cake is thought to have been brought to New Orleans from France in 1870. A King Cake is an oval-shaped bakery delicacy, crossed between a coffee cake and a French pastry that is as rich in history as it is in flavor.

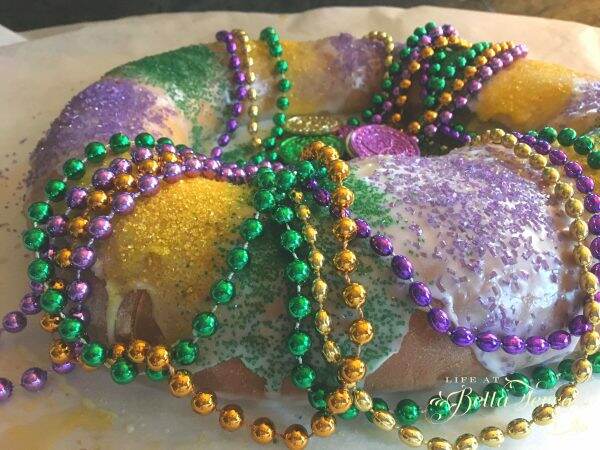
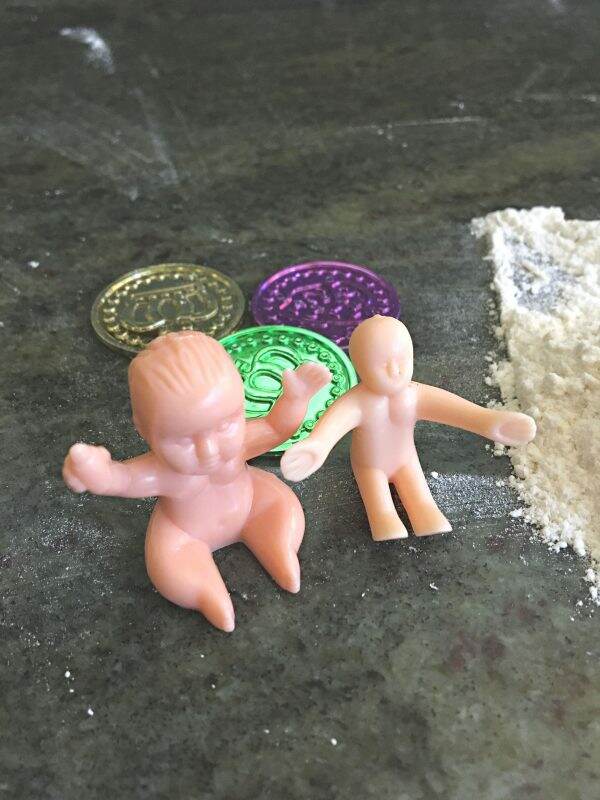
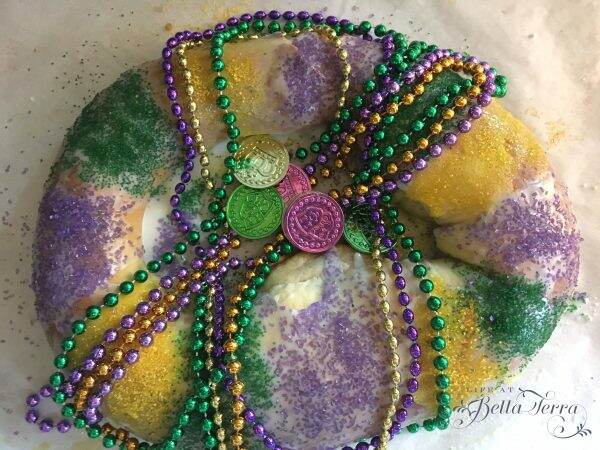
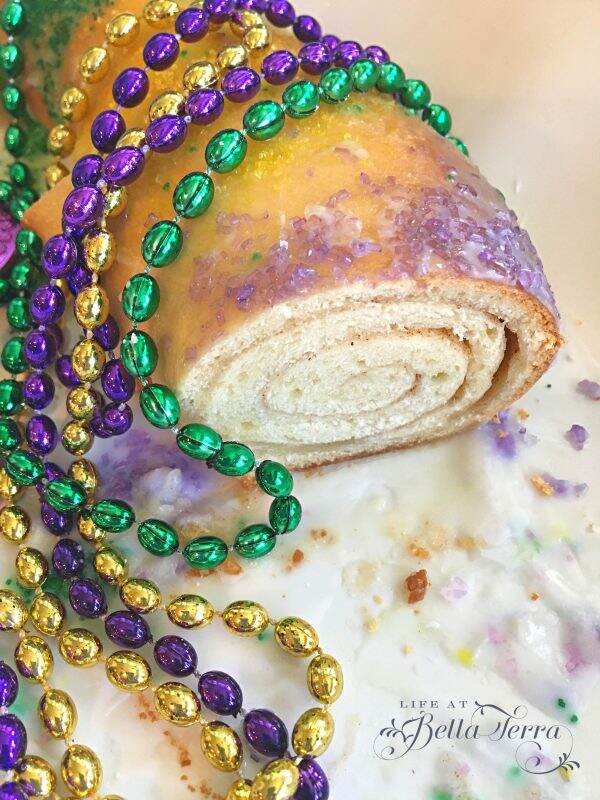
It’s decorated in royal colors of PURPLE which signifies “Justice,” GREEN for “Faith,” and GOLD for “Power.” These colors were chosen to resemble a jeweled crown honoring the Wise Men who visited the Christ Child on Epiphany. A naked baby is hidden inside the cake and whoever finds it received a year of good luck and is treated as royalty for that day.

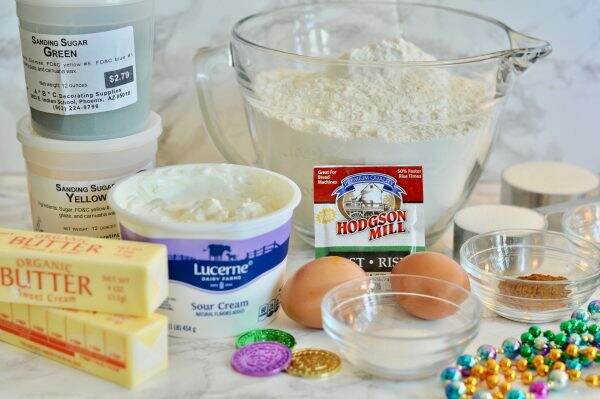
The ingredients are rather simple, but it does take some time to prepare the dough, let it rise and then decorate it. Typically I would take you step by step with a new recipe but I will just highlight a few or this would be a really LONG post.

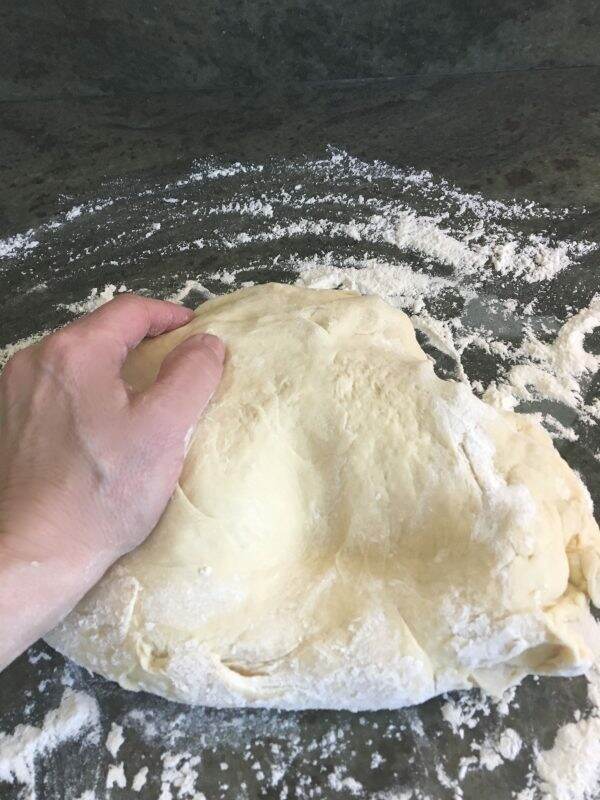
After you make the dough, turn out on a lightly floured surface and knead until smooth.

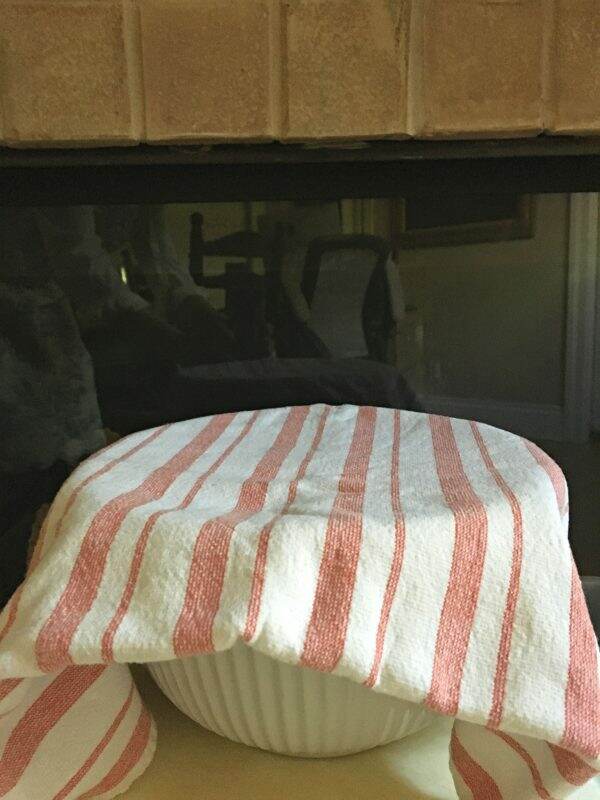
Cover and let rise in a warm place free from drafts for 1 hour or until dough has doubled in size. I place my bowl on a chair in front of the fireplace.

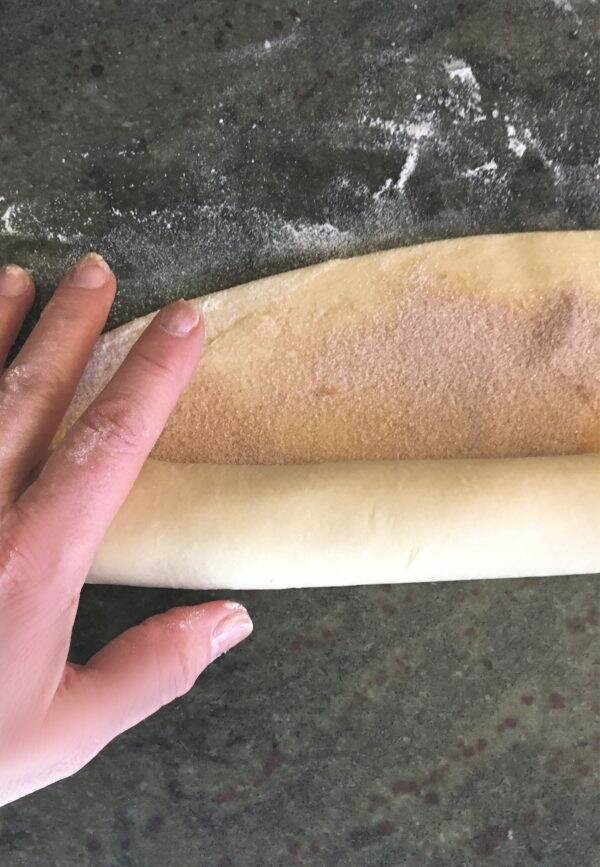
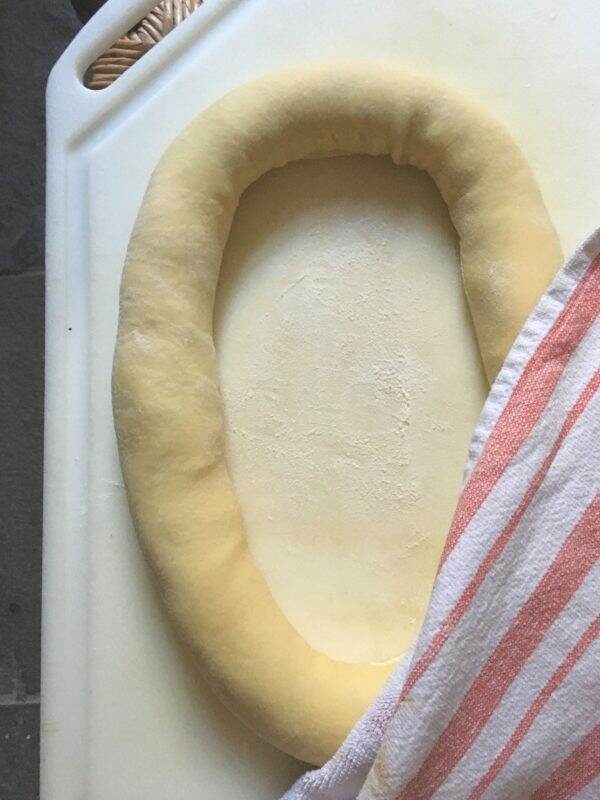
After punching the dough down and dividing into two parts, roll out the dough into a large rectangle. Spread softened butter on the dough and sprinkle with cinnamon sugar. Roll the dough, jelly roll fashion starting at the long side. Don’t forget to add the baby!

Babies come in all sizes!

Bring ends together and form an oval ring. Cover and let rise in a warm place until it doubles in size.

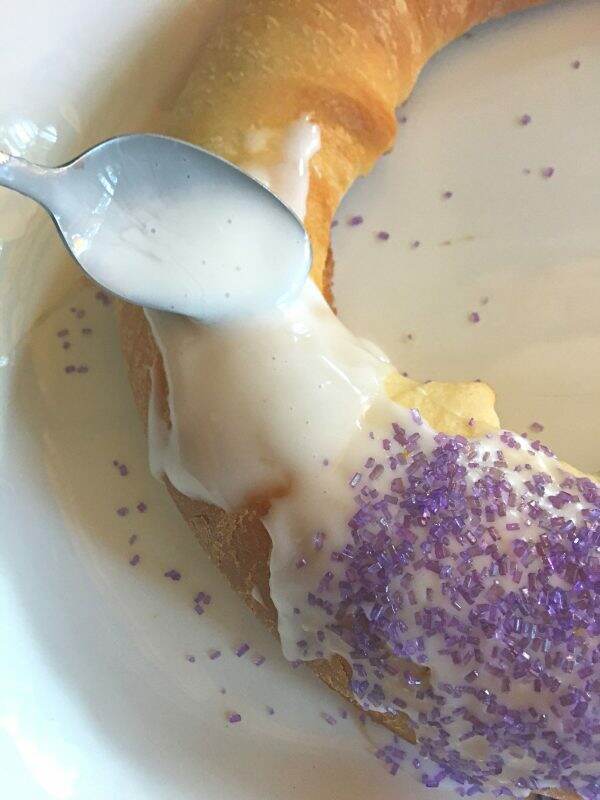
After baking, ice the cake and add the colorful sprinkles. Be sure to add the sprinkles quickly or the icing dries and they will not stick.

I add Mardi Gras beads and coins to make it festive! King Cake is generally available between the Epiphany (January 6th) and Mardi Gras or Fat Tuesday (which is the day before Lent). If you don’t want to make your own, check with your local bakery to see if it is available.

I hope you will try this recipe and make King Cake a family tradition.

King Cake Recipe from 1990 Southern Living ~~ makes 2 cakes

https://www.myrecipes.com/recipe/traditional-king-cake


Bring Back the Hankie and Giveaway!

Historians credit Marie Antoinette with the invention of the pocket handkerchief. She was so broken up at leaving her home in Austria that she cried all the way to France and wiped her eyes with bits of lace torn from her dress and lingerie. Anticipating future tears, she made it a point always to have a piece of lace tucked in a pocket of her dress. This, say the historians, was how handkerchiefs were born (according to 1940 Modern Women magazine).

Handkerchiefs during their existence have been used for many things like greeting someone, cleaning your hands, face, or teeth, wiping your tears and nose, applying perfume, and have even been used to signal to a gentleman that you would like to meet him or given to him as a token of your affection.

We now have Kleenex and facial tissues, and when I mentioned to my daughters that we should bring back the hankie, they said “eeewwww”. But how is washing a hankie any different than washing underwear? And isn’t it more environmentally friendly?

Don’t you agree that pulling out a gorgeous vintage handkerchief to wipe your eyes at a wedding or funeral is so much more sophisticated?

Or if you are on a plane and someone next to you is coughing, what more beautiful way to cover your face than with a lovely hankie?

If you agree, then I have 30 vintage hankies that I would love to share with you. Each one is different and they are super soft.

Some are embroidered or have delicate thread work.

Others have a theme of music or travel.

Some have initials and others are brightly colored.

This one has a scalloped edge and others are tailored. Since they are vintage some may have imperfections, but to me, that contributes to its story.

I would love to send you your very own hankie! All you need to do is send me an email (to marycrz@cox.net) with your name and mailing address. If you would like to share your favorite color or you see one in an above photo you are partial to, please let me know. If not, I will just surprise you!

Do you think we can collectively bring back the hankie???


Tulips and Tulipiere

The first stop on our Baltic Sea tour (in 2007) was Amsterdam. Though it was not tulip season, we quickly learned about the importance of the tulip in their history. During many palace tours, I would spot one gorgeous tulipiere after another. What is a tulipiere?

Image result for images of tulipiere

tulipiere or tulip-holder is an ornate vessel in which to grow tulips, and is usually made of hand-crafted pottery, classically delftware. They are typically constructed to accommodate one single bulb per spout with a larger common water reservoir base. They were not designed as vases for a cut bloom, as is sometimes supposed, though they could also be used for this.

Image result for images of tulipiere

While fairly uncommon now, during the 17th century tulipieres were used to grow tulip bulbs indoors and were common pieces of decorative art that could often be found in the houses of European elites. Large floor-standing pyramid-shaped tulipieres were particularly ornate and were used as a status symbol to indicate the owner’s wealth.

Since 2007, I have wanted to own a tulipiere. I finally broke down and bought two medium-sized ones from The Enchanted Home. She recently did a blog post on it and I just caved. And I am so glad I did!

Around Valentine’s Day I tend to buy tulips. It is my secret protest to the 2 to 3x increase in rose prices. I am very excited to use my newly acquired tulipieres and share how they work.

This one comes in 4 separate pieces. I was doing this on my dining room table, I always put down a towel to protect the surface.

Each section requires water.

I cut the tulip stem to the size of the vessel as the length varies with each section.

I like my stem mine a bit longer because I like the gentle, loopy arc.

Each section holds 4 tulips.

When the bottom portion was filled with water and flowers, I repeated the same process with the rest of the sections.

Here is how they look finished!

The Enchanted Home did send me adhesive to glue all the sections together, but I don’t see why I would do that. Each section requires its own water and if they were glued together you wouldn’t have access to the opening on the top.

I believe the water and weight of each section keeps the tulipiere supported. Of course, if someone were to grab them quickly and move them, it could be disastrous.

I’m always trying new ways to photograph things for you and I thought you’d enjoy my latest picture. It’s a top down view of the tulipiere~~of course I am standing on the table in my athletic shoes (yikes!) and failed to get my feet out of the picture! Artistic, huh?

I wonder if I should try planting bulbs inside and see what happens?


Storing Dinnerware

Do you have lots of dishes and china? Some people collect shoes. I collect dishes and stemware. Fortunately, we have cupboards in the basement to store the items we do not use everyday. But, like most parts of the house that are out of sight, they can get messy and cluttered. My new project is tackling that space and sorting and organizing my dinnerware. To see more about our basement, click here.

Most of the daily use dishes and glasses are either in the kitchen or the butler’s pantry. Since I do LOVE collecting china, the basement is where the bulk of the fine china is stored. To see more about our butler’s pantry, click here.

Determine What You Need

In order to protect the dishes from damage and dust, I store them in the quilted zippered bags that are very affordable and easy to buy online. They come in various sizes for both dishes and glasses. Many come with plate dividers, but I prefer the thicker, felt separators from Richards to protect the more delicate items.

There are many styles, colors and sizes to choose

More storage for stemware from Richards.

Photograph Your Items

In order to easily identify what is in each quilted bag, I simply take a picture of the dish/glass with my phone and then print thumbnail size photos.

After cutting each photo, I glue them to a card stock tag.

Mount and Identify

A written description is added to the back of the tag so I can easily recall the number of pieces and/or the manufacturer’s name.

Additional information is added to the back of the tag.

Hang the tags from the zipper facing outward for easy viewing.

I group the like items and companion pieces together on the shelves.

Finally with the organization complete, the dishes and glassware are easily accessible. This is an area where I also store my various chargers. Cabinets and wooden countertop are from IKEA.

As I complete the basement project, I hope to show you the before and after photos of the entire room in my next blog post. To see more storage areas of the basement, click here.

If you are visiting today from HomeTalk, welcome to my blog. Bella Terra is our historic home in Phoenix, Arizona. I post about daily life from gardening, home restoration, bread making, DIY, chicken keeping and everything in between. I would love for you to subscribe to my blog if you like what you see. You can also find me on Instagram @lifeatbellaterra and Facebook.

This post shared with Between Naps on the Porch Tablescape Thursday #620th


A Small Luncheon with Friends

Three things you probably don’t know about me. 1) I have Royal Worcester soup bowls I love and have never used (after hunting for them for 10 years!); 2) I have always wanted to host a sophisticated lunch with friends; 3) I am design-challenged. I can pick out tile and do a massive restoration project, but when it comes to decorating I can honestly say it is not my strong suit. Low confidence in this arena.

I decided to put all those things together and organized a lunch with friends who are superb at design and whose opinion I value. The deal was I would provide lunch if they would help me with my design obstacles.

Soup was a definite item on the menu as I was excited to use these beautiful footed cream soup bowls and saucer. Since it is January and many people are watching their nutrition, I decided on a simple broccoli soup~~one without cream. Plus I was able to use fresh broccoli from the garden!

I’ve never made cheese crisps before (very easy) and it was a nice accompaniment to the soup. All you do is shred cheese in a 2″ pile on a cookie sheet (lined with parchment paper) and bake for 18 minutes.

The entree would be my Pomegranate, Kale and Wild Rice Salad with walnuts and feta (see previous post here), but I also added baked chicken and avocado.

Since we are in the height of our citrus season here, I thought it might be fun to attempt a new cake~~something small but reasonably healthy? It was timely to receive a blog post from Kitchen McCabe with a recipe for a Candied Orange Olive Oil Cake + Cornmeal and Rum.

This was my inspiration….however, mine didn’t look this good!

I made the soup the night before so it was easy to heat up just before my guests arrived. However, the cake is supposed to be made on the same day you serve it. A rather big undertaking the morning of the lunch.

Thankfully, the table was set the night before and the centerpiece was two simple glass rectangular vases with yellow and white flowers. Placemats vs. a tablecloth seemed more appropriate for lunch too.

The cake preparation took longer than expected. So naturally, I was running a bit late~~hence some of the blurry photos! After looking at the inspiration photo, I think I cut my oranges too thin before I candied them. As a result they didn’t stick as well to the cake. Also, the recipe called for a 6″ pan but 3″ deep. Mine are only 2″ deep, therefore I made 3 layers.

In spite of it not looking as GREAT as the one from Kitchen McCabe, it was still pretty and was very tasty. Kumquats and mint are from our garden.

In addition to a delicious lunch, my friends gave me several constructive ideas on how I can improve the dining room and family room. At first I thought they would tell me to throw everything out and start again, but with they were very complimentary and helpful. Their suggestions were affordable and reasonable and I am excited to make some changes.

I don’t know why it has taken me so long to have a luncheon with friends in my dining room. Typically we would go to a restaurant, but having guests in your home, with food you have lovingly made, is the best gift you can give yourself.

It was so much fun I can’t wait to plan another one! Recipe links below.

Creamy Broccoli Soup with Cheddar Crisps (Note: I seasoned my soup with Better than Bouillon Chicken in lieu of more salt) https://www.foodandwine.com/recipes/creamy-broccoli-soup-with-cheddar-crisps

Pomegranate, Kale, and Wild Rice Salad with Walnuts and Feta (I added cooked chicken and avocado)

https://pinchofyum.com/pomegranate-kale-wild-rice-salad-with-walnuts-feta

Candied Orange Olive Oil Cake and Cornmeal & Rum

https://www.thekitchenmccabe.com/2019/01/13/candied-orange-olive-oil-cake-cornmeal-rum/

Beverages: water, Miraval Cotes de Provence Rose, coffee/espresso


Storing things

Someone recently asked me where I put everything. The challenge with having a large property is to not fill it to the brim with stuff.

I tend to organize by categories. Some people organize alphabetically or by color or project. But it’s easier for me to focus on the object~~looking for scissors? Go to the scissor drawer vs. scissors could be with the sewing stuff or craft supplies or junk drawer.

Since I just finished putting all holiday decorations away, I thought I would show you where I store them.

Basements are rare in Arizona. Basements are common back east, but for some reason, it is unique to have one here. Ours is not a full basement, but a partial one below the dining room, butler’s pantry, kitchen and breakfast room.

Our basement is comprised of three rooms~~the wine cellar (see post here), the Christmas storage room and a center room between the two. We refer to it as the Christmas Room, however, it also serves as a utility room, where we have our water heaters, reverse osmosis water system and a heating/AC unit.

Please don’t laugh at my attempt at calligraphy!

Years ago, I painted the concrete floor large with checkerboard pattern of cheerful red and green with gold squares. Placing the pattern on a diagonal makes the room feel bigger. Even though there are 3 transom-like windows in this room, the northern exposure doesn’t allow for much natural light. Fluorescent ceiling lights are the reason for the sub-par photos.

Since this room has flooded in the past (burst water heater), everything is on rolling racks or above the ground. The walls are the original plaster or brick. When you first walk in the door, you see this.

There are 6 rolling racks filled with tubs of holiday decorations. These are stacked against each other and are easily moved when I need to access the boxes.

*Note: I purchased these rolling racks from Costco and quickly assembled them. I wish I had considered the size of the tubs prior to installing the shelves. I also wish I had been consistent in the tub size since some tubs don’t easily fit on the shelves.

Clear labeled tubs provide easy access to contents

On the adjacent wall is a single rolling rack. Here I store kitchen items that I don’t use every day~~bundt pans, large roasting pan, cake molds, apple peelers, bread machine, ice cream machine, pressure cooker, etc.

Though the main gift wrapping area is in our mudroom, I keep extra supplies of tissue paper, bags and tags here.

On another wall, there is a wooden book shelf that holds signed cookbooks, large stock pots, small electrical appliances, and oversized trays.

All my Christmas artwork is stored in large moving boxes on a platform nearby. Since the basement temperatures tend to be cooler than the garage or barn, most of our cherished Christmas items are safely stored here.

I hope to share more storage ideas with you. I am always inspired when I see someone’s organizational style or skill. Please feel free to send me any tips you have!