1

Tackling the Master Closet

New beginnings, fresh starts and a time to get life in order is what I think of in January. Two years ago I did a major sweep of the master closet and it was a thing of beauty.

But 24 months later, it’s just a mess. Why is it so difficult to keep things in order? It didn’t bother me until our recent houseguest asked to see the upstairs of our home. When she went into our closet, she said she was happy to see I was normal and it was unorganized. Wait. What? Have I been looking at my closet with rose colored glasses for the last 2 years?

And then it happened. I REALLY looked at my closet and gasped. I’m almost embarrassed to share some of these photos.

I’d like to report that I have organized the entire closet but it has just taken me two days to clean up my scarf collection, shoes and a few drawers. I am not only tidying up, but I am assessing each item to save, toss, or donate. When you make progress, you need to share!

I decided to sort my scarves by category first: Snow/winter outdoor activity scarves; winter casual; winter dressy; silk; cotton; head; bandanas; neck warmers, large wraps and ponchos/shawls. And then I organized by size and color.

Trouser rack before (hidden by all the scarves)

The large wraps/shawls are hung on a trouser rack now that is tucked into an unused corner. Big improvement.

I have a lovely collection of silk scarves that were the height of fashion back when I was in corporate America. These scarves are inside a brown fabric box that is labeled and sits on a shelf.

My husband was such a dear to give up one of his drawers for most of my scarves. I am sure he is happy not to see them scattered all over the place.

Snow/winter scarves and my neck warmers are in a basket on a shelf.

Lastly, the cotton/summer scarves, because they have less bulk, are hung on a circle scarf holder and hung on a rod.

Other closet organization progress. This was my underwear drawer before:

This is AFTER!

I don’t understand how you can put two socks in the washer and only one comes out. Where do they go? In cleaning out my sock drawer, I put all my athletic socks in one container since I wear them the most. All the orphaned socks will be discarded when I go through the laundry baskets and dryer, in one last attempt to find their mate.

I will be spending the rest of the weekend making progress on the balance of the closet. Hopefully there will be a full closet reveal soon!

Have you completed any organizational goals this month? Happy Saturday and enjoy your weekend!


Easy Valentine Garland

Can you believe that there are only 9 days left to January? I’m embarrassed to say I haven’t properly stored away some of the Christmas items, but have an end of the month deadline to do so. It is hard, however, not to think ahead to February.

There is an abundance of Valentine craft paper leftover from all the years of making craft projects with the children. In an effort to use some of it up, I made this very simple Valentine garland.

The heart-shaped cut out is from Michaels, but you could easily make a heart pattern, trace it and cut it out. Would also be fun to do different sizes.

Line up the hearts in the patterns you like. I used Baker’s twine because of the red/white color, but any string will do.

Glue one heart to the twine and then press the other heart on top. I placed the string to the upper part of the heart, which allows the hearts to hang without flipping.

Decide the distance between hearts and repeat the process.

Let the hearts dry and flatten out any glue bumps.

Hang wherever you need some Valentine cheer!

A quick and easy DIY to make your February sweeter!


A Few of my Favorite Things

Do you have a favorite item or part of your home that brings a smile to your face or a boost to your spirit? These are the things that if you had to move, you would definitely take them with you.

I suppose organizing guru, Marie Kondo would say these items “spark joy”. In the quiet mornings, when I walk around the house with my cup of coffee, I feel so grateful to be in a place I love. Here are a few of my favorite possessions.

The chair above is a grand, old chair. It was covered in some ghastly burgundy material and I am so happy with the lighter, playful fabric chosen for the back. The seat is a neutral linen. Both fabrics highlight the carved detail of the frame. This is the type of chair that when you sit in it, you feel like royalty.

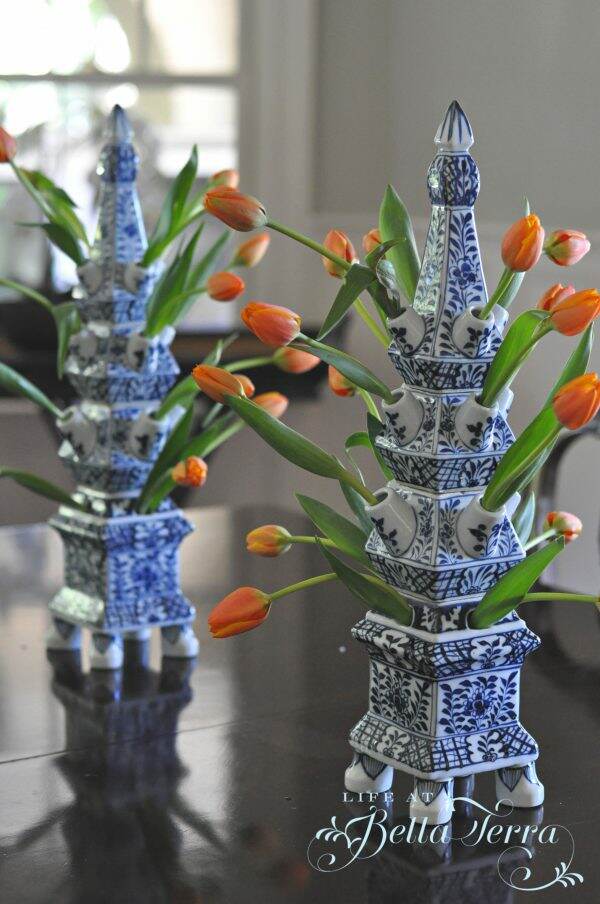
My tulipieries. I first spotted these during a trip to Amsterdam and have always wanted a pair. I purchased them last year from The Enchanted Home and love to fill them with a variety of flowers. They ooze happiness!

The Wedgwood Wild Strawberry tea set was discovered during a shopping trip to Harrods in London many years ago. I remember having sticker shock because I thought the price was in euros vs. the British pound. But I was at the register and wasn’t about to put them back, so I swallowed hard and probably hid the receipt from my husband! Definitely one of those well-worthwhile purchases.

The pastry rack that sits on the kitchen island is the perfect size to break up the expanse of the countertop. Each season I decorate it and it feels unique and rather French. Don’t recall where I got it, but it’s a keeper.

Our duvet cover is Shore Rose by Taylor Linens. Each night when I tuck myself into bed, just looking at this sweet fabric makes me happy. It’s soothing and peaceful.

I found this ornate carving of Mary and baby Jesus in an antique store in northern Arizona. I have never seen one with an oval glass dome on an oval wooden base. I change out the flowers surrounding the statue with the season. It’s hard to get a good picture of the details due to the reflection in the glass, but it’s a beautiful piece and one that I cherish.

My first oil painting. I finally had it framed and it sits on a small easel on the living room sofa table. It was intimidating to take an oil class at the Scottsdale Artist School with master painters, but I like the results.

Our dining room chandelier was brought with us from our last home. Illuminated once by candlelight, we had it wired for today’s use. This would definitely come with us to a new house. It is elegant but not too gaudy.

The antique sofa that sits in our master bedroom was a purchase from the Brimfield Antique Show. Covered in French grain sacks, it was in our barn for years as I pondered what to do with it. Finally, a friend suggested a large houndstooth fabric and voila! It took the upholsterer several months to do it, but I love how it turned out.

Lastly, during a trip to Paris with my dear friend, Susan, I purchased several glass Christmas ornaments. I keep them in a footed trifle bowl on a living room end table all year round. They are so pretty and I can clearly remember that cold day in November when I purchased them and carefully carried them back to the States.

There are so many things I love here at our home, but these items speak to me daily. This year I would like to go room to room and get rid of those things that are just filling space, but do not fill my soul. What do you have in your everyday life that makes your heart happy?

Happy Tuesday, my dear friends!


Meyer Lemon Marmalade

I stumbled across this 2008 recipe from Simply Recipes and just happened to have several Meyer lemons that needed to be used. I am one of those people who love marmalade~~on freshly made bread with a cup of tea or coffee. There is something so romantic and very British about it.

Meyer lemons are a hybrid of a regular lemon and an orange. The skin is thinner and it is sweeter than a regular lemon. With this recipe, please note that you cannot substitute regular lemons for Meyer lemons.

If you live locally, Whitfill Nursery on Glendale Avenue is selling boxes of gorgeous organic Meyer lemons. With only 3 ingredients, you can have your very own fresh marmalade. What is also important to know is that the ratio for this recipe is 1:1:1, which makes this a simple recipe to use with any quantity lemons.

The recipe calls for 2 1/2 lbs. of Meyer lemons (about 9 lemons), 6 cups of water and 6 cups of granulated sugar.

After scrubbing the lemons clean, and discarding any damaged ones, I prepared the lemons by cutting 1/4″ off from both ends.

Working one lemon at a time, cut the lemon in half lengthwise and then cut the lemon half into several segments, lengthwise.

As you cut the lemons into segments, if you can, pull off any exposed membranes.

When you get to the final segment, cut away the pithy core. Remove all seeds from the segments. Reserve the seeds and any removed membrane or pith. You will need these later.

Cut each lemon segment crosswise into even pieces to make little triangles of the lemon peel and pulp until you have 6 cups of chopped lemons.

Put all of the seeds, membranes and pith you removed from the lemons into a bag fashioned out of two layers of cheesecloth or a muslin bag. I used my nut bag (from making almond milk). This is now referred to as your pectin bag. Typically one would add store-bought pectin. Since I had never done this before I was curious to try it~who knew this would become your pectin?

Place the lemon segments and 6 cups of water into a large, wide pot. Make sure it is NOT aluminum which will leach. Place the pectin bag in the pot with the fruit pulp and secure it to the pot handle. Make sure the bag is below the surface.

Bring mixture to a medium boil on medium high heat. Let boil, uncovered for about 25-35 minutes, until peels are soft and cooked through. Remove from heat.

Remove the pectin bag. Place the pectin bag in a bowl and let cool until it is comfortable to touch. Once the pectin bag has cooled to the point you can handle it, squeeze it like play-doh to extract any pectin. You should be able to get a tablespoon or two more from the bag. It has the consistency of sour cream. Return this pectin to the pan with the lemon mixture. Notice how I used a latex glove to protect my hand from any residual heat.

Measure out your sugar (6 cups) and add to the pan with the lemon mixture.

Heat the jelly mixture on medium high and bring it to a rapid boil. Secure a candy thermometer to the side of the pan. Make sure the thermometer doesn’t touch the bottom of the pan. The marmalade may take anywhere from 20 to 35 minutes or so to be ready to pour out. Please note that mine took a lot longer than 35 minutes. I think my lemons were extra juicy.

Note the golden color of the jelly

Testing the marmalade to see if it is ready can be done either on a plate or a spoon. I placed spoons in the freezer and when the mixture reached a temperature of 220-222 degrees F, I placed the marmalade on a frozen spoon and cooled it on a plate in the refrigerator for a few minutes.

When the jelly holds its shape (and doesn’t spread out), it is ready. When you push the jelly with your finger, it should wrinkle. If it is not ready, keep testing with a spoon. It took about 4 or 5 tests, before my marmalade was ready.

While the marmalade is in its second cooking stage, rinse out your canning jars, dry them and place them, without lids, in a 200 degree F oven. They should be in the oven at least 10 minutes before using them.

As the time approaches for the marmalade to be done, boil some water in a tea pot. Put the jar lids in a glass or ceramic bowl and pour the boiling water over them to sterilize.

Once the jelly has reached 220 degrees F or its “wrinkly” stage, remove the jelly pot from the heat. Carefully ladle the jelly into the jars, one at a time, leaving 1/4 “ head space at the top of the jars for a vacuum seal. Wipe the rims clean with a wet paper towel. Place the lid on the jar, securing with a jar ring. Work quickly.

The small leftover amount of marmalade was placed in a small bowl for immediate consumption

Allow the jars to sit overnight. You will hear them make a popping sound as the vacuum seal is created. The jelly will firm up as it cools.

I love the fresh, tart/sweet flavor of this marmalade. Now I need to make some fresh, warm bread!

For the complete recipe, please click this link https://www.simplyrecipes.com/recipes/meyer_lemon_marmalade/. Happy Saturday!


The Fireplaces at Bella Terra

With our recent chilly weather, we are getting good use out of the multiple fireplaces at our 1910 home. Fireplaces in the mid to later 19th century were a way to heat houses.

Tippy enjoying the residual warmth of the library fireplace

Many of the original fireplaces were restored and upgraded during the renovation. There is a total of 5 indoors~~ in the breakfast room, dining room, living room, library and upstairs sitting room. The two exterior fireplaces were added when we designed the outdoor terraces.

After doing some research, I believe the shallow ones are known as Rumford fireplaces.

The Rumford fireplace is a tall, shallow fireplace designed by Sir Benjamin Thompson, Count Rumford, an Anglo-American physicist best known for his investigations of heat. He made them smaller and shallower with widely angled covings so they would radiate better, carrying away smoke with little loss of heated room air.

A good example of this style is the one in the upstairs sitting room. It is small and shallow. Here is a picture of it before restoration. The tiles around the opening were narrow, white ones that were chipped and damaged.

Upstairs sitting room fireplace Before

We replaced the tiles with green, crackled glazed ones from Waterworks. I have converted this room into my art room and it has been lovely to paint with a fire going.

Sitting room/Art Room fireplace after

The original fireplace in the library was okay, but I wanted the library to be dark and cozy. I replaced the original mantel with an antique one and changed out the tiles for a deep, burgundy crackled glazed tile from Waterworks. Years later, I was tired of the dark look and brightened it up with new paint and upholstery.

Original library fireplace. Photo taken before we purchased the house.

The library fireplace today.

Beautiful inlaid detailing

The current breakfast room fireplace location was part of the original kitchen. The chimney was there but nothing else. See the big vent in the photo below. We added on a new kitchen and used this chimney access for a new fireplace.

Chimney vent is the upper left on photo
Breakfast Room fireplace After

What I love about this particular fireplace is that it is on a wall switch starter. It is the first one we turn on to warm up the kitchen. I have fond memories of the children sitting on the hearth drinking cocoa before school.

My unofficial office is at the breakfast room table where I get to enjoy this as my working view. The Batchelder tiles used here came from the original library fireplace.

The dining room fireplace tiles were painted black and once stripped, revealed the same Batchelder tiles from the early 1900s.

In order to comply with City of Phoenix building codes, we had to add gas starters to all the fireplaces during restoration. In the shallow fireplaces, we have ceramic faux logs, which is easier to use than building a wood fire every time.

The living room fireplace tiles were also painted black. Must have been a thing back then? It has the largest opening and as a result, we left it as a wood burning one.

The outdoor fireplaces are new…well, now 20 years old. They share the same chimney. The first floor terrace fireplace is dry stacked stone and during many winter evenings, we have a roaring fire to enjoy.

The second floor terrace fireplace is not used enough, but when lit, it can be seen from the master bed.

There is something very primal about lighting a fire. I could spend hours watching the flames dance and flicker. When I need a moment of quiet contemplation, doing so in front of a fire fills my soul.

Count Rumsford designed these shallow fireplaces in 1796. This design is still used 224 years later! Isn’t that amazing?

Have a wonderful Tuesday! Hope you are staying warm!


DIY Neck Warmers

Many years ago, I was in New York and went to a Christmas market in Bryant Park. I purchased this colorful item below that wraps around your neck and is secured with snaps. The buttons are decorative.

It’s not really a scarf, but I would refer to it as a neck warmer. I LOVE scarves and have several, but there are some days when a woolen, cashmere or even cotton scarf is just too bulky and a silk scarf isn’t enough.

Since we live in a drafty old home, having my neck covered does just enough to ward off the chills. I tend to wear this with a long sleeve t-shirt or light crew neck sweater.

Since I’m not a big fan of turtlenecks, this neck warmer provides the perfect amount of warmth, without the bulk. It snaps on and off so it’s easy to use; no pulling it over your head. There are no long ends to get in the way if you are cooking or doing an activity.

Since I haven’t been able to find anything similar, I decided to make them. I used my original one as a pattern. I also experimented with where I wanted the neck warmer to fasten.

I bought lightweight fleece type fabric, buttons and snaps to do this many years ago. Yes, another project left undone, until now!

The neck warmer before sewing, measured at 27″ x 6″ with 1/2″ seams allowances. You could easily make it bigger too. I have a long neck and short hair and this size works perfectly for me.

Cut out 2 two rectangles of fabric. I used straight pins as guides.

At this point, you have the option to add the buttons and snaps before you sew the rectangles together. Since I used a multi-colored (with different values) fabric, I sewed the buttons and snaps on before I stitched the rectangles together, so you wouldn’t see the back side of my stitching. However, on other fabric, I sewed the rectangles together first, and added snaps/buttons later because the stitching was not visible.

I sewed one end only (the 6″ side) before I determined the placement of my buttons and snaps. Remember the buttons are only decorative; it’s the snaps that secure the neck warmer.

The male parts of the snap are at the opposite end of the rectangle on the button side of the warmer.

Sew the rectangles together (right sides facing each other) and leave a small pocket open to turn it inside out. Slip stitch the pocket to close the seam.

Here is how the finished product looks on. My daughter, Elisabeth is my model.

The next one I made was so much easier. Since the fabric was busy, I added the one button and snap after sewing the neck warmer pieces together. I wanted to see how one vs. two snaps worked.

With one button you can wear it like it is above, or turn the neck warmer where the button is sitting to one side for a completely different look.

The next one I made is with a fabric that felt almost like cashmere. Being solid black, I decided to sew on the snap but left the button off. Instead I used a jeweled pin, which can be interchanged, for a dressier look.

The original one I had a cowl neck placement. I rearranged the snaps on my original one because I prefer this style.

There are endless ways you can get creative with these, depending on where you put the snaps. For just a few dollars, you can make them out of various fabrics and the button selection is endless. You could add some top stitching too or use two different fabrics on the same neck warmer.

These neck warmers also work well when I am having one of those days when I’m hot, then I’m cold, then I’m hot again. Being able to snap it on and off and not needing a mirror to make sure it is organized properly is very convenient.

I hope you enjoyed my first DIY project for the new year! Happy Wednesday!