1

Valentine’s Day Table Inspiration

For many years, we would host our annual Valentine formal dinner party for 12 people. So why not this year? It took me all of January to recover from the holidays! And before I knew it, it’s February. Lack of good planning on my part. Instead, this Valentine’s Day table inspiration is a romantic setting for two.

Sweet pink bowls from my neighbor’s yard sale

What are your Valentine plans? Do you go out to dinner? Stay home and cook a special meal? Nothing?

This year, instead of it being “just another Friday”, I will be making a special dinner for just my husband and me. It is our first Valentine’s Day as empty nesters so it is important to make it unique, right?

Picking the Location

I always find it fun to dine in different areas of our home and property. So this year I selected our front hall to set the Valentine dinner table. We’ve never eaten here before. There is already an existing small drop leaf table and it was easy to just slide 2 chairs over from the adjacent dining room.

Setting the Table

Setting a beautiful table isn’t intuitive for me. I often try several different combinations of chargers, plates and glassware before it feels right. Being a visual person, I need to see it first before it gets the thumbs up.

Since the table is small and the chairs are upholstered, a runner seemed to be the best solution vs. a floor length table cloth. This pink double hemstitched linen one is from Williams Sonoma. It’s a bit long for this table and I experimented with fanning the ends out to tucking it in. I’m clumsy enough without additional tripping hazards!

Upholstered Chairs from Ballard Designs

I do like the look of a charger under the dinner plate. However, the first chargers I selected were way too big, so I settled on these brass ones. Next, what dishes to select?

My very first china set, Juliet from the Romance Collection by Royal Doulton is appropriate for this holiday. This discontinued pattern still brings me great joy. I love the tiny pink flowers in the pattern and consequently, pick pink crystal glasses to match..

If you collect pink glassware, you know the color of the glass can vary from shades of pink to almost orange. I selected the paler pink glass on the left to use as a water glass. The etched pink wine glass is from Pier 1.

Checking for water spots

Silver flatware tends to be my first choice, however, I am fond of this set because it picks up the gold tones on the plate (and doesn’t require polishing!). Napoleon Bee, by Wallace was purchased from Horchow. The gold accent flatware isn’t currently available at Horchow, however, it is on sale at Neiman Marcus.

I tried adding my Valentine garland as table decoration (see post here), but I really didn’t like it. Too kitschy plus it looks much better on the dining room mantel.

Candlelight is a must for a romantic dinner. These low profile brass candlesticks from West Elm are the right size for the table. If you are looking for great tapers, I also recommend West Elm’s.

Decorating the Room

Remember the pink and white balls I hung in the dining room for Christmas? (see blog post here). I thought they would be a fun addition to the front hall. Hung with fishing line, these few balls add a bit of whimsy to the table make the room feel special.

Flowers were a bit of a challenge as there isn’t a great deal of space between the plates. Using mercury glass votive holders from West Elm as small vases, the hydrangeas, wax flowers and greens provide the right height and filler. Fresh flowers from Safeway.

The Results!

Here are some other photos. As a result, I hope you are inspired to select a different location for your romantic dinner this week! Be creative!

If the weather is warm enough, we might even be able to leave the front door open during our candlelight dinner.

Happy Tuesday! Wishing you a glorious day!

This post shared with Between Naps on the Porch Tablescape Thursday #642

If you enjoy this post, please share on Pinterest.


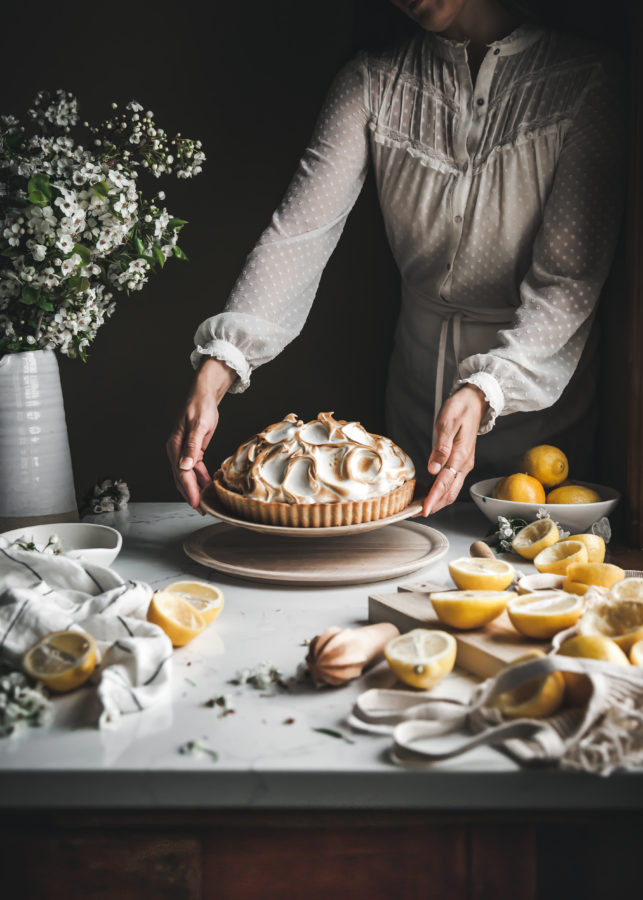
Lemon Tart with Mile High Meringue

My mother always made the best lemon meringue pies. After she passed, I tried to find her recipe but to no avail. I attempted making one from an online recipe and it was a complete failure. The meringue was loose and runny. I never made another.

One blogger I admire greatly is Kayley from The Kitchen McCabe. Not only do I love her photography, but the recipes I have tried have all been winners. When she posted this one recently, I was inspired to try again, in honor of my Mom. Check out her picture of this recipe. I have photography envy.

Mile High Meringue & Lemon Tart
The Kitchen McCabe-her drool-worthy photography

Just before I gathered the ingredients for this, my dear friend, Dr. Ryan Krch brought me a bag of Rangpurs, from his father’s tree. He mentioned that his mother always used them in her lemon meringue pies. Since I had never even heard of a rangpur, I thought I would substitute these for the lemons in the recipe.

As a side note, if you are in need of any skin or cosmetic work, I highly recommend using Krch Aesthetic Medicine. Ryan is such a good friend, a skilled physician and is extremely trustworthy.

The Rangpur lime is said to have originated in the Indian subcontinent and has nothing to do with limes. It is bright orange, about the size of a clementine and a cross between a lemon and a mandarin. It is easy to peel and segment. The juice is extremely sour, like a lemon’s, but with a deeply floral honeysuckle aroma. Apparently you can use the leaves in cooking too. Who knew?

Rangpurs

The crust is a combination of flour, butter and confectioners sugar. Though crumbly, it surprisingly held together when pressed into the tart pan.

The crust requires parbaking. I keep a Ziplock bag of reusable dried beans just for this purpose. Lining the crust with parchment paper, I filled the pan with beans.

After removing the pie weights (beans), the crust bakes for another 5-8 minutes to a light brown color.

The filling is a combination of eggs, sugar, lemon (or rangpur) juice, salt, butter, heavy or coconut cream and vanilla.

Whisk the egg yolks, whole eggs and sugar until combined. Add the lemon juice, salt and then eventually the butter pieces. Check out our freshly laid eggs~~the color of the yolk is nothing short of magnificent!

The filling thickens rather quickly so make sure you keep whisking during this phase. Bake the filling in the crust to set it. Once the filling is cool, cover and place in the refrigerator to chill.

Kayley’s instructions for making the meringue are very good. In her blog post she explains the difference between the different kinds of meringues~~Italian, Swiss, and traditional. Once made, spoon the cloud-like meringue on top of the filling.

It was rather fun to pile on this marshmallow-fluffy topping.

Caramelize the meringue using a kitchen torch. This is optional, but I believe it was the finishing touch on this delicious dessert.

I loved the flavors of the Rangpurs but I imagine it would be equally divine with lemons.

The tart filling, the sweet meringue and the buttery crust are the perfect combination. This will keep for several days in your refrigerator. Each slice is rich so you can feed many with this!

For the link to The Kitchen McCabe recipe, please click here.

I hope you have a spectacular Saturday. The freezing temperatures are finally over and I detect a hint of Spring in the air!


Learning to Paint

Sunflowers 2016

Learning something new later in life can be a bit of a challenge. After my 2nd child went off to college, I decided to try my hand at painting. A dear gardening friend/art teacher began giving classes rather close to my home and I thought, “Why not try this?”

My first art classes involved acrylic paints. The paints dry quickly on the canvas and clean up is easy with soap and water. The very first class we learned about shapes and shadows. The teacher, Joann Augur, provides thumbnails of paintings as inspiration. You pick one and then attempt to paint it in your own style.

I remember that first class. I literally knew nothing. Gesso? What is that? Alizarin red? It was all so foreign to me. Putting the brush to the canvas was intimidating. Where do I start? What colors to choose? What do I paint first? But Joann’s kind and gentle guidance, made the experience less painful.

Here is my very first acrylic painting done in the August 2015. The purpose of this lesson was to train our eye to look at shapes not the object. Where is the light coming from? What is the shape of the shadow? Though it’s hard to tell, but this is an abstract version of an apple. I recall being so proud of this!

My very first painting in acrylics

Here are some details about the class I take. The session typically last 4-6 weeks and we focus on a topic~~color, perspective, landscape, faces, values. The class is held on either Tuesday or Wednesday for 3 hours; 1-4 p.m. or 2-5 p.m. The cost is usually around $225.00 or so.

Here are some other earlier paintings from 2015. Joann told us to paint our shoe. My shoe is gray and splattered with paint and stains. I took artistic license and changed the colors.

What I love about the class is that people with different levels of experience are welcomed. Some have never even picked up a brush and others have been painting for years. Joann is such a good teacher she is able to provide challenges for the more experienced students, while taking time with the newbies.

On to 2016. This landscape was a happy accident. I failed to completely paint the background before I added the trees. Sometimes mistakes can be a good thing as it looks like the sun is peaking through the dark sky.

Feeling a little more confident after a few months of classes, I decided to try a seasonal Valentine painting for my home and it was the first one I framed. I display it every February and it makes me happy!

One of my favorite classes was learning about the Masters and trying to replicate their paintings.

Cezanne inspired oranges/color
Long necks were a signature of Modigliani

Sergei Bongart class

In 2017, our Winter class focused on color and we learned how to paint flowers. At this point, my fears of painting have subsided and I have relaxed the death grip on my brush.

In the Spring of 2018, we focused on painting faces and people.

In addition to acrylic painting classes, I branch out to try oil painting. A few of my master painter friends are students at the Scottsdale Artist School. Talk about getting out of my comfort zone! Oil paints are so different from acrylics~~they are much more expensive, don’t dry quickly and require a different set of blending skills. Instead of painting from an image, you paint from a real life set up. That first class I felt like a deer in headlights.

The real life set up~~learning to paint metals (copper)

This was my 3rd oil painting attempt. Both workshops were given by Nancy Chaboun, a fabulous artist and teacher. I highly recommend taking a class from her. She is delightful and very talented.

Since each student has a different perspective on the still life set up, each painting is a bit different.

Still life set up

During this time, I continued to take acrylic classes, which are much closer to home. Below are a few I completed in 2018. You can see my progress, I hope!

Last year, I spent some time finally finishing some paintings that were incomplete. During the 3 hour class, I rarely finish a painting in class. If I like where the painting is heading, I tend to finish it at home. If not, it sits for months until I decided to either paint over it or finish it.

This is one of my favorites, inspired by Romona Youngquist. Not only is she a talented painter, but she also bakes beautiful breads. To see more of her work, click here. I would love to copy everything she paints.

Last summer was the first time I took my supplies and easel on vacation. It was a relaxing way to paint. The flowers below were inspired by Cecilia Rosslee. You can purchase her paintings on Etsy. Click here for the link.

Inspired by Cecilia Rosslee

As I start a new art session, I look forward to getting better at this. Painting is a bit like golf. One day, you play a spectacular game and the next day you can’t even hit the ball. I have only taken two classes so far this year and neither painting is even close to being finished.

Tried my hand at watercolor/gouache – Summer 2018

If you live in Phoenix and want to start painting, Joann Augur is located at the Studio for Creative Development at 12th Street and Glendale.

I hope this post inspires you to try something new. I find as we get older, it is so easy to get stuck in the same routine. Our paths to learn are not as available and we must continue to stretch ourselves, or we will become old and boring. Maybe someday, I will be able to sell my work.

Wishing you a creative Wednesday!


The Best Kind of Friend

The human-canine bond dates back thousands of years. In the United States, over 48% of households have a pet dog.

A hundred years ago, essayist and naturalist, John Burroughs wrote that with a dog, “You are alone and not alone; you have both companionship and solitude.”

For me, that goes for all our pets. When they are puppies or kittens, they require work and attention. But once they settle into a more adult rhythm, they are agreeable to be our quiet shadows. They provide soul-mate level company~~just happy to be with me while I do my tasking, contemplation or creation. A gentle presence that we often take for granted.

Our dogs are the focus of today’s post. As you may know, we have two dogs, Cooper and Sox.

Cooper, an Akbash, a Turkish breed is 6 years old. He stands tall and weighs 125 lbs. In spite of his sweet disposition, he has a booming presence and a hefty bark. With nearly 2 acres to protect, he takes his job seriously, patrolling and protecting our family. Instinctively, he will chase coyotes off the property and always alerts us when something isn’t quite right. When he stands on his hind legs, he can easily see over our 6′ walls.

Sitting down while patrolling the front yard

Sox, a Beagle mix, will be 13 this year. His hearing has diminished and his eye sight is questionable, but his nose is as sharp as ever. Once he is on the scent, it’s hard to distract him. He is my daughter, Elisabeth’s dog and she has adored him since he was a puppy. The lessons a child learns by loving and caring for a dog is priceless. They have grown up together.

Scientific research about our bonds with dogs and other animals has grown in recent years. Studies show just how smart dogs are and the importance of the connection between us and them. Research has known that just being with a dog can lower our heart rate and our blood pressure and we lower theirs. Dogs can reduce our stress even when our closest human connections fail.

Checking out the ducks in the pool

A study from the University of Buffalo suggests that your dog will be more of a comfort to you in a given stressful situation than your spouse. Just petting a dog (or cat) can reduce stress-related cortisol levels. Dogs are more expressive when we are looking at them, and those of us who love dogs may live longer, healthier lives with them.

There has been analyses about the chemical connection and the release of oxytocin, the feel-good “love” hormone when we look into the eyes of our dog. We feel good.

When my father was living with us during the last few months of his life, the dogs never left his side. They would settle in at his feet and stay there. Just days before he died, it was as if the dogs knew he would soon be leaving us. They were his faithful guardians to the end.

Best-selling author, Sy Montgomery states, “Dogs see who you really are. They don’t care about your eye makeup or if your hair is combed. They see right to your heart, and they don’t get waylaid by that other stuff.”

Our dogs are an integral part of our family. I am so accustomed to them being by my side when I am gardening, gathering eggs or walking through the house. They follow me everywhere. Cooper and Sox are a unit and rarely do you find one without the other.

They provide countless moments of joy and at the end of the day, when they are curled up and sleeping, all is right with the world.

Sitting down while patrolling the back yard!

Unconditional love and a deep rooted connection is what we get from our canine companions. When the dogs sense I am stressed, they don’t leave me alone, but lean in a little. I think it is their way to let me know I have their support and love.

What our dogs get in return is the best care and attention possible. We keep them healthy and happy with a big yard to play, homemade dog food and treats to eat (see previous post here), and plenty of human interaction.

Losing a pet is an unexplainable grief. I once met a pet grief counselor (who knew that was an occupation?) who told me the reason God made the lives of dogs so short, was so we would be able to love many dogs in our lifetime. I like that.

Here’s a short tribute to our previous canine companions.

Lightning-an Anatolian Shepherd
Ruby-Black Lab mix
Tristen-a Cavalier King Charles Spaniel

Do you have a dog? Or other pet? What makes your relationship special?

Wishing you a low-stress Tuesday. Just know that if your blood pressure is up or you are feeling unloved, go and pet a dog.

W. Bruce Cameron dog quotes


Master Closet Reveal

Happy February! January was a blur, wasn’t it?

Last Saturday, I shared the beginning of cleaning out and organizing the Master closet. If you missed that post, click here to see some ghastly before pictures. Though I do have a few more drawers to organize, the bulk of it is FINISHED (at least my side of the closet)! Yippee!

It was a chore sorting through clothes that I haven’t worn in years and finally letting go and donating them. I organized blouses both by color and sleeve length, as suggested by Maggi Heiser, one of my followers who left a comment last week. Thank you, Maggi!

Pants are also organized by color and hang just below the blouses/shirts.

Remember this photo from last week? Here is the before (try not to judge):

And this is how it looks now:

I love my fabric boxes that fit nicely in the shelves. There are 2 different sizes and a total of 20 of them. Each box is labeled which makes it easy to find things, such as bathing suits, bathing suit coverups, small purses, hats, travel items to name a few. I don’t recall where I purchased these but Amazon has an extensive selection.

Affordable racks from Ikea provide plenty of storage for necklaces.

This is one of my favorite closet accessories. A pull-out slide rod for hanging outfits or newly pressed clothing. For less than $20 you can purchase these from Home Depot or Wayfair.

When we were designing the closet, I am so happy I went to the expense of adding a wall-mounted ironing board from Iron-A-Way. It appears they are now readily available from various places online. The quality of this one is very good, plus it is nicely hidden from view with a matching cabinet door.

When we were renovating the house, the only laundry room was downstairs, which is quite a distance from the master closet. Fortunately, our closet is directly above the laundry room, so it was easy to add a laundry chute to drop dirty clothes directly into a basket below. Hidden behind a faux drawer, is the entry point.

Faux drawer is actually access to laundry chute
Laundry chute view from the laundry room

Remember this photo from last week?

This is how it looks now.

A quiet morning in the closet. Window brings in western light.

The jars are from Ikea and are perfect for storing costume necklaces and bracelets, where they don’t get tangled up with another.

This Modigliani inspired painting was done in one of my art classes a few years back. Now that the closet is so clean, it deserved some artwork!

Narrow, flat storage boxes and baskets fit nicely under the hanging rods. This is where I store those holiday sweaters I cannot seem to get rid of and multiple workout jackets/clothing.

I am delighted with my closet progress. I do thank my friend, Ret, who kindly pointed out that this space was a mess and prompted me into action.

Here’s a shout out to Jill at Classy Closets , who was instrumental in creating the closet design. I have used this excellent company many times in other renovation projects.

There is a cedar closet in this area, but I’m a bit “closeted-out” so that will need to be a future endeavor.

Happy Saturday to you! I hope your weekend is filled with relaxation and fun!


Preserved Lemons

The very first time I preserved lemons was back in 2010. It was a failure. It is highly likely I did it incorrectly and based on that experience I never made them again, until now.

A friend recently told me she LOVED preserved lemons and used them all the time. Really? As a result I was inspired to make them again, plus the orchard is bursting with citrus. My friend shared her favorite recipe which was published in the New York Times, March 7, 1999. You can see it here.

According to Epicurious.com, preserved lemons are one of the indispensable ingredients of Moroccan cooking, used in fragrant lamb and vegetable tagines, chicken recipes and salads. Their unique pickled taste and special silken texture cannot be duplicated with fresh lemon or lime juice, despite what some food writers have said.

Since it takes a few weeks to “cure” the lemons, I thought you might want to make them along with me. It’s very easy. In a few weeks, we could try a recipe together using these lemons?

Ingredients

Start with 6 medium-size lemons, 1/2 cup kosher salt, 1 cup lemon juice, 1 Tablespoon cardamon pods and 3 bay leaves.

Preparation

Cut the lemons in quarters, leaving them attached at one end.

Rub the flesh with a little bit of the salt. This is unpleasant if you have any paper cuts.

Place 1 tablespoon of salt in the bottom of a 1-quart glass jar with a tight fitting lid. I used an old Bubbie’s Bread and Butter pickle jar.

In the Jar

Place the lemons in the jar alternating with the remaining salt, cardamom pods and bay leaves, pressing the lemons to fit them snugly in the jar. Note: you really have to push them down.

Pour in enough lemon juice to cover the lemons.

Put on the lid and refrigerate, shaking the jar daily for 2 to 3 weeks before using. Notice how I slipped a Meyer Lemon (orange rind) in there? I figured it wouldn’t hurt as it is considered a lemon.

Two to Three Weeks-Shake

Preserved lemons, covered with liquid and tightly sealed, will keep for several months in the refrigerator.

Some of the recipes from this New York Times article are: Fettuccini with Preserved Lemon and Roasted Garlic; Lamb Stew with Squash and Preserved Lemon; and Swordfish Baked with Preserved Lemons and Olives. Sounds good, right?

The first jar of these I made I DID NOT refrigerate them. I went back to that recipe and it specifically says to never refrigerate. So your guess is as good as mine. Hopefully this recipe will be better.

Has anyone made preserved lemons? If so, please share how you did it and the dishes you use them in.