1

Saturday Meanderings

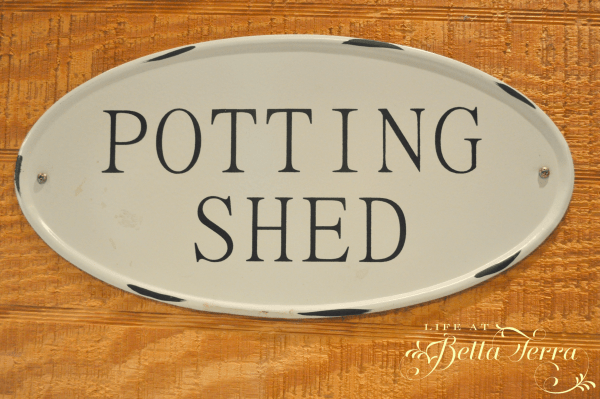
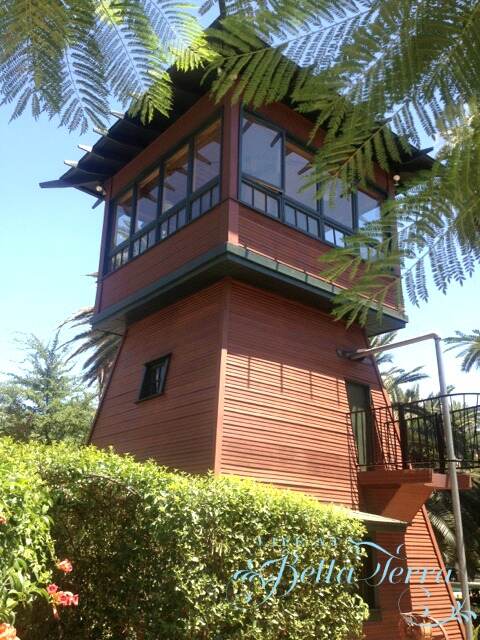
Here are some random thoughts for this beautiful Saturday morning. Yesterday, I completed cleaning the other half of the first floor to the well tower. If you missed Tuesday’s post about the potting shed, click here.

Some fun discoveries in the well tower. I found a box full of old love letters and photos. A lovely trip down memory lane. I often wonder how we will capture the same slices of life with technology? Remember the days when you rushed to the mailbox to see if someone had written to you? Texts and emails don’t seem to hold the same allure.

Young and carefree

I also found a batch of mail from November 2015, unopened. Apparently someone picked up the mail from the mailbox, detoured into the well tower and left it there. Fortunately it was mostly junk mail.

An unexpected well tower project

It is true that starting one project inevitably leads to another. During my well tower cleaning yesterday, I found more wreaths. Tired of having wreaths in multiple places (basement, garage, well tower), I gathered a few of them up. Protecting them in big black garbage bags, I made labels for each and hung them on a blank wall in the well tower.

Garden Update

The poppies are EVERYWHERE! During the day, their purple blooms are wide open. I didn’t realize that poppies close their blossoms at night. Wish I knew how to do time-lapsed photography to capture this.

Poppies open
Poppies closed

It is a hollyhock jungle out there. These perennials have spread all over the yard and are in various stages of blooming.

Primroses are another perennial that provide such an elegant display of pink happiness.

Primroses

Preserved Lemons

I’ve made a 2nd batch of these delectable, delicious morsels. We are using them in nearly everything~~from tuna fish salad to roasted vegetables, fish, and pasta dishes. I cannot believe I have gone through most of my life without these. If you haven’t made them yet, please do so. You will not be disappointed and they are super easy to make. Click here for the recipe.

Moving Forward?

I am excited that Arizona may be one of the states in Phase 1 of opening up our economy! My roll of elastic finally arrived so I am well equipped with masks. The best pattern can be found on the YouTube video from Hobby Lobby. This mask fits my face perfectly. I add pipe cleaners in the top seam so you can mold the mask to your face. It is two layers of 100% cotton fabric with a hole in the back to add a filter if necessary. Masks may become common in the future, so I’m happy I have a few to wear, just in case.

Still Washing Windows

Yes, I am still washing windows. My next big challenge is how to wash the windows at the top of the well tower. I will try Windex Outdoor where you attach the cleanser to a garden hose. The directions state you need to be within 5′ to apply it. Perhaps if I hang out of one of the windows and aim the hose at the adjacent ones?

Birthday Gift

Botswana Agate, Pearl & Swarovski Crystal Bracelet

My sweet 99-year old aunt (yes, 99!) sent me a check for my birthday. Typically I just deposit something like this, but I decided I wanted to buy something special to remind me of her. My Instagram friend, Tanya Lochridge makes beautiful jewelry. I ordered the bracelet above. I think this is a very nice gift to myself.

To Do List Completion

Fixing the wall

This week went by so quickly. I almost feel like I did too much. Keeping busy is my way of coping with the lockdown and we accomplished many projects. But I am pooped and hopefully tomorrow, will be my day of rest.

I was so excited to receive this photo from one of my followers. I have rose envy!! Thank you so much for sharing!

IMG_0199.jpg

Happy Saturday! Enjoy the weekend. Any special plans?


Propagating Roses

I have always wanted to learn how to propagate roses, especially the antique ones we have at Bella Terra. With a clean potting shed (see yesterday’s post here) and sheltering in place time on my hands, I thought I would try this.

Meet Quatre Saisons (Rose of the Four Seasons), R. damascene bifera). We have three of the original antique rose bushes that survived the property renovation. This is the oldest European rose to reliably flower more than once during the year. It is one of the most important historic roses, probably going back to the Romans or earlier. 

Quatre Saisons

This rose is not cultivated for the appearance of its shrubs as they are rather gawky and VERY prickly. Foliage is plentiful and leaves have a serrated edge. The blossoms are a bit unconventional and messy-looking but the scent is a mighty treat for the nose.

The reason I am so intrigued by having roses at Bella Terra is a reference made in a previous owner’s diary on April 1, 1922, when she wrote “saw first rose bloom”. When we were researching the house, we found these diaries at the Arizona Historical Museum. Apparently the roses are referenced many times as an important part of the landscaping. To know I am enjoying roses here just the same way someone did 100 years ago gives me great joy.

In Preparation

In preparation for the propagating process, I scrubbed and cleaned the clay pots I wanted to use. Since the success rate of propagating roses is about 50 50 to 75 percent (according the Dr. William C. Welch), cleaning the pots will help minimize any contamination. I then covered the hole at the bottom with a small rock.

Next I loaded up my clean pots and headed out to the compost pile. There are several sites on Google that recommend the type of medium to use for rose propagation. Our compost soil has always done wonders in the past and so I’m counting on it now.

If you missed my composting post, click here. With the pots filled with soil, it is now time to select roses.

How to Take the Cutting

Take a 12-inch segment of the stem, cutting at a 45-degree angle. The best cuttings usually come from the sides of the bush vs. the center. I made sure I used my sharpest and cleanest clippers, in order to avoid contamination or crushing the stem. I immediately put the cuttings in water while I continued cutting the others.

Cuttings taken from new growth vs. old, hardened wood are more likely to be successful. Spring or early summer is the best time to take these softwood cuttings. Select them in the early morning when the plant is most hydrated. Wish I wore gloves as these roses have such sharp thorns!

Remove Most of the Leaves

Remove all but the top two leaflets on the stem. Then, cut of the stem just above this top set of leaves. Removing the excess leaves helps to divert energy to root production. However, the stem still needs to continue with photosysthesis and feed itself until new roots are formed. Also remove any flowers. The flowers will consume energy, and you want to encourage the stem to refocus its energy on survival by sending out new roots. 

Prepare the Stem for Rooting

Using sharp pruners make a fresh cut on the bottom of the stem just below a stem node. I made the cut at a 45 degree angle. The stem node is where new growth typically forms. Then slice into the bottom stem about a quarter of an inch up, splitting the stem into open quarters.

Using a Rooting Hormone

Though this step is optional, a rooting hormone can help spur the plant into developing new roots. I purchased this rooting powder from my favorite nursery, Whitfill Nursery for $5.99.

Slightly moisten the split end of the rose cutting and then dip it into the powdered rooting hormone. Shake off any excess powder.

Plant the Cutting

Plant the cutting in a container filled with at least 6 inch of planting medium. Some recommend a mixture of coarse sand and vermiculite or a potting mix designed for roses. Keeping my fingers crossed that my homemade compost is sufficient.

Poke a hole in the potting medium (I used a screwdriver) and then insert the stem. Be careful not to rub off the rooting powder. Gently firm the soil around the stem and water well.

How cute is this pot~~a school Mother’s Day project made in 2004 by my son Benjamin!

Selecting the Location

Roses prefer a sunny location, but for rooting purposes it is best that they are shielded from the hot afternoon sun. It is important to keep the soil moist so the cutting does not dry out. Some people put a plastic bag over to create a humid environment.

I have placed the 5 pots on the window sill directly across from my computer, so I can check on them every day. The northern exposure will provide bright light but no direct sun.

Of course, I discovered the following advice AFTER I cut the stems. However, I did remove the flowers and buds, so hopefully I will have success. Here is what I read: “Moreover, avoid taking cuttings when your plant is heavily blooming. The plant is putting most of its energy into flower production rather than root development, so a cutting won’t readily root. If you must propagate when the plant is blooming, make sure to remove the flowers and buds from the cutting.”

I am planning to let them grow over the summer in these pots and then plant them in the fall? Or transplant them into bigger pots with a January 2021 planting? Still trying to figure that part out. If there are any rosarians out there, I welcome your help!

Here are some other photos that I’ve taken over time of these delightful roses. I wish you could scratch and sniff.

Lastly, it was difficult to decapitate the flowers off of the stems for this propagation. But not to fret! I am utilizing all the blossoms in a potpourri I am making for the hen house.

Have you ever propagated roses? What is your favorite species? Wish me luck and hopefully I will have 5 more Quatre Saisons soon!

Wishing you a delightful Wednesday! Today I am still washing windows (ugh!) and making face masks as my roll of elastic finally arrived!

References: The Rose Bible by Rayford Clayton Reddell


Cleaning out the Potting Shed

What started out as cleaning the windows to the well tower, turned into a full day of cleaning out the potting shed. The potting shed occupies the first level of the well tower. If you are new to the blog, the well tower is just that, it houses the well, which we re-activated when we restored this property. To see a previous post about the well tower, click here.

In order to get to the windows, however, I came across this mess. Most of it was my fault, as I recently have been searching for paint to do touch up for both the interior and exterior.

I am still trying to understand how things get so messy. But with many people using this space, it becomes a great dumping spot. The good news is I tackled it yesterday and decided to share it with you today.

When we restored the well tower, this was an empty space. An old tub and sink were “leftover” renovation items and we decided to repurpose them here.

This fabulous porcelain cast iron sink is BIG. One side is very deep and the other shallow. It’s a bit banged up but perfect for washing my garden tools and pots.

Leftover tile from Waterworks was used for the countertop and backsplash. The casement windows provide ventilation and a lush, green view right into the hollyhocks.

Washing the exterior window was a bit of a chore as I had to negotiate my way through the hollyhock jungle!

The bathtub is on a raised platform and is used as a dog bathtub. It’s impossible to get Cooper in there, but it is perfect for the smaller dogs.

The curtain panels cover 3 separate storage areas. I’m not wild about how they look but they are a Waverly old rose fabric and serve a purpose. Maybe they need a shorter hem?

One section is where we put all the paint cans. We have a local hazardous waste area where you can take old paint cans annually. This year I am committed to sorting through all these cans, labeling the good paint and tossing the old.

The other sections have numerous pots and gardening items. An old chippy wire basket keeps miscellaneous pots and supplies on the counter. Garden boxes hold seeds that I will need to sort through to see which ones are still viable.

I found these cute French hooks and put them up to hold my gardening bags. This way I can fill them with my tools and head out to the garden.

After removing two huge black garbage bags of trash, the potting shed is clean. I still have the other side to organize as I approach the final window on the first level.

Here is a larger view of the space. The well tower has 2 sets of spiral staircases that lead to the top. I don’t look forward to scrubbing that.

Entry into the well tower is through these gorgeous Dutch doors on the north and south side.

I am hoping to clean the rest of the room today, however, my back is aching.

Are you tackling any big projects during this lockdown? Some days I feel like it and other days, not so much. I don’t know about you but I am really ready for this virus thing to be OVER.

Have a wonderful and productive Tuesday!


My Easter Table

I know many of us are having smaller Easter dinner celebrations this year. However, albeit cozy, it is important to make it special for several reasons. Easter is a time of rebirth, joy and celebration. Even though we may be apart from our friends and family, we are healthy and safe.

Typically we have our sit-down dinners in the dining room, but since I have a “new” (from a yard sale) table in the family room with 4 “new” (from a yard sale) chairs, this location felt right for 4 people.

I chose the Royal Worcester Yellow Urn/Roses/Greek Key china because of the cheerful colors. An old business friend bought me 4 dishes many years ago. Slowly, over time, I have added to my collection but it is a rather difficult to find other pieces to this pattern.

Check out my adorable DIY bird nests! I am still tickled over how they turned out. If you missed my last blog post, click here. They fit perfectly inside my creamed soup bowl and add the Spring touch the table needed.

Yellow linen napkins are from Sferra. The sweet lamb napkin holders are gifts from my friend, Gwen. I am putting the napkins off to the side in a non-traditional location but this seems to work best with the round table configuration.

It’s hard to have Easter without bunnies! Daffodils were from our local Safeway store. I have no idea where the bunnies came from…maybe I just started with two? Ha!

My latest glassware purchase include these drop dead gorgeous Rogaska Gallia crystal glasses. They stand 9 3/8″ tall and the crystal cuts are stunning. Thanks to my friend, Louise, I was introduced to them at her dinner party last fall. I fell in love with the weight of the glass and was fortunate to find these on eBay.

Though I haven’t finalized the menu, I am hoping we have all the ingredients here so no one has to make a trip to the grocery store. We are wearing our masks out in public. I am encouraged by the latest projections as it appears that sheltering in is helping.

Wallace Silversmiths Bee Flatware from Horchow

Today I am making the annual family Lamb Cake. I am hoping all my siblings and my son are doing the same so we can have our Lamb Cake competition. My mother would bake one every year and it is one of many fond memories I have of her. Here’s a glimpse of last year’s cake. To learn more about the tradition of this cake, click here.

Happy Saturday and wishing you a blessed Easter with your family. May you continue to have good physical, mental and spiritual health!

The post shared with Between Naps on the Porch Tablescape Thursday #653


Making Easter Nests

In setting the table for Easter Sunday dinner, I needed something to make it feel more spring-like. I love birds’ nests and have a few, but didn’t think it was very sanitary to actually place them at the dinner table.

The Royal Worcester dishes I am using for the place settings have a lovely small 4″ creamed soup bowl with plate that I want to place on the dinner platter. Now the challenge is making a nest that will sit inside the bowl. I’ve got this!

Getting Started

After some pondering, and not wanting to go to the hobby store, I searched the house for materials. Leftover bottles of Mod Podge and shredded paper from the shredder sparked me into action.

In order to form the depression in the middle of the nest, I made a ball out of aluminum foil and covered it with plastic wrap. I have not used Mod Podge in years and I couldn’t recall if it would adhere to foil, hence the protective plastic wrap.

Knowing this would be a bit messy, I put down a piece of parchment paper, gathered my supplies of latex gloves, shredded paper, 4-5″ styrofoam bowls, plastic wrap and glue. If you don’t have Mod Podge I would imagine any glue diluted with a bit of water would work.

The Process

Line one bowl with plastic wrap. In another bowl, mix the shredded paper and Mod Podge. Use enough so the paper follows your hand around the bowl. If you use more, the drying time will increase.

Pat the glue/paper mixture around your center ball until you get the size nest you want. Do not cover the ball.

Let dry. I put mine in the sun since it was late afternoon. I removed my ball to make sure my depression was deep enough and clearly defined.

After approximately 1 hour, the nest is consolidated enough but not completely dry. I re-shaped the nests to have more of a rounded base vs. the shape of the plastic bowl.

Like most projects, the more you practice the better you get. The first nest I made, had more glue than the others. However, it did require a bit more drying time. The Mod Podge is very sticky and the shredded paper stayed together.

The Finishing Touches

While the nests are drying, choose your paint colors. Using old cans of spray paint, I selected 3 colors that would resemble a real nest.

Matching spray paint colors to a real bird’s nest

For protection, lay down a drop cloth or plastic, and spray your nests to the color of your choice. Think of all the possibilities! I even used a bit of gold on top.

I let the nests dry overnight. They are nice and sturdy.

The next morning, I added bits of different color moss for additional texture. You can add twigs, feathers or really any yard debris for a more natural look.

Using a glue gun, drip the glue over the nest. Push the moss onto the glue. I placed darker moss on the inside and a lighter one on the top.

Trim any excess if necessary.

Fill the nests with faux eggs or candied eggs ones for color. The nests fit perfectly into the soup bowls.

This project was completely unexpected! It was fun for me to search the house for supplies to make it. Now I am thinking of all the things I can make out of glue and shredded paper. My own version of paper mâché!

This project took approximately 2 hours. If I used less glue, they would have dried faster. You may need to let them completely set overnight. Today, I will leave them in the sun to get rid of the spray paint smell. I like the fact that I can use these year to year too!

I can’t wait to show you how adorable these look on my Easter table ~~that will be Saturday’s blog post!

Happy Wednesday! What are you up to day?


Hello Tuesday Morning!

Taking advantage of the beautiful weather to do laundry on the line

Unlike most bloggers, I do not write my posts weeks in advance. Sometimes I just make my cup of coffee and start writing on the morning of sending it out to you. Especially now, when we are all living in a one day at a time scenario. Today is one of those days where I need to take my own advice, from the post last week on Ways to Navigate Life Now. I am feeling a bit like I’m walking through concrete. But then I scold myself because we are blessed with good health and a safe place to be.

So today I will share what I have been doing to keep busy and focused. Over the weekend, and with the new recommendations about wearing a mask in public, I tried a few different patterns on making masks. It is impossible to find elastic here and though I searched my sewing items, I didn’t find any. What I did find was a terrific collection of fabric! Many of my friends don’t have a sewing machine, but my husband made one without it, just using 2 sheets of paper towels, elastic bands and a stapler.

In searching the internet, there are many choices, but the first one to pop up is The New York Times pattern. In my opinion, it is not well written and when I printed it out, the pictures accompanying the instruction were so small and difficult to read.

This pattern did, however, have 4 long ties on their style mask. I understand health care professional prefer this so they can use it over their N95 masks. The mask’s top ties do not stay on the top of your head, especially if you have straight hair. You must hook them over the top of your ears and tie them behind the base of your skull. The lower ties do help secure the bottom of the mask and these tie behind your neck.

The easiest and best fitting pattern I found online with Hobby Lobby. The video is short, walks you through the steps, gives you pleat dimensions and makes a mask that has an opening on the back to add a filter. I understand a coffee filter or a paper towel works. Click here for the video.

For the ear loops I used thin ribbon. I have very small ears and anything thicker did not stay in place. The dimensions of the mask fit my face perfectly, but was too small for my husband.

With some slight adjustments, I was able to make him a well-fitting mask. Once I get some elastic (ordered it online with a delivery date of next week), I believe this mask will work well for most. Also, I am happy to make masks for anyone who needs them. Hoping it won’t come to that, but I feel better if we are prepared.

I also added pipe cleaners in the top seam that fits against your nose. It was an easy way to bend the mask and make it conform to your face.

Easter is on Sunday and I hope to get an energy boost to do a lovely table. It will only be the four of us, but Easter is one of my favorite holidays. Last Sunday, on Palm Sunday, we missed getting our palm crosses from church.

Being in the DIY mode, I searched the yard and found that palm trees are not equal. Since I needed a certain length of palm frond, the fan palm was the only one that would work. Date palm fronds were too short.

It was a bit of a revelation as I had never REALLY looked closely and noticed the different kinds of palm trees we have. The things we learn during this crisis! It’s all part of being resourceful and creating a new norm in time of need.

I’ve been trying a few new recipes. My daughter, Elisabeth stated she wanted to learn to cook more. A happy benefit for me to spend more time with her in the kitchen. This vegan pineapple, lime, coconut and ginger cake from Twigg Studios is a relatively easy cake to make. Click here for the recipe.

The texture of the cake is more dense, like a carrot cake, and the canned pineapple provides plenty of moisture and flavor. I skipped the part that suggests making pineapple flowers out of fresh pineapple. The icing is a simple blend of coconut cream, confectioner’s sugar and lime juice. Really quite tasty. Happily shared most of it with our neighbors.

On a vegetable note, we also made Baked Parmesan Zucchini sticks from Damn Delicious. They are easy to make and so tasty. Click here for the recipes.

Baked Parmesan Zucchini - Crisp, tender zucchini sticks oven-roasted to perfection. It's healthy, nutritious and completely addictive!

I am still working on washing windows. It’s taking longer than I’d like. In addition to washing windows, I am also cleaning the rooms as I go along. Hoping that accomplishing tasks keeps me moving in the right direction. Being in a funk just isn’t fun.

Thought I would share this picture of Cooper. He’s our first line of defense and does such a great job patrolling the yard and checking out the area. He takes his job seriously, even though he has a sweet temperament.

And you can see another project getting done~~wall repair!

Paws on the 6′ perimeter wall

What do you have planned for the week? Best wishes for a Tuesday filled with joy and simple pleasures.