1

3 Thanksgiving Centerpieces using Plants and Fruits

Each Thanksgiving I try and do a unique centerpiece that reflects the harvest and a season of gratitude. I love using fresh potted plants because I can plant them in the yard or planters after the holiday dinner is over. It seems counterintuitive to be planting in late November or early December, but it is our growing time here in Phoenix.

The autumn harvest is filled with many wonderful fruits~apples, pears, pomegranates, plums, persimmon, dark grapes and figs. Utilizing these in a centerpiece adds texture, color and shape. Plus you get to consume them after the meal is finished.
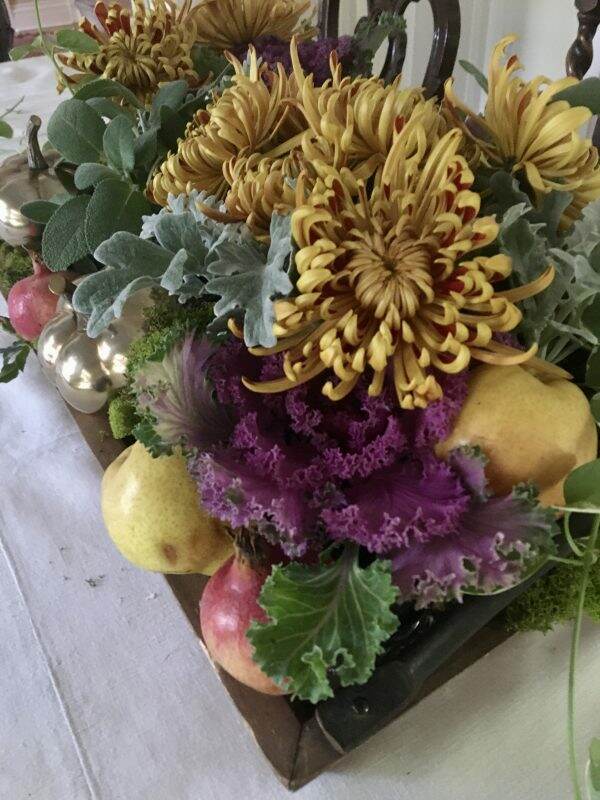
Centerpiece #1

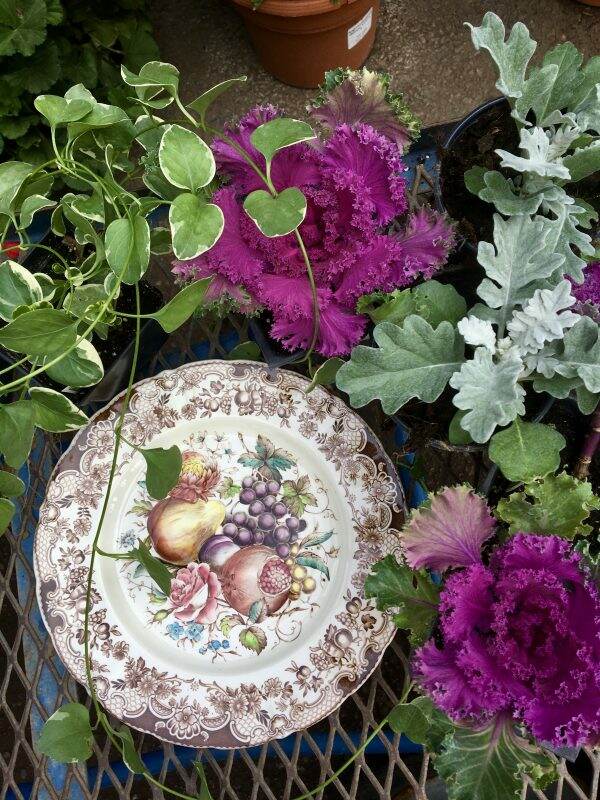
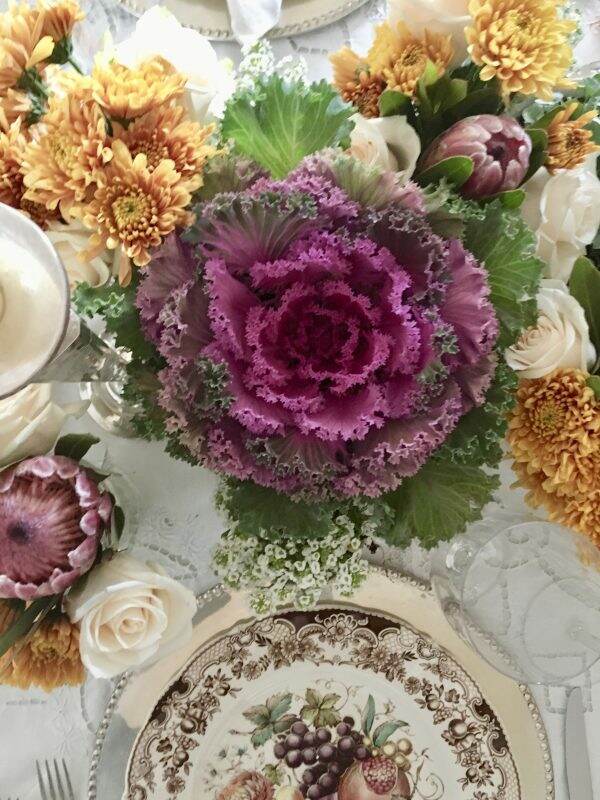
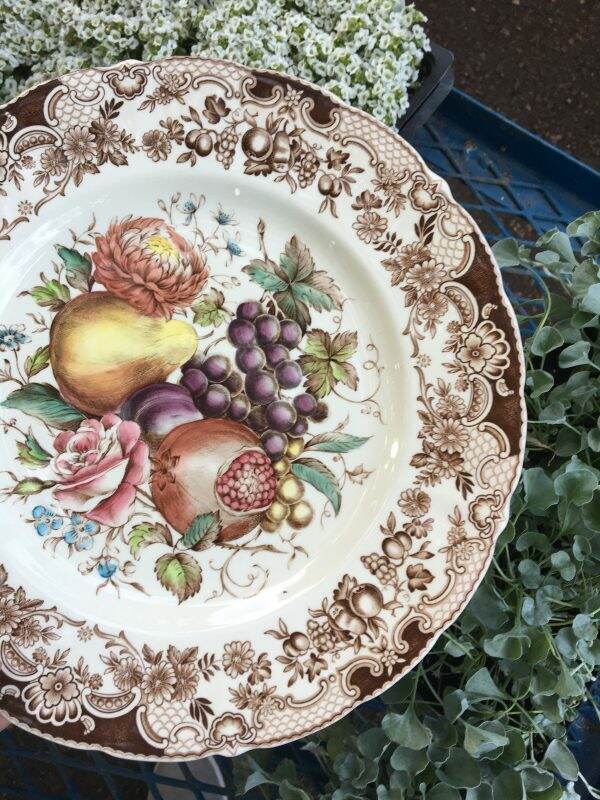
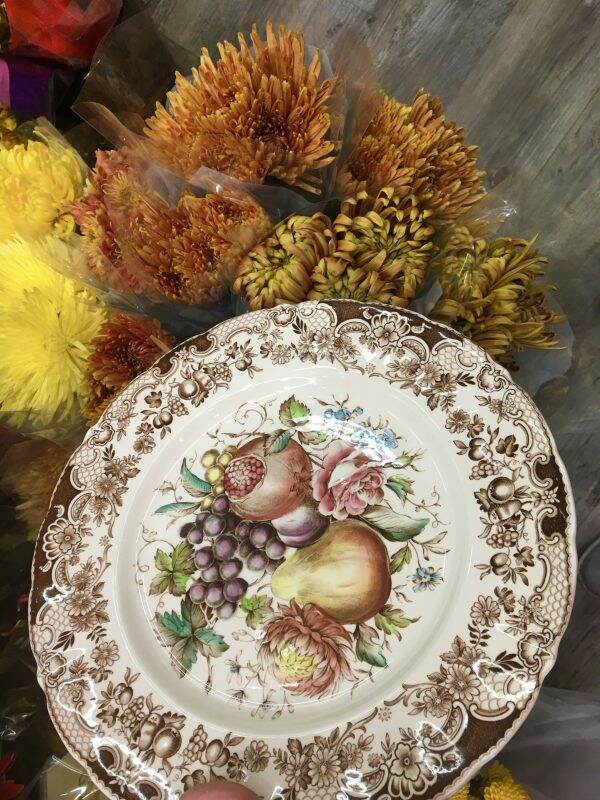
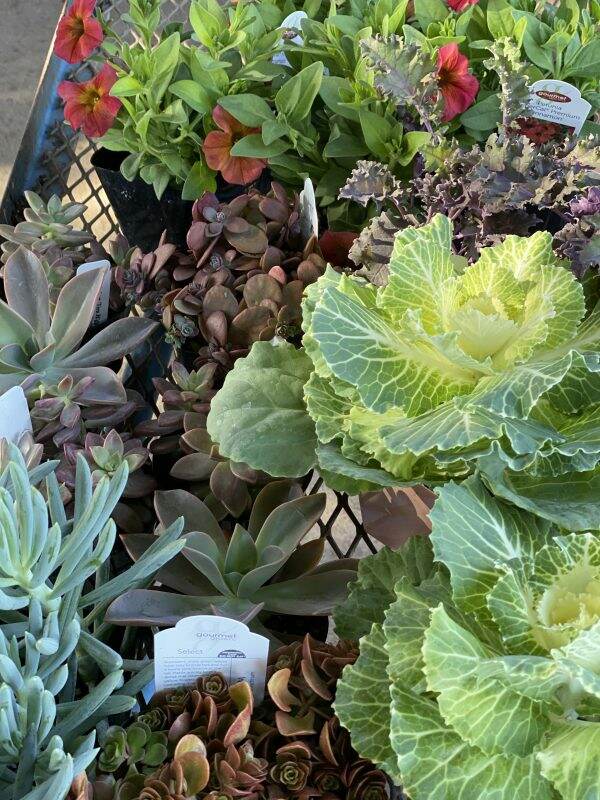
Each year, after I select the dinner plate I will use for my place setting, I take it with me to choose centerpiece items. My first stop is usually my favorite gardening spot, Whitfill Nursery. Here, my Johnson Brothers Windsor Ware works perfectly with the ornamental purple cabbage, alyssum, and the ivy. This tends to be my Thanksgiving plate of choice because of its colors.

The next stop is to the closest florist, which is at our grocery store, Safeway. Here is where I purchase pomegranates, pears, apples and cut flowers to compliment the dinner plate. I try to keep cut flowers to a minimum because they only last a few days, whereas all the other items I can simply re-use.

After selecting the items that you want to use, then consider what vessel or base you will stage them. If you are like me, I always set my table a few days before Thanksgiving. Using potted plants, you will need to water them so make sure that they have a place to collect water. Or you can make your base or vessel waterproof. You don’t need to have excess water leaking out from underneath your centerpiece.

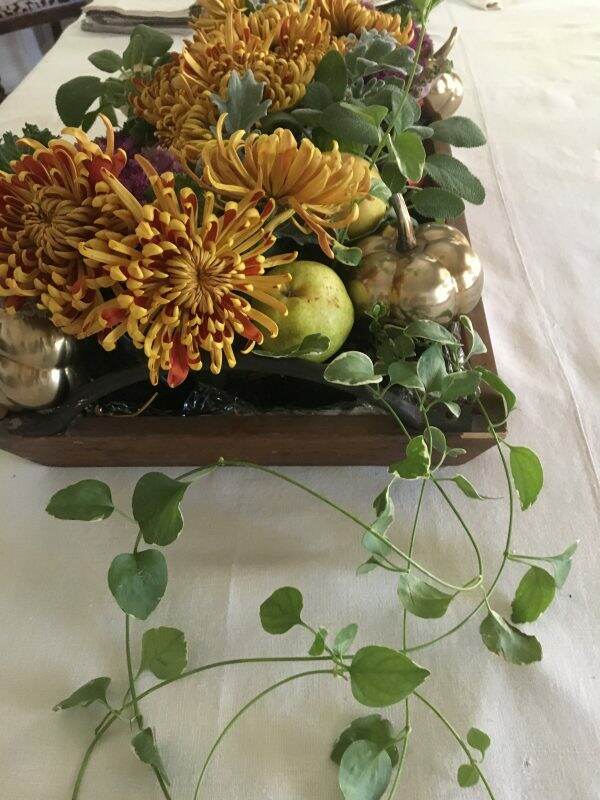
In this particular centerpiece, I am using a wooden tray, that I lined with foil and plastic. Using fresh fruit, moss, brass pumpkins, fresh herbs (sage) and potted plants, it is a low, but abundant centerpiece. The ivy can be woven down the table or around candlesticks.

Centerpiece #2

With a larger table or one with more place settings, here is another way to use a mixture of potted plants, flowers and pumpkins. Using multiple vessels for the plants and flowers, creates a sense of interest, as well as different heights.

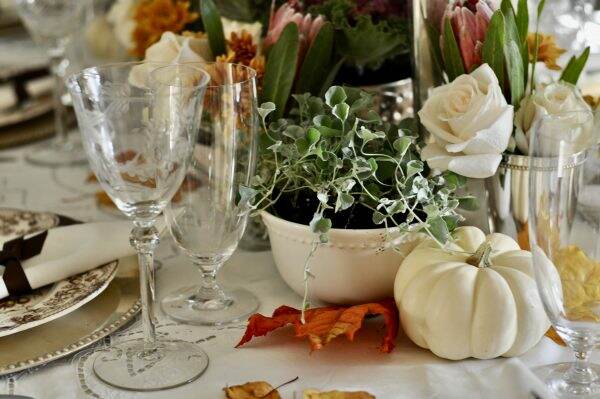
Putting plants in simple bowls, like the white one above from Pottery Barn (Emma), blends in nicely with the white roses and white pumpkins. Proteas, mums and autumn leaves enhance the colors on the dinner plate.

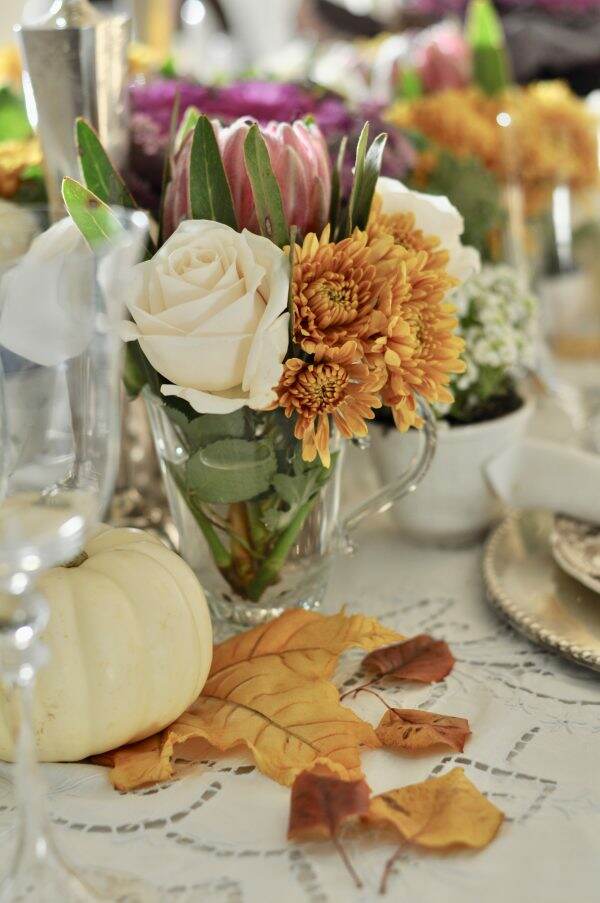
Often we tend to think that flowers need to go into a vase. But by using glass coffee and silver mint julep cups, you have flexibility to tuck the flowers and plants in where you want.
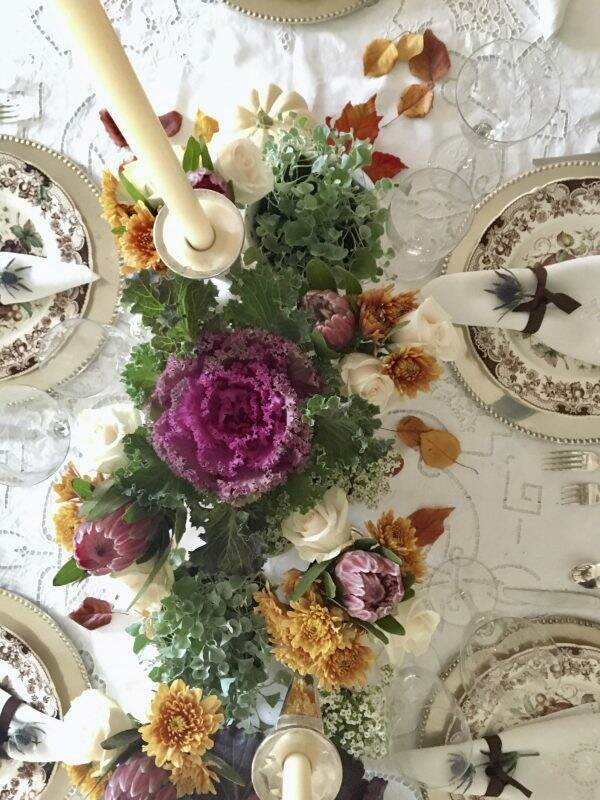
Centerpiece #3

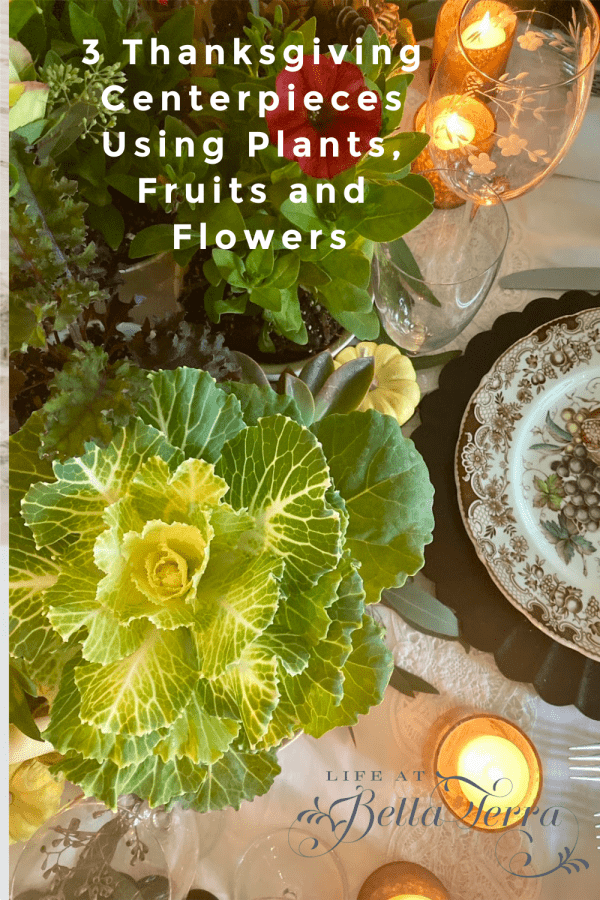
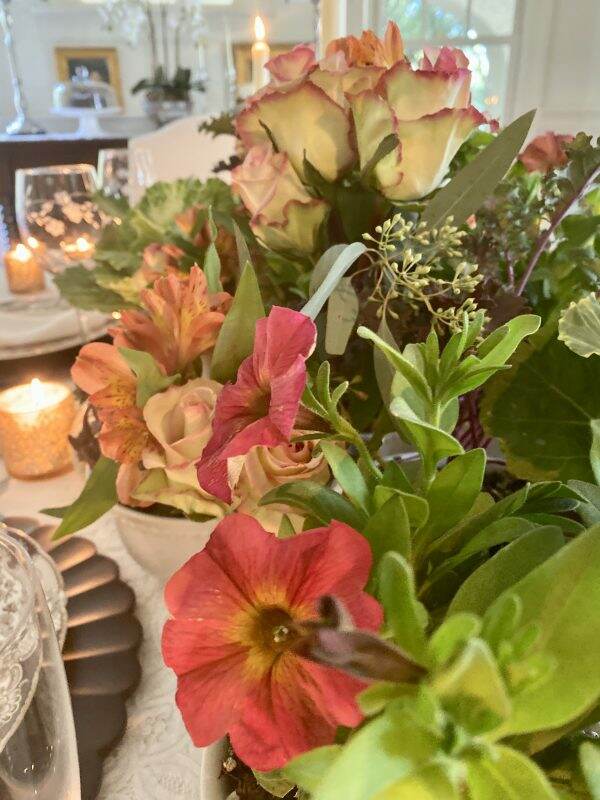
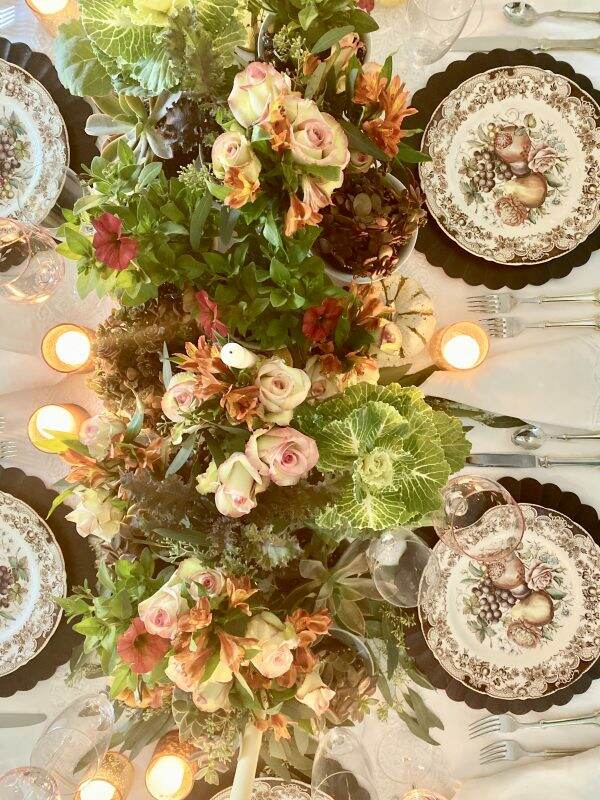
Lastly, this centerpiece uses succulents, copper colored petunias, ornamental cabbages, and red kale.

Adding alstroemeria, peachy colored roses and seeded eucalyptus, completes the fall look. Look at all the lovely shades and textures.

Again I am using a variety of bowls and small glasses to hold the plants and flowers.

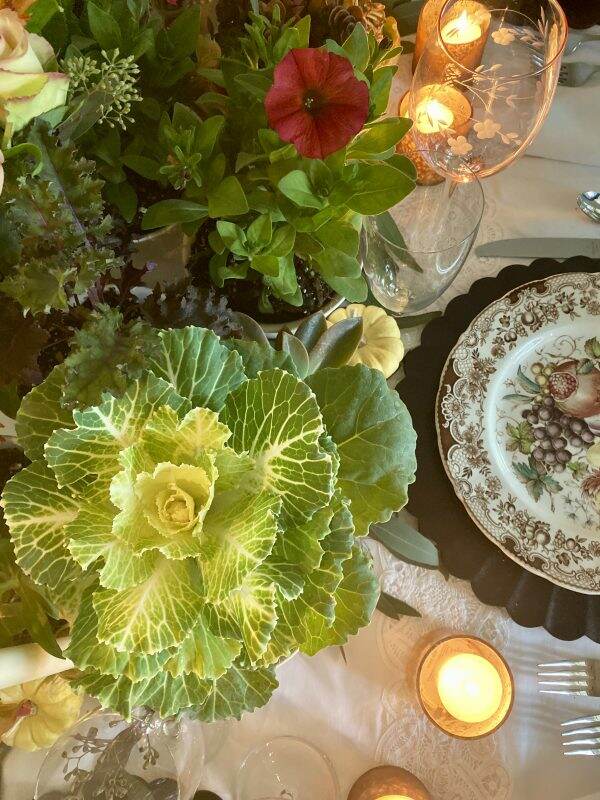
Both white and orange pumpkins are tucked around the centerpiece. A combination of tapers and votives add a magical ambiance.

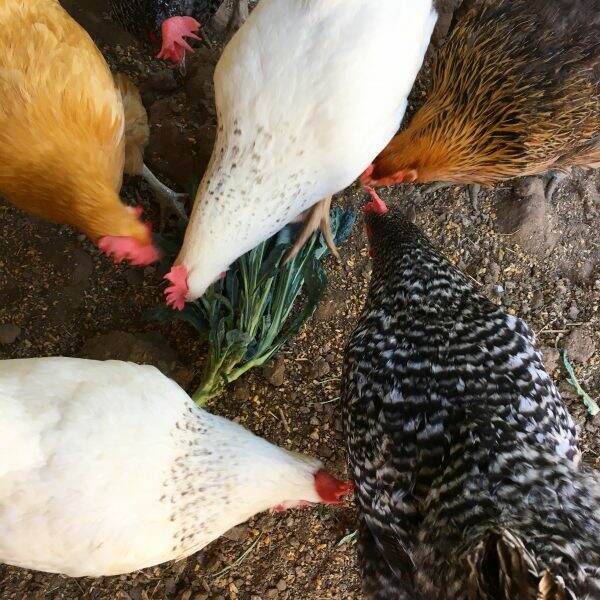
The benefits of using plants and fruits is their extended use once the holiday meal is over. All the plants go back out into my yard and the fruit gets eaten or used in recipes. Of course, we enjoy the fresh cut flowers and then dry the blossom into potpourri we spread in our hen house.

Get a little creative in the colors, textures and vessels in your centerpiece. I hope this post has offered you some inspiration for your holiday~however it may look this year.

And Now More Thanksgiving Inspiration

Kippi from Kippi at Home shows 3 Simple Thanksgiving Table Settings.

Stacy Ling from Bricks and Blooms creates an easy Thanksgiving centerpiece.

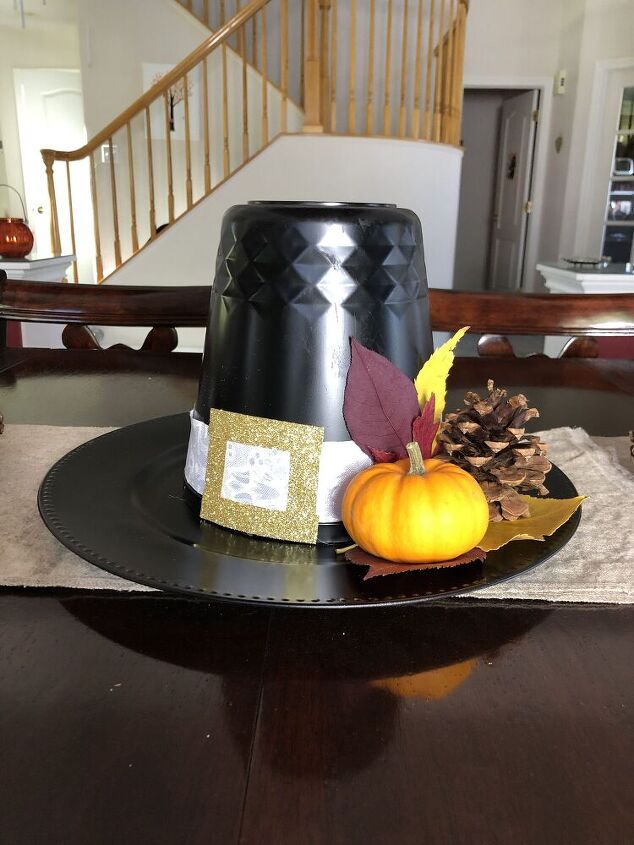
Chas from Chas Crazy Creations makes this fun Easy Pilgrim Hat Centerpiece.

How do you make a simple Thanksgiving centerpiece? How can I decorate my Thanksgiving dinner table? I'm sharing an easy pilgrim hat centerpiece and it only cost me $3.

Cherryl from Farmgirl Reformed shows how to Create a Simple Thanksgiving Tablescape.

Rebecca from Zucchini Sisters has a 10 Minute Thanksgiving Decor Basket.

Olivia from Olivia O’Hern makes this sweet Felt Inspired Fall Garland.

Niky from The House on Silverado shows Three Simple Place Settings

Jemma from At Home With Jemma shows this adorable Vintage Truck Thanksgiving Centerpiece.

Please visit Agnes from Just That Perfect Piece and see her super easy last minute Napkin Rings.

I hope all these wonderful Thanksgiving ideas is getting you excited about the holiday. If you enjoyed this post, please share it on Pinterest.


When a DIY Craft Project Fails

Full disclosure, I am not a crafty do-it-yourself-er. And I am reminded of that when I take on a new cute project and completely screw it up. But like most things in life lately, we need to make the most of it. Here is my story on when a DIY craft project fails.

The Inspiration

Over a year ago, I saw this adorable craft idea on someone else’s blog. Since I have never tackled a project like this, I clicked on all her links and purchased the items needed for this craft. And they have literally sat unopened for the last year. So I decide this is the week to try making it.

How to Stencil a Thanksgiving Napkin
How to Stencil a Thanksgiving Napkin in 5 minutes

Here is how Karen at Sanctuary Home Decor (who just seems to be perfect in EVERY way) made this craft. It is a dinner napkin stenciled with the word “thankful”. She used this for her Thanksgiving table last year. Pretty, isn’t it? And she claims she did it in 5 minutes!

Follow the Instructions

I carefully follow her instructions by first ironing my napkins. Since I didn’t want to completely copy Karen, I choose the word “Blessings” to stencil on the napkin. I proceed to cut out the letters and decorative vine. See below for sourcing information.

In making sure I place the letters neatly, I determine the center letter so I can line it up properly on the napkin.

Up to this point, I’m fat, dumb and happy about this project. And then here is where it starts to unravel. There are only two “S” stencils available and the word “Blessings” has 3 “S” letters.

Applying the Letters

Next Comes Paint

These mesh stencils have self-adhesive backs, however, in order to protect the rest of the napkin from paint, I use blue painters tape on the edges. Working with the plastic wedge recommended with the paint gel, I apply the paint to the stencil.

Of course, mid-way, I needed to move the S from the end of the word to fill in for the missing middle S.

The Disappointing Result

When I peeled off the stencils, the paint has leaked between the S stencils and left a mark. I try covering it up with White-Out…..what a mistake!

So, with 11 napkins to go, I try this again on a new napkin. Changing the word to “Blessed” solves the lettering problem.

Carefully applying the paint, I am convinced this one will be perfect. However, this napkin also has paint blotches. Seriously?!!

Third time is a charm, right? Not for me.

After the fourth failure, I just gave up. At this point, I have ruined 4 napkins and most of the afternoon. Karen said this is an easy 5 minute DIY. What is wrong with me?

The next day, still disturbed over the fact that I am a complete failure on stenciling napkins, I am determined to find a solution.

Making the Mistake Obvious

Fortunately, I purchased 2 additional paint colors for this project. Using red paint, I cover all the black blotches and make them into hearts.

Where hearts didn’t work, I applied some white paint. They certainly are not perfect, but at a quick glance, you almost don’t notice all the boo-boos.

I will use these 4 napkins to wrap baked bread over the holidays, so not all is lost. Who knows? Maybe I will try again as I still have 8 white napkins.

The moral of the story~not all DIY projects are perfectly easy. If I share one in the future, please know that I will warn you about the challenges. In our social media world, perfection is often portrayed. However, in this case it was certainly not my reality!

It is good, affirmative exercise to write the word “Blessed” many times. Because I am blessed to have you reading this (and hopefully laughing about it!).

If you want to attempt this DIY project, here is the link to Karen’s post. Also,

you will need the following supplies:

Napkins of your choice (I used these from World Market), quantity of your choice. I ordered 12.

Good luck! If you do this, please let me know the results.

If you enjoyed this post, please feel free to share it on Pinterest.


DIY Holiday Gift~A Soothing Bath Soak

Yesterday, I shared the steps for making Muscle Relaxing Bath Salts. If you missed that post, you can see it here. Today, I am making another luxurious product, perfect for reducing stress. This has been a crazy year and the holidays, in and of themselves, tend to be frenetic. My focus this year is providing gifts that will help calm, soothe, and pamper my family and friends. So today is the second DIY Holiday Gift idea.

Simple, Clean Ingredients

Again, I sourced Pinterest for this recipe from Sweet Nature’s Beauty. This Chamomile, Lavender and Oatmeal Bath Soak blends dried flowers, oatmeal, Epsom salts and relaxing essential oils. I wish I had dried more of the chamomile flowers in my garden, but instead I am able to purchase these ingredients easily online. To see my garden chamomile, click here.

Chamomile is known for its reducing anxiety and promoting sleep. However, this sweet, floral herb has many other benefits from helping skin irritations to treating cold symptoms. Click here to see the 8 benefits of Chamomile tea by Medical News Today.

Though oatmeal is great for breakfast it is also a wonderful addition to your bath. It is moisturizing, soothing and inflammation-relieving for the skin. For this bath soak, put the oatmeal in a blender to get a finer texture.

Unlike yesterday’s recipe, this one calls for fine Epsom salts, another great source of magnesium.

Essential Oils

Lavender flower buds have been used in many cultures for many years. It is suggested that lavender helps purify the body and mind. Since ancient times, lavender has been used to treat many different ailments, including mental health issues.

In this recipe, I use Chamomile and Lavender essential oils, making it smell SO good.

Mix all the ingredients together. Make sure you remove any dried stems that may still be attached to the chamomile flowers. No one wants dried little sticks poking you while in the bathtub.

Presentation is Everything

Originally, I thought I would put the bath soak mixture into small muslin bags. However, for longer term storage, perhaps a glass container is better?

And since you will need to scoop the mixture out to put into your bath (2-4 big scoops), adding a spoon or scoop is a nice addition. Many different sizes, styles and price points can be found here. The bamboo spoon above is found at World Market.

Again, I did make labels for this bath soak with the ingredient list on the back. Using Avery Business Card #5377, it is very easy to create your own design and print both sides with a template.

As I mentioned yesterday, it would be such fun to put a spa basket together with the Muscle Relaxing Bath Salts and the Chamomile, Lavender and Oatmeal bath soak. In addition you could add the easy-to-make lavender pillow (see blog post here), a dry scrub brush, soaps and a candle for a lovely gift for friends or family. Who doesn’t need some love and attention, especially after this year?

I’ve never made products like this before. Not only is it enlightening and informative, but the results are gifts you would be proud to give. Packaging it up pretty for the holidays will make the recipient of this gift feel extra special.

The Ingredients

1 cup Fine Epsom Salts

1 cup Oatmeal, blended (I did not use instant)

4 TBSP Chamomile Flowers

3 TBSP Lavender Flower Buds

12 drops of Chamomile Essential Oil

12 Drops Lavender Essential Oil

Glass Jars or

Muslin Bags

The Directions

Blend the oatmeal in a blender or Cuisinart. In a bowl, combine Epsom Salts, oatmeal, dried chamomile flowers and dried lavender buds. If your chamomile flowers have stems, remove them. Stir in the essential oils.

Store in either an airtight glass jar or if using in the near future, use a muslin bag.

Happy Wednesday! Have a blessed day.

This post shared with Karins Kottage Wednesday Linky Party #202

Creative Crafts Linky Party #16


DIY Holiday Gift~A Muscle Relaxing Bath Salt

Typically I do not make holiday gifts because I am just too busy around the holidays. And quite frankly, other than making and baking food, I’m not much of a do-it-yourself-er. But 2020 is a different year. We all need more nuturing and pampering, not only during the stressful holiday season, but especially this year. So I stepped out of my comfort zone and am making 2 gifts. Today is Gift #1’s reveal and tomorrow you will see the other.

Also, my blogging buddies, Andrea from Design Morsels and Chas from Chas Crazy Creations are sharing their Holiday DIY ideas at the bottom of this post.

I am a big fan of giving a gift that is consumable, or a commodity that can be used up rather quickly. We all have received those white elephant gifts that we either donate, re-gift or take to a gag party. At this stage in our lives, we just have too much anyway.

With the theme of pampering and reducing stress, today’s DIY is an easy, simple, make-in-your-kitchen item. The ingredients can be ordered online and delivered so you don’t even need to go to the store. And I believe it to be timely (at least for me), because I have not exercised as much this year. Now that the gym is open, getting back into it is hard on my muscles.

And with the colder weather coming, there is nothing more relaxing and calming than a nice long bath.

Magnesium Flakes vs. Epsom salts

These Muscle Relaxing Magnesium Bath Salt recipe is from Pinterest and the original author is Laura, from Simply Laura Leigh. What I like about this particular recipe is that the ingredients are simple and clean. I have never used Magnesium Flakes vs. Epsom Salt so I did a little research.

Magnesium is world-renowned for its health benefits such as aiding sleep quality and relieving muscle tension. Epsom salts aren’t actually salt, but magnesium sulphate. They are sourced either from naturally occurring springs, or are created from synthetic materials.

Magnesium Flakes are a magnesium chloride solution which has been heated up then cooled down to create a hard sheet of highly-concentrated magnesium chloride that is then broken in to small pieces to create the ‘flakes’. Magnesium chloride is a naturally occurring compound which can be mined from ancient sea beds or in open-water sources like the Dead Sea.

While the appearance and application may be similar, the ‘unseen’ difference in absorption between Magnesium Flakes and Epsom Salts is what really sets these two compounds apart. The magnesium in magnesium flakes is a type of magnesium that is better absorbed and better processed by your body. The magnesium in Epsom salts is harder for your body to absorb and quickly processed out.

Benefits of Pink Himalayan and Baking Soda

Pink Himalayan sea salt is able to generate negative ions in the air, creating the type of calming effect many people experience on a saltwater beach.

Baking soda is a remarkable ingredient in the bath. Click here for the 10 benefits of baking soda on your skin from Medical News Today.

Mix all the dry ingredients together. Eucalyptus essential oil is my choice for this bath salt mixture, however, you can select any essential oil you want. Not only does eucalyptus oil open your nasal passages but it also eases joint pain.

I have never worked with shea butter before. Because of its moisturizing qualities and high vitamin content, shea butter is a great addition to these salts. So helpful with dry winter skin! I broke the butter up into smaller pieces and mixed it in with the other ingredients.

The Container

Naturally, since these are gifts, I want to present them in a pretty glass container. I found two sizes and styles at World Market, but if you can find them online here.

The Gift Tag or Label

You can either label or tag your gift with the ingredients. Using Avery Business Cards #5377, I am able to create my own design and add my logo. Avery has an easy design format to use online, especially if you use their templates. On the back is the ingredient list.

The Scoop or Spoon

These natural bamboo spoons work well to scoop the bath salts out of the container. Again, I bought these from World Market, but look at the variety of scoops here on Amazon! With this set above, I also have the forks and knives.

The Presentation

What a relaxing and pampering gift to include these muscle relaxing bath salts with other fun items to make a spa basket. Remember the lavender pillows I made (see post here)? Add a candle, a scrub brush and some soaps and you have a wonderful spa gift.

Ingredients and Links

Here are the ingredients you will need:

1 1/2 cup Ancient Minerals Magnesium Bath Flakes (I bought the 4.4 lb. container but it does come in 1.7 lbs too)

1/2 cup Baking Soda

1/2 cup Pink Himalayan Salt

1 TBSP Unrefined Shea Butter– I bought the 1 lb. bag, but you could do with a lesser quantity

10 drops Eucalyptus Oil

Recipe Directions

Combine the magnesium flats, baking soda, and pink Himalayan salt. Add the Eucalyptus oil (or the essential oil of your choice). Mix. Place in a container and place the shea butter on the top of the ingredients (I chose to mix mine in after I crumbled it into small pieces).

When you are ready to use your Muscle Relaxing Magnesium bath salts, just add it to a hot bath and soak for 30 minutes. Also try dry brushing your body, starting at your ankles and working upward with circular motion.

Drying bushing is a great way to not only shed dead skin cells but it has also been shown to help improve circulation and lymphatic drainage. The Dry Body Brush above is from World Market ($4.99). Others can be found here.

This is a very easy and fun DIY, providing you gifts you can be proud to give. Stay tuned for the 2nd DIY holiday gift idea that I will be sharing tomorrow.

P.S. Just a reminder that any words that are italicized bring you to the source. If it is a product on Amazon, please note that I am an Amazon Affiliate. If you purchase something through my website, I receive a small (very small!) stipend, which doesn’t affect the price you pay at all. My goal is to make sourcing the items easy for you. Thank you for your continued support.

Now for more Holiday DIY gift ideas

Andrea from Design Morsels is creating DIY Healthy Homemade Food Gifts.

Chas from Chas Crazy Creations is making DIY Hand Soap Dispensers

Thank you so much for joining me today! Happy DIY-ing!

Please share to Pinterest too if you enjoyed this post!


Living Simply and Efficiently

I recently purchased a new book, Simply Living Well by Julia Watkins. This hard cover book is a guide to creating a natural, low-waste home. The book is filled with great ideas and recipes on how to reduce what you consume and throw away. But it got me thinking about how we live. What are we currently doing that is living efficiently and reduce what we consume and what we throw away?

Composting

About 30% of our kitchen waste is recycled through composting. I have written about this before (see post here) and put every single peel, pit, skin, eggshell and other non-cooked fruits, vegetables and flowers into the composting garbage can. Grass clippings, tree branches and other brown material is also composted here on the property. This significantly reduces our waste that goes to the City’s landfill and dump.

All the luscious rich fertilized soil goes back into the yard~the garden, the orchard and all the bedding areas. Giving back to the land is very rewarding.

Recycling

The City of Phoenix has a recycling program so we separate our garbage into separate bins for pick up once a week. Cardboard boxes, paper, plastic, glass and cans are separated from the trash. In our kitchen we have 3 garbage cans~one for composting, one for trash and the other for recyclables.

Gardening and Chickens

Growing our own fruits and vegetables reduces the number of trips to the grocery store and farmers market. With the exception of summer, the garden is producing the rest of the year. And again, the leftovers go to the chickens or the compost bin. Though we do support local business, having a back up food supply is satisfying.

Our chickens provide us with the most delicious eggs. All the shells are recycled in the compost bin too.

Preserving Food

Growing up in a family of 7, my mother never wasted a thing. For example, leftover stale bread was turned into bread pudding. As a result, it’s hard for me to throw good food away. I just made a big batch of mole chicken and after having it a few days in a row, I will freeze the rest in individual servings for another time. Same with the big pot of chili I just made.

Meyer Lemon Marmalade

Abundant harvests from the garden or orchard are canned and preserved for use during another season. From fruit preserves to tomato sauce, these are either canned or frozen.

Laundry

Line drying here in Phoenix, especially in the summer, is a quick and easy energy efficient task. Not only does the sun acts as a powerful disinfectant but also has natural bleaching powers. Plus nothing smells better than slipping under freshly washed sheets that are line dried! Even my children notice when their sheets have been washed and dried outside.

Coffee

I recall a time when daily and sometimes more, we would drive through Dutch Brothers and get our coffee. The staff knew us by name and their fun, upbeat vibe was a plus to our cup of Joe. Unfortunately, that coffee location closed, but I shudder to think of ALL those paper cups and plastic tops we used. Dutch Brothers had become a line item on the monthly budget.

Now we make our coffee here at home using my favorite Nespresso machine. The coffee pods get recycled through Nespresso recycling program. Not only have we saved a boat load of money, but we are no longer excessively using paper cups and plastic tops.

Paperwork

As I mentioned in a blog post about my kitchen, there is an industrial shredder placed next to the compost garbage container. See that post here. Daily, the excessive amounts of junk mail is shredded and added to the composting bin. A good use of unwanted junk mail (and all those political flyers!)

Manage our Utilities

About two years ago, I was asked to give a lecture to a group of 7th and 8th grade students about the recent utility (electric) increase that was imposed and how that rate hike affected our neighborhood. Of course, I didn’t even realize we had a rate hike. So in order to provide an intelligent presentation, I got to work and did a thorough evaluation.

What I discovered is that we were not on the most efficient or advantageous utility plan. Once I understood that, then we started paying attention to our electric usage. The first month, we saved so much money. Over time, we saved even more.

Reminders I placed on the major appliances

The moral to this story is 1) understand your utility usage; 2) investigate the best plan for you and your family; 3) by making reasonable changes you can reduce your usage and save a lot of money.

Now, during the warmer months (trust me, air-conditioning bills can be ridiculously expensive here), we monitor our large appliance and air conditioning usage from 3:00 p.m. to 8:00 p.m.

Water consumption

IMG_0878

Water here in Arizona is a precious resource. Rates go way up in June, July and August. By using flood irrigation provided locally, we are able to deep water the orchard and yard at a low annual cost. The well that we re-instituted many years ago, handles additional yard watering (see that post here).

Shopping with Reusable Bags

Trader Joes. Love that they used reusable bags before it was cool.-and the  designs are unique and FUN! | Trader joes, Reusable bags, Shopping bag  design

My car is the keeper of many reusable shopping bags. However, since COVID, no store is using them. Seems unfortunate however, I understand the need to be extra careful now. Hopefully, this too will pass.

Room for Improvement

Like with most things in life, I can certainly improve and lessen my waste. We have too many things that need to be sorted, organized and donated. That is an ongoing project that I need to jump start again. My goal is to reduce the items in each room by 50%. Lofty goal, but maybe I will start this effort after the first of the year. To see where I put Marie Kondo’s organizational tips in place already, see that post here.

18 health benefits of walking everyday outside instead of driving

I’d love to live in a place that doesn’t require driving everywhere. Phoenix is more car-dependent than other cities, but during the cooler weather I do try to bike and walk more.

Green cosmetics: 6 eco-friendly or eco-friendly makeup brands not to be  missed

In addition, I need to assess my use of cleansers/detergents and investigate more eco-friendly cosmetics.

So what are you doing to lighten your footprint? Please share any ideas so we can all get better at this!

Happy Wednesday!

If you enjoy this post, please feel free to share on Pinterest.

This post shared with Between Naps on the Porch Metamorphosis Monday #614


Holiday Gift Guide

For those of you who know me, I do not do anything Christmas/holiday related until the day after Thanksgiving. No decorations, no gift buying, no holiday cards. However, 2020 is a completely different year, forcing completely different behavior. Ever since the pandemic started, our supply chain has been stressed. And even though there is toilet paper back on the shelves, many other items continue to be out of stock. Inventories are low. A recent trip to Walmart had 30% of the shelves completely empty.

So what can we do differently this year in our holiday gift planning? I am teaming up with my blogging buddies as we are trying to find viable solutions to gift giving. And I do believe we must all think about it sooner rather than later. Here’s just a peek into some ideas and hopefully I will generate a few more gift guides in the next few weeks. And please check out the links to other holiday gift ideas at the end of this post.

For the cook/foodie

My son, Benjamin is our family’s foodie and he loves to cook. Here are his recommendations in the kitchen:

  • Instant Read Thermometer. Link is here
  • Good Oven Gloves. Link is here
  • Nice Balsamic Vinegar~Hands down, our FAVORITE balsamic is from a very small shop in Pinetop, Arizona. This thick, delicious balsamic comes from Modena and is called the “mamma” of all balsamic. Link is here. Their shop has limited hours of Wednesday-Saturday, but you can order online or give them a call. $18.00/bottle

For the Gardener

As a gardener, I go through many things~gloves, shears, and tools.

Gardening Shears~Depending on your budget, here is a selection of shears/pruners.

Gardening Gloves: I literally can trash a pair of gardening gloves in one day in the garden. So having a few is always recommended. This 6 pack from Amazon is a great deal. Click here.

Gardening shoes: I’ve written about my Sloggers before. These were a Christmas present from my friend, Janie and I LOVE them. I wear a typical 7.5 women’s shoe and these Sloggers are a WO S 7 and they fit perfectly…..and oh so comfortable. Here is the link.

For the Wine Connoisseur

Costco is again featuring their wine Advent calendar this year. With 24 1/2 size bottles of wine from around the world. At $99.00, it works out to be about $4.00 per bottle. Wine advent calendar from Costco. Link is here.

As we all know, 2020 has been an interesting year. There are SO many wine glasses out there with fun quotes for the person who loves wine and has a sense of humor. See the extensive collection here.

For those wine enthusiasts who like to keep track of the wines they are enjoying, this leather bound wine journal is a lovely gift. Link is here.

For the Hostess

My favorite candle is Capri Blue Volcano candle. Generally for the holidays, they change up their jar design but you cannot go wrong with this candle. If you prefer, there is also a reed diffuser.

Click the link here.

Small Prep Bowls: A gift from my friend, Connie, I use these 4″ bowls all the time when cooking, entertaining or just using them for food storage. Here is an affordable set of 16 for nearly $20.00.

I met the owner, Sherri of Mad Dash Mixes during a trip to Waco in June. So far the mixes I have tried are very good (and easy to use!). These mixes are just fabulous to have on hand if you need to whip up a dip, or a soup or dessert. Just for this blog post, Mad Dash Mixes has created a coupon for you for an additional 10% off! Any orders that you place using BELLATERRA10, will get you this discount.

Here is the link to their main page so you can peruse the numerous products they have. If you want to order the Host Bundle (Link here) it includes Warm Spinach Artichoke Dip, Cranberry Pasta Salad, Cheesy Chicken Enchilada, and Pumpkin Spice No-Bake Cheesecake. $21.00 (and don’t forget the discount code!)

Just some wonderful gift ideas:

23 and Me~for the person who is interested in real science, real data and genetic insights that can help make it easier for you to take action on your health. Especially this year, knowing more about your ancestry, genetics and health profile is a valuable gift. Link here.

My personal splurge is subscribing to the quarterly subscription to My Stylish French Box. It is such a treat to get this beautifully wrapped box filled with hand picked French items four times a year. You can also do a one-time purchase or give it to someone as a gift. I highly recommend this for yourself or someone who is extra special. My Stylish French box. Link here.

Help your local businesses as suggested by my friend Tevia on her Instagram.

As soon as I finish typing this I am going to start my holiday gift planning. I hope you enjoy today’s post and please send me any other ideas you have for holiday gifts.

And now for some other gift suggestions from my blogging friends:

Family Gift Exchange Ideas from Chas Crazy Creations|DIY Custom Gift Boxes for Christmas from Design Morsels|Holiday Gifts under $30 by Celebrate and Decorate|

Am still traveling and cannot wait to share some of my photos of this trip with you! Happy Tuesday.

If you enjoy this post, please share on Pinterest.

As an Amazon Associate I do earn a small commission on qualifying purchases. If you purchase something linked through my website, it will not affect your cost, but does provide me with a small stipend for making the recommendation.