1

Saturday Meanderings

Painting by Janice Howell

Christmas is a less than one week away. Oh my. Even though I dream about having a comprehensive holiday home tour to show you, I am still noodling around with decorations (and cleaning up). Welcome to Saturday Meanderings! I am envisioning you with all your gift shopping done and lounging around in your red striped pajamas as you are reading this! And drinking a fabulous cup of coffee or tea, completely stress free on this Saturday morning!

The Main Tree

The main live tree is up…finally. It fell over twice (really) but fortunately the crash happened before the lights and ornaments were on it. Did I mention that the tree did fall over years ago and shattered our cherished, rare ornament collection? Oh well. Every year since, the children say, “remember they year the tree fell over?”

Wires are affixed to the ceiling

When the fresh tree is finally straight on all sides, then it gets wired to the ceiling so it will NOT fall over after ornament placement. I cannot say enough about the quality of the freshly cut trees at Whitfill Nursery. We’ve been going for years and have never been disappointed. The entire front of the house smells so good!

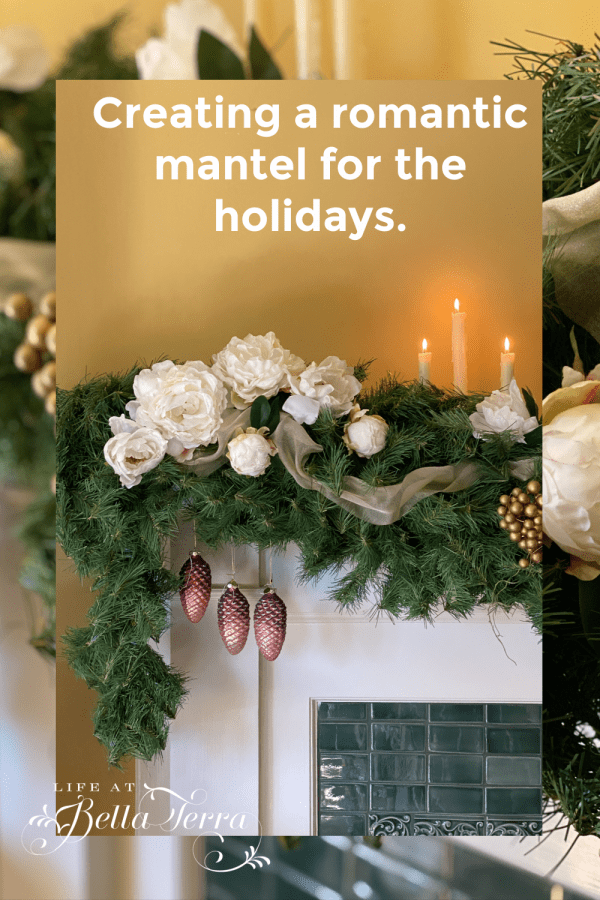
The Breakfast Room Mantel

The fireplace in our breakfast room (my office) typically gets a holiday painting and the mantel displays the nutcracker collection. However, this year, I am retaining the painting of the Italian village done by Janice Howell. I love the colors and the laundry hanging from the balconies. By happenstance, I placed two sets of wooden village buildings purchased at Target (for $5.00 each) on the mantel, and was instantly inspired to re-create the painting.

Adding battery operated votive candles behind the houses, and trees on either side of the mantel makes the foreground feel like it is part of the painting. Miniature holiday sweaters, hats and mittens hang on a “clothesline”. Since turning the votives on at night is a bit of a pain, I may just lay battery-operated fairy lights behind the houses instead.

The Laundry Room

Hanging sweaters in the laundry room wall

The leftover mini sweaters are hung with care in the laundry room. It is fun how they mimic the mural on the wall.

The Garden

With pending frost temperatures this week, I am worried about plant damage. Typically in the winter, I will cover the garden beds with frost cloth and/or a heavy ply plastic. Adding Christmas lights (not the LED kind) will add a bit of heat under the cloth too. Amazon has 2-day shipping for frost cloth here and heavy ply plastic here.

It looks a bit like a moonscape at night with the lights glowing from underneath the covers.

It is harvest time for shishito peppers, lettuces, herbs and some of the cherry tomatoes are producing as well. If you have not had shishito peppers, they are so easy to grow.

Plate by Pottery Barn

Blistered in hot oil, then seasoned with salt, pepper and a squeeze of lemon, we just love these as an appetizer. I’m not sure I understand why some are green and others are red, but they taste terrific regardless. A mild pepper but occasionally you can get one with some heat.

Blistered shishito peppers~yum!

Christmas Cards

Do you send out holiday cards?My goal is to take our family photo at Thanksgiving, create the card and have them in the mail by December 15th. It is also when I draft our family newsletter reviewing all the good, bad and ugly that has happened in the year. Since I do love receiving cards, I will continue to send them out each year. Another thing to check off the list! Card by Minted.com.

Our nativity scene

There are a few decorations to finalize but I think we are nearly done here (thankfully). Not sure why I felt so disorganized this year. I may have mentioned that I volunteer on our neighborhood board and we’ve had two zoning cases in December that unfortunately, have taken a great deal of time. I’m blaming my scattered approach to the holidays on that!

If you missed my two other posts this week, you can see my pink dining room decorations here, and the holiday front porch here.

I may take a break from blogging next week (not sure yet), but if an email doesn’t appear in your inbox on Tuesday or Wednesday, you will know why. Until then, I am sending big virtual hugs to you!

If you enjoyed this post, please share on Pinterest.


Saturday Meanderings

Our “fall” is now

What a week! Slowly the decorations are coming out and we will get our fresh tree this weekend. It’s a family tradition to get our main tree on or near my husband’s birthday. The goal is to have the tree up and decorated no later than next Tuesday. I know I am way behind other bloggers, but it doesn’t really matter because this is how we celebrate here at Bella Terra.

The Annual Christmas Painting

Our cat, Donovan

As you may recall, I started painting about five years ago (see post here). Each year I attempt a new holiday painting. Based on a wonderful photo, I painted our cat, Donovan. He is a stray Maine coon cat the girls found in the yard years ago and he is currently our only cat. After losing our very first cat, Tippy this year, I have an increased desire to capture our pets on canvas. If you follow me on Instagram (I hope you do!), you may have already seen this.

Two New Recipes

Chocolate Sourdough Babka Bread

Every Christmas, I replay the previous Christmases and holidays in my head. I feel blessed to have had many happy and joyous holidays from my childhood to now. Naturally there have been a few where loved ones are not there and occasionally my heart feels heavy from their loss. Lately, I have been thinking of my Mom and Dad, who both passed away rather unexpectedly 5 years ago, 5 months apart.

But they were very good parents and they made our holidays extra special every year. Being of Polish decent, I recall some of the traditions and foods surrounding the holidays. With fond memories of babka bread, I realize that I have never made one.

Babka is a dense cake, although it looks a little like a bread. It’s a sweet yeast dough filled with fudgy chocolate or cinnamon in layers and baked. It also sometimes has a streusel on top.

Rising in front of the fireplace

Since I am always looking for ways to use my sourdough starter discard, this recipe is a Chocolate Sourdough Babka with Streusel de Coco from Artisan Brian is perfect. You can see the recipe here.

A 2-day recipe, but well worth the effort. Also, I have never braided bread before but this is a fun learning recipe with excellent results!

Aged Egg Nog

Aged eggnog in glass goblets topped with eggnog.

Have you ever heard of aged egg nog? I certainly haven’t, yet my son brought up the idea at Thanksgiving.

Although most Americans think of eggnog as something they get out of a milk carton during the two-week period leading up to December 25, eggnog actually descends from sack posset, a strong, thick English beverage built upon eggs, milk, and either a fortified wine (like Madeira) or ale. 

In this recipe, you must age it for a minimum of 2 weeks, but they say a month or two would be even better. We made this on November 24 and will drink it later this month. Made with eggs, sugar, fresh nutmeg, half-and-half, whole milk, heavy cream, Jamaican rum, cognac, bourbon and a bit of kosher salt, let’s not count the calories!

It looks like it has lost a bit of volume (where would it go?). We all tasted it before it went into the refrigerator and it is delicious. Should be interesting to see how it tastes 6 weeks later. Click here for the link to the recipe.

An Easy DIY Holiday Decorating Idea

As you know, plaids are all the rage this year. During a recent trip to Michaels, they had buy one and get one free rolls of wrapping paper. So I grabbed all the plaid ones and did this simple, easy and fast DIY.

Here is the chest in my family room, before.

And look how festive it looks now with minimal effort!

I simply wrapped the books with the plaid wrapping paper, changed out the wooden beads for silver ones (a necklace of mine) and added faux greens.

In setting up a small tree at the other end of the chest, I added small wrapped packages underneath too.

I hope to show you more of our holiday decorations (if I can get my act together) next week with a holiday home tour.

Thanks for the help

If you don’t follow me on Instagram stories (I hope you do), I want to thank you for all the fabulous feedback on how to improve upon my dining room mantel. My friend, Jeanne suggested adding fairy lights and that did the trick! Most voted against adding ribbon and I think that was the right choice.

So far, no fresh garland this year

Every year I order a 75 foot roll of fresh cedar garland. Unfortunately, this year none was available from my resource. So I am hoping when we pick up the live tree this weekend, there will be fresh garland to purchase. Important areas of the house are draped in garland and this may be a year that we go without.

Enjoy your Saturday and weekend. We had our first big rain here the other day and I am hoping and praying for more. If you missed any posts this week, see how I clean our crystal chandeliers and how to make bleached pinecones.

Thank you so much for joining me today!


How to Make Bleached Pinecones

I don’t recall where I saw this DIY, but it sounds like a project that I could tackle. We have lots of pinecones at our cabin and I brought some back with me during our last trip. But I can’t find them anywhere. Go figure. So I did a garage search and came up with enough pinecones to try this. Actually these are cinnamon-scented pinecones, but it doesn’t seem to matter. Here is how to make bleached pinecones.

The supplies you will need~pinecones (in good condition), bleach, water, a bucket, and bricks (or something to help submerge the pinecones), and rubber gloves. I also wore an apron because I tend to be a bit messy.

Take precautionary measures

Clorox Disinfecting Bleach - Regular - 121oz : Target

First of all, bleach is a caustic substance and not only will it ruin your clothes and eyes if you splash, but the fumes can be overwhelming and dangerous. Why do I know this? Because I tried doing this DIY in the kitchen, vs. outside in the fresh air. It took a matter of seconds but I could feel the negative effects of the bleach fumes. Not smart.

Also make sure your vessel does not leak. I unfortunately didn’t see the hairline crack in my container and had bleach leaking out….in my kitchen while I was nearly overcome with fumes.

Pinecones in a 5 gallon bucket

Put your bucket outside. Toss in any amount of pinecones you’d like (20-30). Cover the pinecones with bleach (1.5 gallons) and add water to cover.

Submerge the Pinecones

Don’t forget to wear gloves

Place the bricks on top of the pinecones (as they will float) and leave for 24 hours.

Submerge the pinecones with bricks

24 hours later…

Remove the pinecones and let dry. What I didn’t realize is that pinecones, when wet, will close up. But as they dry, they spread open again.

Lay bleached pinecones out to dry

When the pinecones first came out of the bleach solution, they did not look white. But over time, as they dried, the pinecones will get lighter.

Pinecones will slowly open

I did read that if you leave them in the bleach longer than 24 hours they start to break down. The first batch I did complete within the 24 hour time frame.

The second batch

Not wanting to toss the bleach solution yet, I am trying another batch. We will see if the chlorine is still strong enough to bleach them. The second batch was left in for two days. They are still drying out, but look fine. You can see how tightly closed the wet pinecones are compared to the dried ones.

Add to Your Holiday Decor

Now I am excited to use these pinecones around the house for the holidays. Yesterday, I created a holiday theme for the top of a cabinet in the family room, using a few bleached pine cones. If you have a beach house, wouldn’t these look great? Also, the pinecones do not smell like bleach either.

So remember, if you do this DIY, please take more precautions than I did. I am really happy with the results. Since I love regular pinecones and now bleached ones, it will be fun to decor with both this holiday season.

Have a fabulous Wednesday. The decorations are going very slowly, but I am certainly not complaining. Trying to take my time and enjoy every minute.


How to Clean a Crystal Chandelier

Cleaning a Chandelier

The crystal chandelier in our dining room has traveled with me from house to house. Found in an antique store and electrified, I love the elegance and beauty of it. Not too gaudy, but just enough sparkle to make the dining room extra special. Once a year, every December, I clean the chandelier by hand. Since I am participating in a blog hop that involves lighting, this seems like the perfect opportunity to accomplish this task and share with others. Make sure you check out the other bloggers and their lighting tips and tricks at the end of this post!

The Before

I look at the chandelier and say, “does it really need to be cleaned?” Probably me just trying to talk myself out of this task. Even though it looks nice, you’d be surprised how much dust and dirt land on these crystals and arms.

Prepping the Work Space

Every year I seem to try a new method. But before I even begin, I lay several beach towels over the dining room table. Not only to protect the table, but the first year I didn’t do this and 3 crystals fell…..and shattered. At least if they fall on the towels, they have a soft place to land.

The first year I cleaned the chandelier I sprayed the entire fixture with vinegar and water. The towels help protect the table from all the drips if you choose to clean the crystals this way.

Pulling back the upholstered chairs ensure you don’t accidentally stain those either.

Select Your Cleaning Product

This year, I decide to use a foam glass cleaner, as I have good results with it on windows and glass table tops. I believe we buy this at Costco as I tend to have several cans of it. Or you can find it online here.

Be Safe

Make sure you use a sturdy step stool to prevent any falls or injuries. Not only do I use the step stool, but also kneel and stand on the table while I’m cleaning.

Start Cleaning

Saturating a microfiber rag with the foam, I start on the saucers under the candles. The minute I wipe both sides with the foam rag and wipe it again with a clean dry rag, I can see a difference in sparkle already.

Here is where most dust settles. In doing this, the chandelier really moves around increasing the chances of a crystal falling or breaking, so be extra careful. Look at the dirt collected in just a few of the saucers.

Repair and Replace

I do have an assortment of extra crystals in case one breaks. They are kept in an old cigar box for safe keeping. Someday I will turn the unmatched ones into ornaments for the tree. You can find additional crystals in antique and thrift stores. Unique ones can be found on eBay or sourced on the internet.

This is also a good time to make sure the wires attaching the crystals are secure. I pinch them closed so they will not fall off with all the swinging associated with cleaning the chandelier.

After doing the saucers, I start in the center of the chandelier and work out. Don’t forget to wipe down the arms or any other surface that collects dirt and dust.

These long 3-sided crystals are difficult to find so I take extra care in wiping them down.

Use Scissors for Snags

Occasionally the microfiber gets caught on the wire between the crystals. Do not pull to separate it but use a small set of scissors. Any tugging on the crystals can cause them to dislodge and drop. I’d rather ruin the rag than the crystal.

The project doesn’t take very long and it’s actually rather soothing to do this. Plus the end result is a sparkling, clean chandelier that will just glow for the holidays.

Replace the Bulbs

I step back to admire my work and notice a light bulb is out. Fortunately I do have a few extras on hand because this particular bulb is not easy to find locally. The bulbs are covered in a silicone material that look a bit like a flame. Naturally, they are available on Amazon here.

Even though this bulb is slightly larger than the dead bulb, no one will notice.

I keep any additional chandelier related items nearby in the buffet so I am not searching for them every December.

So now the chandelier cleaning is finally completed! Remember if you have issues with height, use a good ladder or have someone else do this for you. After looking up for a period of time, it is easy to get dizzy.

While I had the ladder out I also cleaned the foyer chandelier, which took only a few minutes because it is much smaller.

Hopefully this post will inspire you to clean any chandeliers or glass globe pendant lights. It is amazing how something this easy makes a subtle but dazzling difference around the holidays.

Thanks for joining me today and now for other lighting ideas, please keep reading.

This post shared with Between Naps on the Porch Metamorphosis Monday #622

Niky from The House on Silverado shares her Cozy Lighting Tips and Tricks.

Kristin from White Arrows Home has 3 Christmas Lighting Projects.

Kim from Shiplap and Shells teaches you how to make a Mercury Glass Lamp Base with a Twist.

Andrea from Design Morsels show us how to Paint a Chandelier.

Amy from Health Home and Hearth demonstrates how to add wireless under cabinet lighting.

Chas from Chas Crazy Creations makes this adorable lampshade makeover.

Tarah from Grandmas House DIY creates a moody speakeasy with Basement Lighting.

Kippi from Kippi at Home makes these pretty DIY Wooden Lanterns.

Thank you for joining me. Please remember that all of us love your comments and feedback!


Another Beautiful Mantel

As promised, I want to show you another beautiful mantel done by my fabulous friends. Quite honestly, wouldn’t it be nice to have your creative and talented friends help decorate your home for every holiday? There must be a business idea in there somewhere! If you missed yesterday’s post about the romantic mantel in my art room, click here.

Chloe’s Joy to the World Tablescape!

Let me introduce you to Chloe from Celebrate and Decorate. Chloe lives in Celebration, Florida and she is one talented gal. Not only does she have boundless energy, but she is a skilled actor and an innovator. I have fondly nicknamed her, Take Charge Chloe! Check out the above photo of her holiday tablescape. Wow!

After raiding the Christmas room (read more about that here), Chloe began working on the living room mantel. This mantel is long and deep and each year I have struggled with decor that didn’t fulfill the needs of the mantel.

Assisting Chloe is Andrea from Design Morsels. Being the very witty and dry-humored one, Andrea always downplays her creativity, but she is marvelous as well. Check out these Star Wars ornaments she is hand making for her son!

chewbacca ornaments
Andrea’s handmade Star Wars ornaments

If you need a deep dive into anything (linens, vacuum cleaners, bookcase design), Andrea is the person to follow. Her blog, Design Morsels is the Cliff notes of design tricks and products.

Andrea setting up the lighting

Since the living room only gets good light in the morning, we set up professional lighting to help with the photos.

Starting with garland and using Command hooks, Chloe is able to drape an abundant amount of garland and have it stay on the mantel.

Chloe doing her magic!

Asymmetrical mantel designs are big this year and Chloe did not disappoint. I think this is the first year I have a mantel in style! She twists the garland to attach to the ends to each other too.

Next she adds artificial red berry garland. Some of the red has come off so I need to take a marker and do some touch up.

This old, inexpensive set of cow bells (can’t recall where I purchased them) are used at the far end, nestled in the garland and berries.

On the right side of the fireplace, balance is created with 3 small artificial trees. I did buy the trees at Scottsdale Marketplace last year but you can probably find them online too.

Above the trees I will hang the stockings (haven’t done that yet), again adding more weight on this side of the mantel.

Chloe cleverly stacks the battery operated candles on various items to create different heights. She uses what she can find~small books, boxes and even the bottom piece of my tuliperie (to see more about my tulipieres click here). She is just so creative!

At night, the candles provide a warm glow to the overall look of the mantel.

Stepping back, here is a picture of the entire mantel with the new holiday decor.

Now isn’t this just beautiful? No more wimpy looking holiday decor on this fabulous fireplace! Once I hang the stockings and get the rest of the room ready for the holidays, I will definitely share the final look!

I hope this has inspired you to try something different if you are decorating a mantel or a shelf. Chloe is a dynamo and threw this together in a relatively short period of time. I was speechless and so over the moon with the results!

Happy Wednesday, my dear friends! I hope you aren’t tired of mantel decor because I hope to share the last two mantels with you on Saturday. Stay safe and healthy and live brightly!

Resources:

Green garland here

Red berry garland here

Command Hooks here

Battery Operated Candles here

Bells (similar) here

3′ small trees here

If you enjoyed this post, I love it when you share it on Pinterest!


Decorating a Mantel for Christmas

Earlier this month, I had the pleasure of hosting 4 other bloggers here at Bella Terra. Being the recipient of their collective creativity, they tackled 3 fireplace mantels and decorated them for the holidays. What a fun experience watching these talented gals in action. Today I want to share the mantel over the fireplace in my art room. To see more about this fireplace and room, click here for a previous post.

Barbara from Mantel and Table is the innovative person behind this. If you love fine china, silver, teacups and flowers, her blog is one to follow. Barbara actually participates in table setting competitions (who even knew those existed!) and is an elegant, poised lovely individual.

She went right to work finding items to use~including artificial garland, faux silk peonies, candles, ribbon and ornaments.

Barbara adding ribbon

First of all, I wouldn’t have thought to use clusters of peonies. Nor would I add the ornaments. What is so wonderful is how much I am learning from these talented women!

Adding the gold sprig brings a bit of brightness to the theme. I love how Barbara weaves the ribbon throughout. This is such a soft and feminine look, perfect for my art studio!

Lastly the candles are added at different heights to create interest and ambiance.

I love the fullness of the garland. Typically I just run the garland straight across the mantel, however, this abundant look is more appealing. The asymmetrical use of the pinecone ornaments and garland works too!

Barbara states that her inspiration is a painting that I haven’t completed, but is sitting on the easel nearby. It is also a bit hard to stand back and take a picture as this is a very small room, filled with my art supplies. I love how romantic this mantel looks in my work space!

Unfinished painting

To read more about the fireplaces at our home (we have 7), click here. There are two more decorated fireplace mantels to show you and I will post about those tomorrow. To read more about these 4 fabulous women and their visit to Bella Terra, click here.

Have a wonderful Tuesday. I am just now starting all the other Christmas decorating slowly but surely!

Please share this post on Pinterest~thank you!

Source for similar items used in mantel:

Artificial Garland at Amazon here

Pinecone Ornaments here

Gold Berry Stems here

Ribbon 2″ wide here

Silk peonies here

Straight taper candles here

Candle holders from West Elm here