1

Painting/Stenciling a Concrete Floor

Silver, crystal, linen and china closet

At the Willetta restoration, we created a large closet off of the dining room by enclosing a portion of an old adjacent storage area.  The purpose of this room is to become the silver, crystal, linen and china closet.  I’ve always wanted a separate space to store my “stuff”- large trays, candlesticks, tablecloths, dishes, silverware and entertaining items.  This 6′ x 7′ closet will be PERFECT for the new homeowners to do just that.

Dining Room Before

The challenge is that the floor in the new closet is concrete and is flush with the dining room floor which is hardwood.  Adding new flooring on top of the concrete doesn’t make much sense as it would have create an awkward transition.

What could I do to make the floor feel more formal, like the dining room, without adding tile or more wood? After pondering this for a few days, I asked myself,  “How hard could it be to stencil/paint the concrete floor?”  So I googled “how to paint a concrete floor” and watched the YouTube video by Annie Sloan, entitled How to stencil a concrete floor in 10 easy steps. 

The video is set to catchy music and yes, in 10 easy steps, Annie Sloan creates a beautiful floor.  So easy peasy, right? To make it even more convenient, you can buy the entire stenciling kit from Royal Design Studio Stencils.

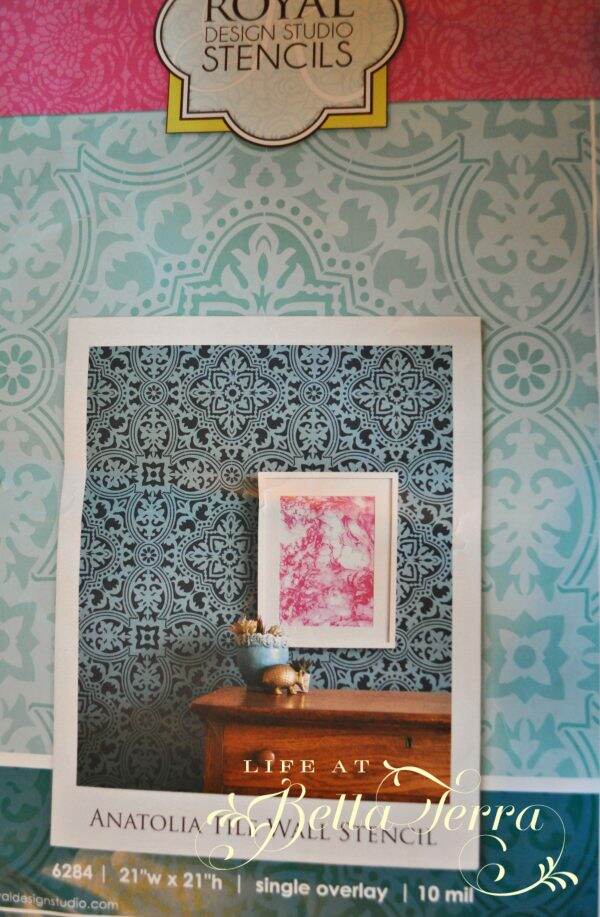
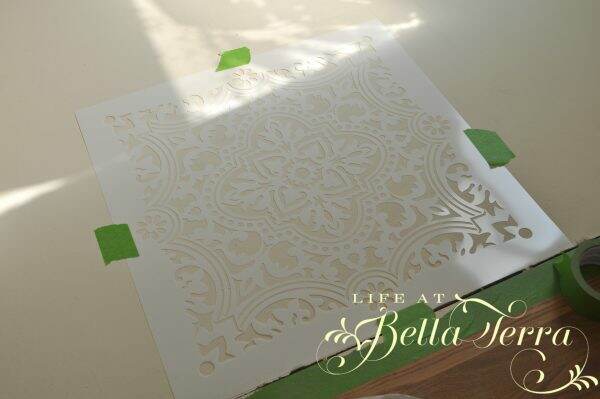
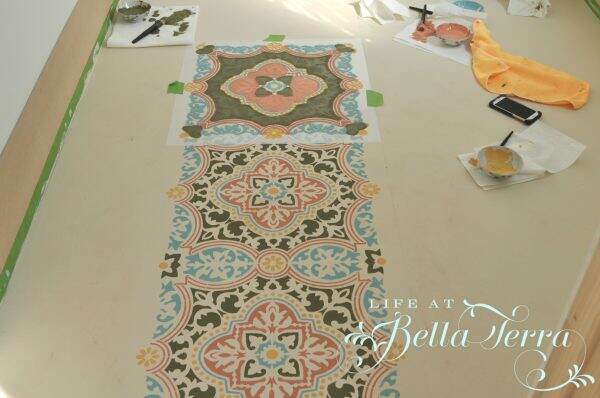
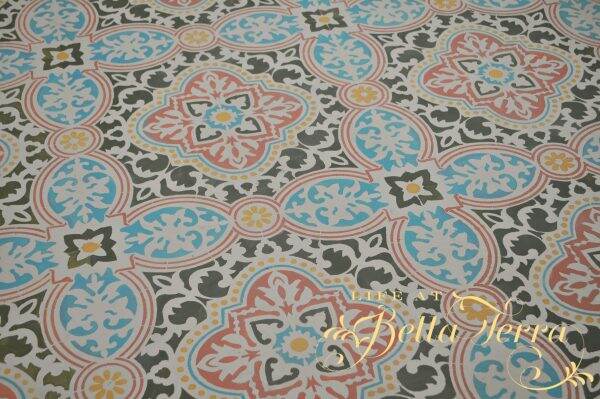
The stencil that is used in the video is the Anatolia Wall Stencil.  However, the packaging below shows the stencil using 2 colors only (which in retrospect would have been MUCH easier!).  In the video, there are five different colors. The stencil dimensions are rather large at 21″ x 21″.

Within minutes, I purchase the stencil kit online and figured nothing ventured, nothing gained. Right?

The kit is complete with the stencil, the paint, the brushes and the top clear coat.

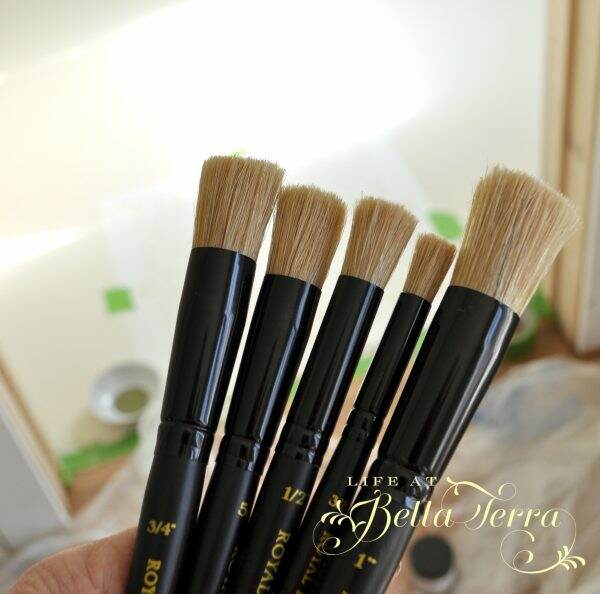
I’ve never stenciled anything elaborate before so I didn’t realize you needed special brushes, but thank goodness they came in the kit.  However, there wasn’t any information on what brush to use with what color.  I had 4 colors and 5 brushes.  No problem, as I thought I could wing it.


Starting the Stenciling Process

When the kit arrived a few days later,  I didn’t see any instructions in the box.  So I called Royal Design Studios and asked where I could get a copy of the instructions of the floor that was created in the video.  They told me that there weren’t any written instructions.  Yikes.  So, my smart painter, John, suggested I do screen shots of the video and print them out.

So armed with 20+ pages of instructions and my stencil kit, I began painting the floor over the weekend.

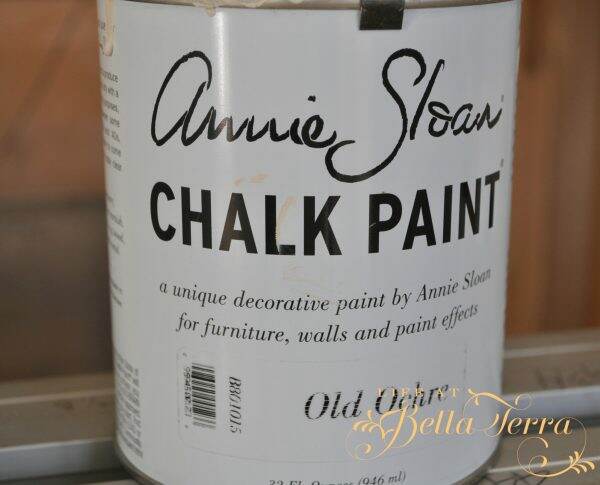
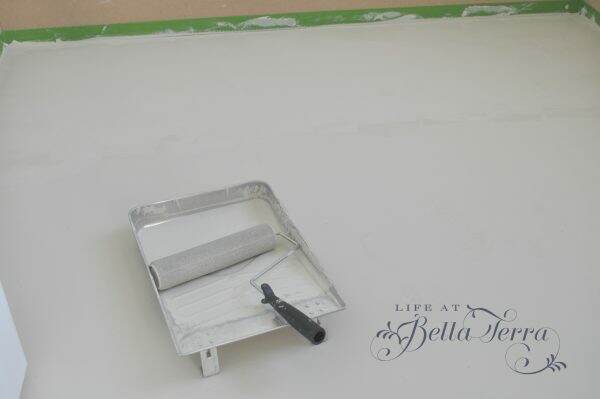
First, I taped off the baseboard (which hasn’t been painted) with painter’s tape and painted the floor Old Ochre Chalk Paint.  The paint is a very warm white and rolled on rather well–velvety in a way.  I used a foam roller as recommended in the video.  The paint dried very quickly, however, I waited until the next morning to do a second coat.

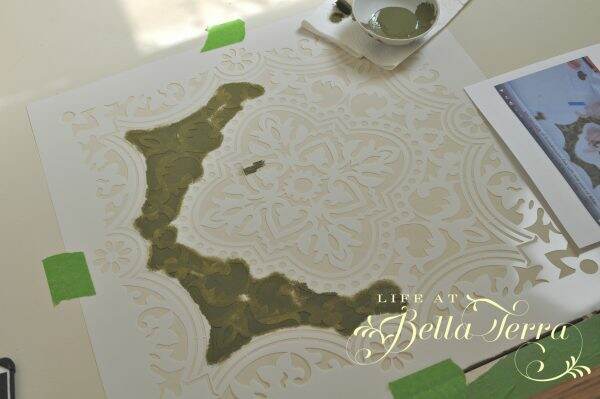
After finding and marking the center line of the room, I placed the first stencil at the doorway and put the right edge of the stencil on the center line.  You can see here that the concrete floor is flush with the dining room hardwood floor.  I used green Frog painter’s tape to secure the stencil and protect any paint from spilling onto the hardwood floor.

Since the paint brush sizes weren’t designated to a specific color, I would use the largest brush on the bigger parts of the stencil and then work my way down.  The first color was Olive~~I’m so glad I printed out the steps as it’s a bit confusing trying to determine what color goes where on the clean stencil.

Next came a color that required blending of a pink and yellow paint–I will refer to it as salmon. The stencil brushes have a blunt cut, so I gently dabbed paint onto the stencil.

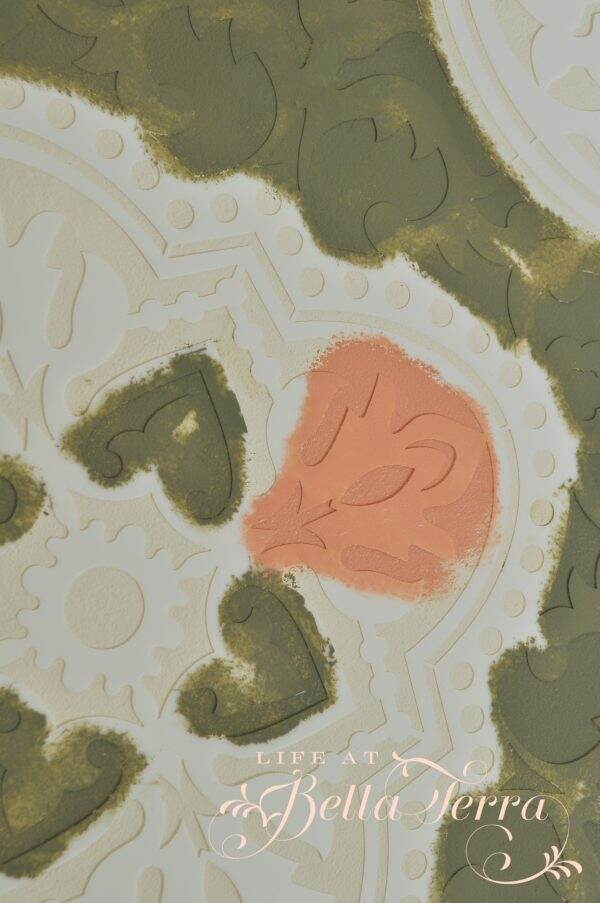
At this point, I have completed the olive and salmon paint colors. Notice the paint and the paper towel in the photo below.  It is important to dab off any excess paint on the paper towel before applying to the stencil.

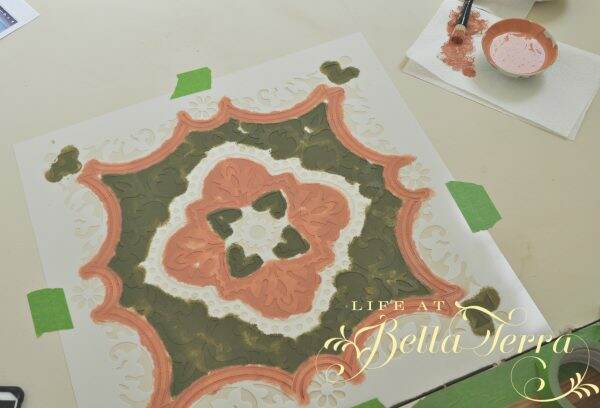
Yellow paint next, then followed by the blue.

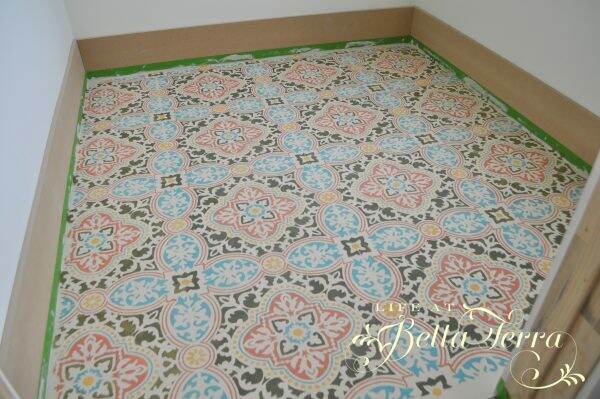
The chalk paint dried very quickly so I didn’t need to wait to proceed with the next stencil.  It was relatively easy to line up markers on the edge, re-tape the stencil to the floor, and repeat.

The first few stencils seemed to take an eternity, because I was proceeding cautiously.  With the colors now on the stencil, I didn’t need to refer to the notes anymore so the process went a bit faster. By the end, I was able to complete a tile in 30 minutes. Mid-way through, I washed the stencil off with soap and water, as the dried paint began accumulating.

The center portions of the floor could accommodate the entire stencil, however, when I got close to the baseboards, only a partial stencil would fit.  It was a little tricky because it was hard to keep the stencil in place, even when secured with the tape. This step requires patience.

All in all, I painted this stencil 16 times to cover the 6′ x 7′ space.

With the stencils completed and the paint dry, I now paint the edges with a 2″ border of the olive paint to complete the look.

Finishing the Floor

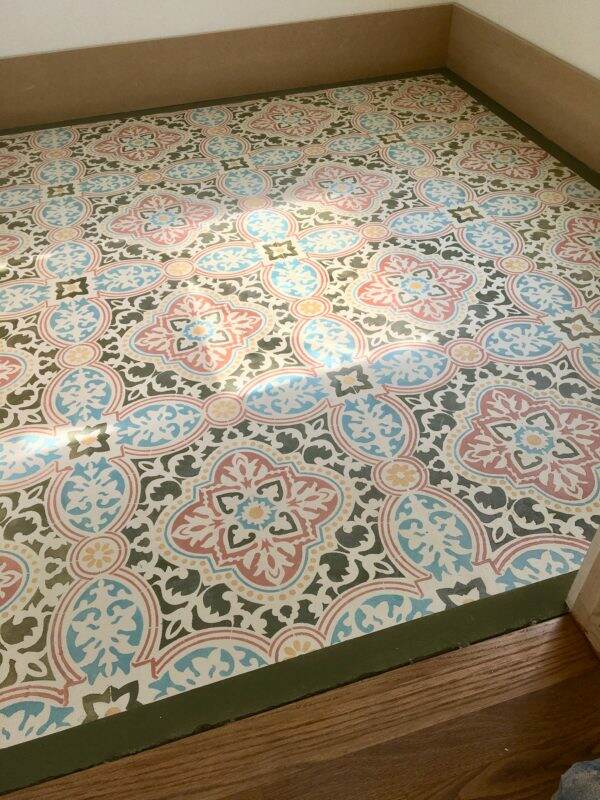
In order to protect the floor I finished it with 2 coats of the clear floor lacquer provided in the kit.

I am so happy with the results! In retrospect, this was labor intensive and I was so sore from sitting or kneeling on the hard concrete floor for hours on end.  From start to finish, I would say I invested 10-12 hours of labor, not counting the drying time. However, this project was well worth it.

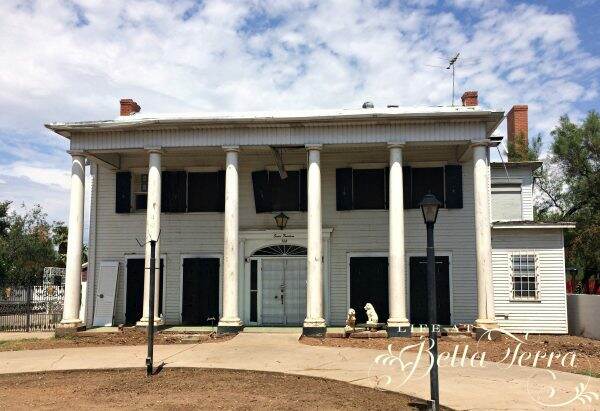
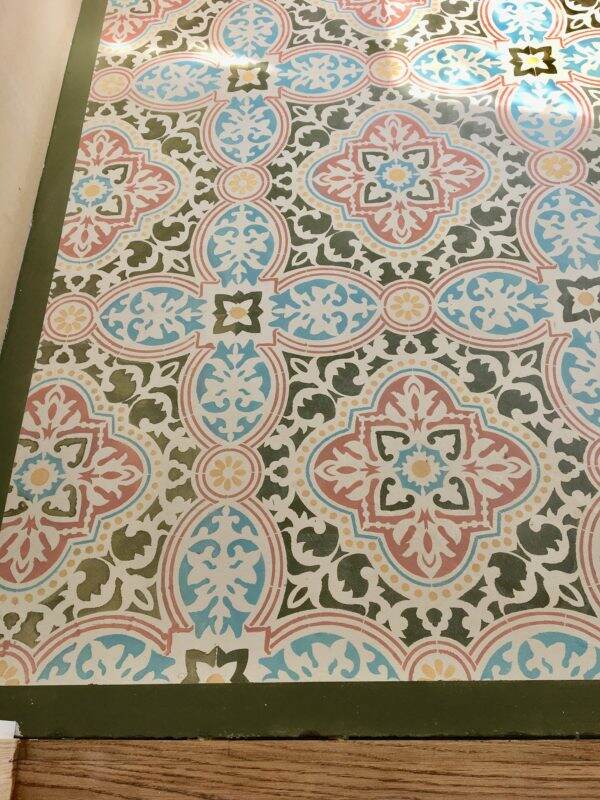
 I always love to do something unique and personal to each of the homes I restore/remodel.  This historic Willetta home now has an original piece of art by me. To see more about the Willetta restoration, click here.

Here you can see the proximity of this storage area to the formal dining room. The floor is so pretty you can leave the door open!

I hope you have enjoyed watching the transformation of this special room. If you love Before and Afters or restorations of historical homes, I invite you to browse my website. If you like what you see, please sign up to get my weekly blog posts! You can also find me on Instagram @lifeatbellaterra.


Restoration update!

So much has happened at the Willetta house restoration.  To read the first post on this historical renovation click here.  Perhaps the most noticeable change is to the front of the house.  When I purchased it in August, the entire house was covered in aluminum siding.  Here is the front of the house with the aluminum siding still on…well, some it anyway.  Notice the big piece hanging down from the underside of the front terrace!!

We tested a small part of the back of the house and took off a few strips of the aluminum.  Underneath was the original 3″ clapboard siding. I held my breath as we tore off the aluminum siding. I had no idea if the clapboard was still under the entire house, nor did I know the condition of the clapboard, which I assume has been covered for decades.  Albeit dirty, the clapboard siding is in relatively good shape.

Yes, every window had security bars.  We removed them and recycled all the aluminum siding and the metal bars.

We also removed all the original shutters on the front of the house. I have never seen this particular cut-out design on any shutter to date – not sure of its origin.

The pigeons over the last 20 years, have enjoyed roosting on the shutters.  It will take a big effort to change that behavior! If anyone has any suggestions on how we can rid ourselves of these birds, please let me know. The shutters were painted black on one side and dark green on the other.  An interesting way to change the look of your home!

The shutters on the first level cover the French doors that lead out to the terrace. Since the front of the house is south facing, the shutters are a brilliant way to keep the sun off the windows in the afternoon. The louvered door below was removed from inside and is resting on the exterior….and eventually ended up going home with one of the workers.

Most of the shutters were in relatively good condition and only a few needed to be completely replaced.

When we removed the aluminum siding from the underside of the porch ceiling, we found a great deal of water damage.

We needed to remove the blue ceiling and found even more damage to the structure underneath….cha-ching.  After all that was removed and replaced, what a big improvement!

Here’s what it looks like today.  I used a Sherwin Williams paint called Atmospheric for the blue and stayed with white for the house. Shutters have been painted black and re-hung. All 6 columns have been repaired.

Notice the beautiful craftsmanship in the detail at the roof line that is hard to find today.  There are two different sizes of crown molding-some of it missing, some of it rotted. Fixing it was challenging.  This nearly 100 year old structure is no longer square plus we needed to rent a lift in order to have the carpenter work at this height.

So as of today, here is the front of the house (with a new roof).  We are waiting to paint the front doors/entrance when all the construction traffic dies down.  As you can see by the piles of insulation,  the rough-in of the plumbing, electrical, and HVAC are complete.  Drywall starts at the end of the week.  More to come!!!!

Save

Save

Save

Save

Save

Save

Save

Save

Save

Save

Save

Save

Save

Save

Save

Save

Save

Save

Save


Raising Chickens

Raising chickens does not take a great deal of maintenance. Providing a shelter, food and room to range is about all that they need. One of our original reasons we have chickens is to manage the bug population here on our property. Since Bella Terra was in a deteriorated and overgrown state for many decades, the bugs moved in and stayed. Chickens and guinea hens do a natural job of pest control. To see read more about our home restoration process, click here.

Hen House Design

Initially our chickens and guinea hens would freely ambled around the yard.  And then we got a dog…who liked licking the chickens in places I don’t want to mention.  And he would chase the chickens, surely thinking they were his new toys.  Coupled with birds of prey and coyotes, it was evident that we needed to secure our birds. So I designed our hen house, which sits between the garden and barn.

The interior of the hen house is a mirror image of itself. This symmetrical layout is to have the ability to utilize both sides independently-for an injured chicken, or baby chicks.  There is definitely a pecking order, so it’s difficult to safely put chickens of different sizes and ages together.

Inside the hen house

Each side of the hen house has access to the nesting boxes where we gather eggs daily. The blue rolling tubs contain the chicken scratch and feed.

Handle to the nesting box

Fun themed handles add a bit of whimsy to the building.

At dusk, the chickens march their way inside the hen house, where they roost for the night. If we sense any predators finding their way into the screened-in area, we can secure the door for additional protection. Currently the 9′ x 12′ hen house can easily accommodate 25 – 30 chickens.

Security door

Outside Run

There is an outside run in the back so the chickens can free range safely. Here is where the food and water is located. The ground is dirt which allows the chickens to bury themselves during the heat of the day. Also these dust baths are a natural way the chickens get rid of any body bugs.

Today, we have 14 chickens (and one duck) and a variety of breeds-brown, white and blue/green egg layers. 

Treats

Homemade Chick-Nic table here

Since our sweet chickens provide us with the best tasting, fresh eggs, we, in turn give them treats and high quality food.

Being located right next to my vegetable garden, often the chickens get Swiss chard and other greens. During the hot summer months, frozen corn, peas, squash and chilled watermelon are favorite snacks.

We also feed them black soldier fly larvae by Grubblies. These treats provide protein and calcium and the chickens LOVE them! And they are made in the USA and can be found here.

Bedding

I am experimenting with a mixture of dried flowers and herbs to add to the nesting boxes. Inspired by Lisa from Fresh Eggs Daily, this mixture is instrumental in keeping the hen house bug free. And who wouldn’t love laying eggs on rose petals?

Pot pourri for the nesting boxes

To line the bedding boxes and flooring, we alternate between straw, hay and alfalfa. The straw is changed out weekly or as needed.

Access to the nesting boxes

And by the way, we only have our chickens for the eggs, not meat.

Egg Laying

During the year, the chickens lay the most eggs in the Spring and Fall. The hot summers slow down the process. In the winter, a hen needs 14 hours of daylight in order to lay an egg daily. We do have a light to illuminate the hen house during the winter months.

Do all chickens lay eggs? The answer is no. Only hens (females) lay eggs and they do not need a rooster (male) to do so. When a rooster is introduced into the flock, then you can get baby chicks from a fertilized egg laid by the hen. Certain types of chickens lay more or less eggs than others.

eggsign

If you are considering raising your own chickens, check with your local government to make sure you are allowed to do so. Here in Phoenix, you can have hens, but no roosters are allowed within the City limits.

Baby chicks can be sourced locally or online. Our latest batch of chicks are from McMurray Hatchery. Through this website you can choose different attributes like the type of chicken, egg color, and age. Seems a bit strange to get a box of live baby chickens in the mail, but that is how it is done.

I cannot say enough about fresh eggs. They taste better. Unlike the eggs you buy commercially, we retain the protective coating on the outside of the eggs and wash them prior to use. Ours are always fresh and delicious.

To read more about chickens, here is a post of frequently asked questions.

Happy Wednesday, my sweet friends! Tomorrow my son arrives home and I cannot wait. There is something about having the family together that just feels right.

Mary.Signature

Save

Save

Save

Save

Save

Save

Save

Save

Save

Save

Save


Hosting an English Tea Party at Our Historic Home

What an honor to host a charitable English tea party event at Bella Terra, our historic home in Phoenix, Arizona. Speaking at this tea is New York Times best selling author, Rhys Bowen. Since Rhys Bowen is British, our fundraiser’s theme is a proper English tea party. And if you aren’t familiar with her books, you must add them to your reading list! Many are on the New York Times Bestseller’s list.

The Entrance

This afternoon event is set outside. As guests arrive, they travel through the gated entrance with a tea cup wreath to the side garden.

The Attire

And what is a tea party without a fabulous hat! Nearly all participants arrive wearing such lovely head attire. Fortunately for me, Dillards has such a great selection of springtime head wear. And the tea length Ralph Lauren dress is a comfortable choice for this event.

Me sporting my new hat from Dillards

With anys fundraiser, one needs to minimize expenses.  My dear friend, Linda, let me to borrow her extensive collection of old English china.

The Table Setting

Susan, my lifelong friend and co-sponsor is the best person to help organize the event. Using Party People, we easily rent the tables, chairs and linens. Julie Greder is a very creative local caterer. She creates a fabulous menu centered around the English tea theme.

teatable1

The tables, set in the side garden, remain cool under the shade of the immense date palms. As our guests gather and mingle, we serve chilled champagne. It is such a civilized time to make new friends and participate in interesting conversation.

The Menu

Everyone claims their seats at the tables, and we begin to enjoy the delicious menu. Teacups are filled English tea. The menu includes: Currant scones with fresh Devonshire cream and lemon curd; cucumber dill, champagne egg salad and tarragon chicken salad sandwiches (no crusts).

Next, for dessert, come lavender shortbread cookies and chocolate praline tarts. Rhys regals us with her stories of being an author. With a longstanding career as a an author, we learn about her inspiration for her settings and character development.

The Presentation

centerpiece

As a parting gift, our guests receive a package of French macarons from Bonbon Macarons. These macarons rival anything I’ve tasted in Paris.

scones1

The Charity

With nearly 40 people in attendance, we raise significant contributions for a non-profit organization that works through one of our local high schools.  Family to Family Foundation provides scholarships to students in rural El Salvador.

Living in a low socio-economic area with no funds for schooling, these children are unable to receive an education. Each year the students from Brophy College Prep travel to this village in El Salvador to meet these scholarship students.  

hat

What an enjoyable and very informative day!  Between the delicious food, stylish hats and outfits and Rhys’s delightful personality, it is the perfect afternoon. We hope this will become an annual fundraising affair.

Rhys1
watercontainers

Thank you for joining me on my very first blog post! I hope this inspires you to subscribe and follow more adventures from Life at Bella Terra. To see the second fundraising English tea event with Rhys Bowen, please click here.

If you enjoyed this post, please feel free to share with others on Pinterest

This post shared with 617th Tablescape Thursday at Between Naps on the Porch.

For more information about Rhys Bowen and her books (I just completed the Royal Spyness series), check it out here: http://rhysbowen.com/

Photos were done by Unfading Beauty Photography http://unfadingbeautyphotography.com/SaveSaveSaveSaveSaveSaveSaveSaveSaveSaveSaveSaveSaveSaveSaveSaveSaveSaveSaveSaveSaveSaveSaveSaveSaveSaveSaveSaveSaveSaveSaveSaveSaveSaveSaveSaveSave