1

Style Trends in 2021

Calming blue in my living room is in style!

Honestly, I have never been in style. Whether it be fashion, interior design, or haircuts, this is an area where I remain classic and traditional, not trendy. But with all the articles coming out about what’s in for 2021, I may just be in sync with the Style Trends in 2021, at least in home decor.

Grandmillenial Style

First of all, who came up with this unfortunate name? I’ve also heard it called Granny Chic? Ugh. Why not Collected Chic? Or Storied Style?

But what is Grandmillenial style? Let’s agree to just call it Collected Chic. According to Better Homes and Garden, it is a combination of traditional style adopts old-school design trends (think: skirted tables, patterned upholstery, floral wallpaper, and richly stained wood furniture) with a fresh spin for the 21st century. By mixing in a few modern elements, the style is nostalgic and comfortable without looking kitschy.

House & Home

It is a return to old fashioned comforts we grew up with and is strongly trending, especially due to COVID. Dark wood furniture is in, but mixed with some updated pieces. Traditional and classic is rising in popularity. Yay!

Color is In

Warm, welcoming colors (fabrics and wallpaper) are in. White and monochromatic is out. With people spending so much more time at home, it makes sense that we need environments that provide a sense of calm and security. Calming blues are also trending (like my library~to see more about this room, click here).

Natural Materials

Materials like rattan or cane webbing, organic fibers and live plants are continuing to be in style.

Closed Floor Plans

Our Kitchen

Throughout 2020, many families had to learn how to co-exist under the same roof from morning until night. The appeal of open floor plans, where each room flows seamlessly into the next, has greatly diminished. An article in Better Homes and Gardens states: “The pandemic has forced us to recognize how important our space is, and open floor plans aren’t always the best decision when it comes to intentionally using a room. Carving out a designated space for different activities, such as remote work or homeschooling, allows for more privacy and limits distraction.”

To see the post where we discuss Open vs. Closed Floor plan, click here.

Silver and Beautiful Tablescapes

My tea service

Sadly, silver was also neglected for years, deemed too “high maintenance” and pushed aside for bamboo flatware, goldware, etc. Grandmothers and mothers bemoaned that their heirs didn’t want their silver… and you can still purchase it for a fraction of the original cost on eBay.

But thanks to the Collected Chic generation, we are slowly seeing a return to silver, especially when creating beautiful tablescapes which has become an art form within this group.  And it’s not just the Collected Chic who have taken to the tablecloth: at the time of writing, the hashtag “tablescape” on Instagram yielded over 1.3 million results!

Home Entertaining

Once we are past COVID, the prediction is that there will be a surge in home entertaining. Many people are cooking more and setting tables for their families while being cooped up at home. Starved for socializing, entertaining will increase.

Home Offices

No surprise here as millions of people are now working virtually. And as corporations look to reduce overhead and real-estate costs, working from home is here to stay. There are so many articles on how to make your work space beautiful and personalized in your home. To see my home office, click here.

Collections
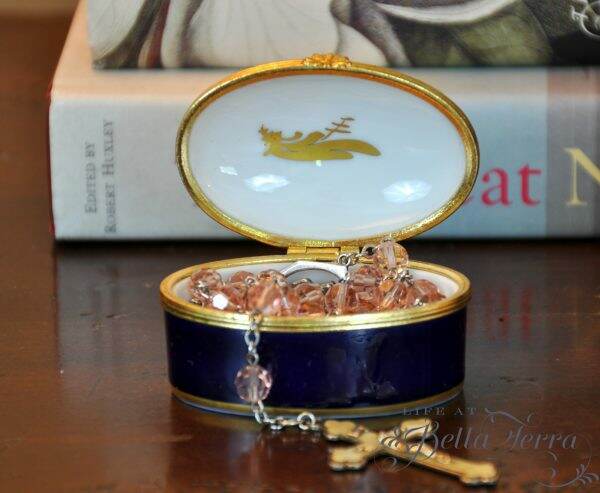
My Rosary bead collection

This is in keeping with the Collected Chic style. Antique, heirloom, or new collections tell a story and fill our homes with cherished memories. My collections range from rosary beads to sand from different beaches around the world. What do you collect? To see more about my collections, click here.

Charm Bracelets

My charm bracelet

One article I read also states that charm bracelets are back in style! One of my early childhood memories is sitting on my mother’s lap and playing with her charm bracelet. Since no one seems to know what happened to it, I decided to start one for myself. Janice Mullen @janice.mullin (or @terraceoaksantiques), finds fabulous vintage charms and has been a great resource in helping me create my unique bracelet.

The information in this post is a compilation of trends from Better Homes and Gardens, The Glam Pad, The Insider, The Washington Post, and Real Simple. What other trends do you see emerging this year?

I hope you enjoyed the holiday weekend. Wishing you a merry Tuesday!

If you enjoy this post, please share on Pinterest.

This post shared with Between Naps on the Porch Metamorphosis Monday #626


Grilled Cheese and Tomato Soup

We recently held a small surprise birthday dinner party for my husband, Scott. All intentions for a larger surprise gathering evaporated with COVID. But since this is a landmark birthday, we did try to make it a bit special regardless. Here are the grilled cheese and tomato soup ideas we created based on a grown-up theme.

Entertaining at home is limited to very small groups. We are careful to be outside in the fresh air. As much as we want to include all our friends, we are being conscientious until this whole pandemic settles down.

In planning, I need to be more aware of how food is served, social distancing and the weather conditions. Our winters in Phoenix are chilly, especially at night and in the morning.

With the help of my children, we did all the cooking while trying to keep Scott out of the kitchen (that could be a blog post in itself!). It was a bit frenetic to say the least. Before any event I am so swamped I forget to take really good pictures of the setting and food. I need to get better at this!

The Menu

The menu for the dinner is:

The recipes for the creamy tomato soup and artisanal grilled cheese are from Bon Appetit’s October 2012 issue. Guests design their own sandwiches from a table of curated fixings.

The Fixings

To make the sandwiches have adult appeal (but who really doesn’t love a crisp, gooey grilled cheese sandwich?) you can vary the ingredients. For this party, the meat fillings for the sandwich include: thinly sliced ham, prosciutto, smoked brisket, and crispy bacon.

Pre-shredding the cheese allows for faster and even melting. Dill havarti, sharp cheddar, pepper jack, gruyere, and smoked gouda are good cheese choices.

Sliced sourdough bread is an easy store purchase, and you can use whole grain or rye. Whole grain mustard, fig and sour cherry jam, are nice spreads to add. Though we did not include these, thinly sliced apples and sauerkraut would work too.

The Soup and Salad

This easy, delicious tomato soup can also be made ahead of time and reheated. If you haven’t made my Winter Kale salad, this is a winner. For this particular event, I did not include the wild rice, but made the salad with chopped fresh kale, feta cheese, pomegranates and toasted walnuts. See the recipe here.

The beauty of this meal is that you can prepare most of it ahead of time. On the day of the event, slice and skillet (or broil) the bread, grate the cheese, make the salad. The soup can be prepared up to 2 days earlier. Just before guests arrive, re-heat the soup and set everything out.

The Preparation

Let your guests decide their fillings, and then finish the sandwich off on the grill or in the oven~hot for consumption. It is fun to take everyone’s order and with one person grilling, the sandwiches are ready quickly.

Soup is served in mugs so everything can fit onto one large plate.

Desserts

For dessert, our guests choose from either rich, fudgy brownies or Black Forest cake or both.

Brownies with walnuts from my son’s favorite cookbook, Bravetart
Black Forest Cake from one of my favorite cookbooks, Layered by Tessa Huff

This warm and comforting meal is very appropriate for a rather chilly evening outside. I was afraid the cake was too small to serve everyone, but thin slices are appropriate for this rich, dense and delicious cake. And I always forget to take off my apron!

Homemade layer cake!

Happy Tuesday, my friends! I guess the New Year has officially begun. How nice to have a weekend after the holiday! We are celebrating our youngest’s birthday this week and I will no longer have any teenagers at home. Where does the time go?

If you enjoy this post, please share on Pinterest.


Creamy Tomato Soup

This recipe can be easily doubled to feed a larger group and makes great leftovers.

  • 1/4 cup unsalted butter (1/2 stick)
  • 10 sprigs thyme (tied together)
  • 1 medium onion (thinly sliced)
  • 2 cloves garlic (thinly sliced)
  • 1/4 cup tomato paste
  • 2 28 oz. cans whole tomato
  • 1-2 tsp sugar, divided
  • 1/4 cup (or more) heavy cream
  • kosher salt, freshly ground pepper
  1. Melt butter in a large heavy pot over medium heat. Add thyme, onion, and garlic. Cook until onion is completely soft and translucent. 10-12 minutes. Increase heat to medium-high; add tomoato paste. Continue cooking, stirring often, until paste has begun to caramelize in spots, 5-6 minutes.

  2. Add tomatoes with juices, 1 tsp. sugar and 8 cups water to pot. Increase heat to high, bring to a simmer. Reduce heat to medium. Simmer until flavors meld and soup reduces to about 2 quarts (8 cups), 45-55 minutes. Remove soup from heat; let cool slightly. Discard thyme sprigs. Working in small batches, purée soup in a blender until smooth. Return to pot.

  3. DO AHEAD: Soup can be made 2 days ahead. Let cool slightly; cover and chill. Rewarm before continuing.

  4. Stir in 1/4 cup cream. Simmer soup until flavors meld, 10-15 minutes longer. Season to taste with salt, pepper, and remaining 1 tsp. sugar. Add more cream if desired.

For a lighter soup, omit the cream; or for a little decadence, add more cream or swirl in a little crème fraiche.


Grilled Cheese Sandwiches

The secret to making grill cheese for a crowd? Turn on the oven (or use the outdoor grill). Encourage guests to customize their sandwiches with the cheeses, breads and fixing you have set out. Then simply pop them on a baking sheet or grill and cook.

  • 3/4 cup unsalted butter, room temperature (1 1/2 sticks)
  • 16 1/4" thick slices assorted bread
  • 1 1/2 lb. Assorted cheeses (coarsely grated)
  • Assorted fixings (meat, spreads, etc.)
  • Kosher Salt, freshly ground pepper
  1. Arrange racks in upper and lower thirds of oven; preheat to 350 degrees. Set a wire rack inside each of 2 foil-lined rimmed baking sheets. Butter 1 side of each bread slice with about 1/2 TBSP butter.

  2. Heat a medium skillet over medium heat until very hot, at least 2 minutes. Melt 1/2 Tbsp butter in skillet. Add 2 slices of bread, buttered side down, cook, pressing down often with a spatula to ensure even basting and rotating pan frequently, until bread is evenly golden brown, 3-4 minutes. (Do not rush or increase heat, or your bread will burn before it can evenly toast).

  3. Transfer bread slices, toasted side down to prepared wire racks (this will keep bread crunchy). Repeat with remaining bread and butter, wiping out skillet between batches. (If all the bread doesn't fit on the racks, you may need to bake sandwiches in two batches).DO AHEAD: Bread can be toasted 1 hour ahead; let stand at room temperature.

  4. Garnish untoasted side of each slice of bread with fixings, then top each slice with a small handful of cheese (about 1 1/2 oz.), scattering evenly. Season with salt and pepper (do not skip this steps; it really elevates the flavors in the sandwich).

  5. Bake bread slices, rotation baking sheets halfway through, until cheese is thorougly melted, 10-12 minutes (begin checking after 8 minutes, some cheese melt faster than others). Working in batches, firmly press 2 cheese-topped sides of sandwiches together. Let rest for 1-2 minutes. Slice in half or into quarters. Serve hot or warm.

We grilled the sandwiches on an outdoor grill, not in the oven.  Either works fine.  Fixings can be:  sliced ham, prosciutto, bacon, smoked brisket.  Cheeses suggestions: cheddar, Swiss, Havarti, pepper Jack, gouda.  Spreads: fig jam, sour cherry jam, chutney, cranberry sauce, whole grain mustard, Grey Poupon.  Other: thinly sliced apples, sauerkraut. Get creative!


Restoration of an Antique Table

Once again, I am participating in the DIY Blog Hop. The focus for January is on tables. Today I have a guest blogger. My husband Scott recently completed the restoration of an old table that we’ve had for almost 26 years. Here’s Scott’s story about this unique piece of furniture.

The Table~Before

When my wife and I were married (seems like yesterday), our decorator and designer, Robert Lashua, catered our wedding reception.  One of the things he brought was this antique table. He beautifully staged it with an abundance of flowers and food. We kept it and have used (and abused) it for entertaining, ever since.  The table is the one on the left in a recent photo. And the drawer (an unusual feature on a table) is missing.

Drawers are warped and deteriorated

One of the legs is splitting. the drawer is coming apart, and the under table support for the drawer is half gone.  I am fixing the table so the drawer is functional and the table can continue to provide service for a couple of more decades. Mary loves this table because it’s wide and perfect for staging food for entertaining.

The drawer is apart in one corner and on the underside (see below).  In the picture on the left you can see one whole side of the under table drawer support is missing.   A consult with a woodworking master (Steve Renneckar) to figure out how to proceed proves invaluable.

 A trip to Home Depot provides the hardwood I need to replace one side of the structure for the drawer to slide on under the table.  I’m using some wood glue and Liquid Nails to pull the drawer together.  
  

You may be asking….why bother.  This is a very old table.  Take a look at the unique pin and cove round style dovetail on the drawer (below).  This method of joining corners was developed in the United States in the 1870’s.

This dovetailing is on Victorian and Eastlake furniture in the US and Canada from the 1870’s into the 1890’s. I have no idea how old this table might be but it’s certainly worth my time to bring it back to functionality.

The Work Begins

The first steps include fixing the split leg (liquid nails polyurethane and clamps), repairing the drawer and planning the under table structure (in the empty area of the center picture below). It is a mirror of the structure shown in the picture on right below.

There are several places where the wood is split or separated.  A lot of wood glue (Titebond here) and some clamps do the trick.  The boards of the table top are fitted together with dowel joinery but have separated a bit.  I attach hardwood strips to the edges of the table (first one end, then the other).  Using my two large bar clamps (40 plus inches- a Jorgensen and an Irwin – you can see them above on the drawer), I pull the slats together and screw hardwood strips underneath to hold them in place (below). You can find the clamps on Amazon here.

Now I need to finish the repair on the drawer and install the new vertical support for the hardwood drawer slides.  This is a hardwood drawer on hardwood slides.  What could go wrong 😑.

First step is to put the drawer back together and try to replace (with hardwood) the portion of the drawer that is gone.  The side of the drawer has a slot for the slats.  The part where I’ve circled is where the bottom of the drawer has disappeared.

Using maple hardwood (and my brand new Makita circular saw – the old Craftsman finally quit) I cut some pieces to replace the missing parts of the drawer.  I glue them, place them and clamp them.  That evening it started to rain so everything was moved into the garage.

Today it’s sunny and with the oversight and assistance from our son Benjamin, it’s time to finish the project.  First we sand down the repairs to drawer.  Then, slide it into the table (upside down at the moment) to make sure it still fit and to finalize the side support.

We cut and place the side piece and slide rails (tried nailing but ended up using screws. I check the final fit of the repaired drawer and ….

The After

 Project is complete- (other than waxing the slides and staining the new wood and maybe refinishing the top 😉).

Now the table can be used again. Mary loves the chippy old paint that is still seen on the sides.

The drawer works beautifully now. The original brass cup hardware looks great on this newly functioning drawer!

The artistry of joint construction like this is long gone. All the more reason to restore this table vs. buying a new one.

Thank you for joining me today and now it’s off to the DIY Blog Hop to see other table ideas from these talented bloggers.

If you enjoy this post, please share on Pinterest.

Tarah from Grandma’s House DIY writes about How to Remove Paint, Scuffs and Scratches from wood Furniture.

Chas from Chas Crazy Creations has a tutorial on a side table makeover.

Kim from Shiplap and Shells has A Simple and Easy Way to Upgrade a Garage Sale table here.

Kristin from White Arrows Home is showing some Creative End Table Ideas here.

Andrea from Design Morsels shows us how to refinish a wood table.

Niky from The House on Silverado displays a Winter Tiered Tray on her Entry table.

Kippi from Kippi at Home is demonstrating simple ways to update furniture

Please remember we all love comments and feedback!


Happy 2021 and Setting New Goals

Veuve Clicquot Champagne with Hibiscus flowers

A new year, a vaccine and hopefully things will be looking up for the world. A rather spontaneous series of circumstances is the basis for our New Year’s Eve celebration. Instead of having a formal meal on New Year’s Day we opted to have a dinner with family and friends on December 31st. So here’s how we welcomed in a happy 2021.

Champagne glasses ~Waterford crystal Millenium series

I am a big believer that setting the mood for an event happens as soon as your guests arrive. That’s why having a champagne bar out of the back of my vintage 1974 Triumph TR6 seemed like a good idea.

My son’s girlfriend, Delaney help create the vintage/luxury theme by using a fur stole, crystal garland, a tapestry shawl and sparkly trees. A copper tub holds the champagne and Prosecco and hot mulled apple cider is also offered as a non-alcoholic beverage.

Our neighbor who always finds fabulous things, brought over a jar of hibiscus flowers she found at Trader Joe’s. What a festive addition to the champagne! To see how I decorated the TR6 at another event, click here.

A sit down dinner for 10 on the back porch included: smoked turkey and ribs, salad from the garden, French onion soup, twice baked potatoes, bread pudding, mincemeat pie and persimmon bread. Then the sparklers came out which is a fun way to end a year. More fireworks were occurring on the cul-de-sac next to us, so it was an eventful night!

Onto New Year’s Day

View of the sunrise from our upstairs balcony

Rather early to bed on NYE and up in time to see the first sunrise of 2021. Since we have so much foliage we never get a good view of the horizon, but it was still quiet and peaceful to watch it.

Implementing a Resolution

Probably the most important resolution for me is to get back to habitually exercising. In 2021, I am committed to doing something at least 6 days per week. For me, this doesn’t mean a high intensity workout daily (at least not yet), but easing my way back into the habit of exercise. So on New Year’s Day I took a long walk, getting my heart rate up enough to qualify as exercise. Whether it be hiking, biking, walking, going to the gym or Pilates, I am attempting to exercise each day.

Last year for Christmas I received an Apple watch. I was seeking a way to monitor my heart rate as three close friends (in my age group) had cardiac issues (one fatal). Instead of some sort of heart monitor, the family bought me this watch. I actually love the fact that it records my movements, heart rate and can also let you know if something is amiss.

Setting Goals

My activity in January 2020

Here’s an example of what it records. There are 3 circles that represent your activity. Blue is for standing, yellow is for exercise and the red is for calories burned by moving. You set the parameters for this. My goals are: 12 hours of standing; 30 minutes of exercise (I should increase that); and 560 calories burned by moving. When you reach your goal, the watch notifies you and the circle is complete.

As you can see I did pretty well January 2020. To give you an idea, I completed 31 workouts for a total of 21 hours 32 minutes of exercise and burned 5,044 calories. So I started last year with good intentions. But you can see what happens over the course of the year (and COVID didn’t help). In November 2020, I did 13 workouts, 12 1/2 hours and burned 2,400 calories. Pretty pathetic.

The watch also tracks the # of steps you take per day. Lots of areas to set new goals. If you have a smart phone, the Health App also tracks several items too.

I am also using the Lose It app, which monitors your caloric intake. Surprisingly, when you write down what you eat, you tend to eat less.

So I am hoping that the combination of exercising, tracking my food intake and reporting back to you will help me in 2021.

A few of you asked about my exercise goals and hopefully this will motivate you to get started. Remember to check with your doctor if you are doing something out of the ordinary. What works for me, may not work for you. But let’s get started together. I hope to publish my monthly results in order to make myself accountable to you.

I hope you had a wonderful New Year’s celebration. Now let’s make this a fabulous year!


The Christmas Dinner Table

With only 3 days until Christmas, I always like to set my table ahead of time to minimize the chaos on Christmas Day. Inspired by my pink and burgundy dining room holiday decor, I did a completely new tablescape this year. Thanks for joining me and I hope you enjoy my Christmas Dinner table.

Protecting the Table

We have a custom table pad made by Guardian (however, I cannot find them online). Padding on the table top accomplishes a few things. First it protects the surface of the table. Next, and perhaps what I like most, is that the pad softens the sound of table activity~for example placing your glass down after using it. Subtle as it may be, you can register when there isn’t a pad or protective layer, as the table will echo the noise.

The Tablecloths

Sorry for the bizarre color~photo taken at night

For this setting, I am using two tablecloths~a larger lace white one first, and then a smaller burgundy/pink toile fabric one. Toile designs depict pastoral scenes, farm life and hunting scenes. My source for the tablecloth is Williams Sonoma, but it appears they do not carry it in stock anymore. Here is a link to a gorgeous toile fabric you can buy by the yard.

The Place Setting

Napkins are trimmed with greens and berries

If you read my blog post about the DIY napkin project that I completely botched (see post here), you will be pleased to see these beautiful napkins. My sister, Susie, read my post and as a Christmas gift, embroidered much prettier ones! What a nice sister!

Chargers were discovered through my friend, Barbara at Mantel and Table

The antique silver chargers can be found at Amazon (set of six here) and though they look like real silver, they are melamine. Hard to believe, right? Silver rimmed, white dishes are from Pottery Barn and have a picture of each of Santa’s reindeer on them.

The pink wine goblets are from Pier One and the vintage water ones are part of my collection. They are a subtle link to the pink holiday theme of the fresh Christmas tree.

The Centerpiece

Fresh greens, and a collection of tinsel and white feather trees gather in the middle of the table. Individual silver mint julep cups hold fresh pink roses, evergreens and a sparkly blush-toned pinecone.

Votive candles in a rose tone (from West Elm) add another glow of light to the centerpiece. Pomegranates are strewn throughout to add a deeper shade of red to the table.

Decorating the Chairs

Each chair is adorned with a boxwood wreath and pale pink satin ribbon. These are pinned to the tops of the upholstered chairs. Wreaths are a Ballard Design purchase, during one of their sales events. They look lovely year after year.

Inspiration is a funny thing~I am such a visual person and sometimes an idea is sparked by the most random thing. I haven’t used this toile tablecloth in years, yet here it is working beautifully for the holidays. The burgundy ribbon is another relic found in the bottom of a Christmas bin.

Even my friend and Pilates teacher, Heather, found the perfect ornament to match my pink tree!

I do feel so Blessed

Today is food shopping for our holiday dinner and one more zoning case. Then I can finally relax and wrap gifts and enjoy these last few days before the 25th.

Since I will be taking the rest of the week off and spending the time with my family, I want to wish you and yours the happiest of holidays. Whatever you are celebrating, I hope you are surrounded by love and laughter. Each day I am so grateful for your interest in our pursuits here at Bella Terra. From the bottom of my heart, thank you for following me. Have a fabulous week and stay safe and healthy.

If you enjoy this post, please share on Pinterest

This post shared with Between Naps on the Porch 641st Tablescape Thursday.


How to Clean a Crystal Chandelier

Cleaning a Chandelier

The crystal chandelier in our dining room has traveled with me from house to house. Found in an antique store and electrified, I love the elegance and beauty of it. Not too gaudy, but just enough sparkle to make the dining room extra special. Once a year, every December, I clean the chandelier by hand. Since I am participating in a blog hop that involves lighting, this seems like the perfect opportunity to accomplish this task and share with others. Make sure you check out the other bloggers and their lighting tips and tricks at the end of this post!

The Before

I look at the chandelier and say, “does it really need to be cleaned?” Probably me just trying to talk myself out of this task. Even though it looks nice, you’d be surprised how much dust and dirt land on these crystals and arms.

Prepping the Work Space

Every year I seem to try a new method. But before I even begin, I lay several beach towels over the dining room table. Not only to protect the table, but the first year I didn’t do this and 3 crystals fell…..and shattered. At least if they fall on the towels, they have a soft place to land.

The first year I cleaned the chandelier I sprayed the entire fixture with vinegar and water. The towels help protect the table from all the drips if you choose to clean the crystals this way.

Pulling back the upholstered chairs ensure you don’t accidentally stain those either.

Select Your Cleaning Product

This year, I decide to use a foam glass cleaner, as I have good results with it on windows and glass table tops. I believe we buy this at Costco as I tend to have several cans of it. Or you can find it online here.

Be Safe

Make sure you use a sturdy step stool to prevent any falls or injuries. Not only do I use the step stool, but also kneel and stand on the table while I’m cleaning.

Start Cleaning

Saturating a microfiber rag with the foam, I start on the saucers under the candles. The minute I wipe both sides with the foam rag and wipe it again with a clean dry rag, I can see a difference in sparkle already.

Here is where most dust settles. In doing this, the chandelier really moves around increasing the chances of a crystal falling or breaking, so be extra careful. Look at the dirt collected in just a few of the saucers.

Repair and Replace

I do have an assortment of extra crystals in case one breaks. They are kept in an old cigar box for safe keeping. Someday I will turn the unmatched ones into ornaments for the tree. You can find additional crystals in antique and thrift stores. Unique ones can be found on eBay or sourced on the internet.

This is also a good time to make sure the wires attaching the crystals are secure. I pinch them closed so they will not fall off with all the swinging associated with cleaning the chandelier.

After doing the saucers, I start in the center of the chandelier and work out. Don’t forget to wipe down the arms or any other surface that collects dirt and dust.

These long 3-sided crystals are difficult to find so I take extra care in wiping them down.

Use Scissors for Snags

Occasionally the microfiber gets caught on the wire between the crystals. Do not pull to separate it but use a small set of scissors. Any tugging on the crystals can cause them to dislodge and drop. I’d rather ruin the rag than the crystal.

The project doesn’t take very long and it’s actually rather soothing to do this. Plus the end result is a sparkling, clean chandelier that will just glow for the holidays.

Replace the Bulbs

I step back to admire my work and notice a light bulb is out. Fortunately I do have a few extras on hand because this particular bulb is not easy to find locally. The bulbs are covered in a silicone material that look a bit like a flame. Naturally, they are available on Amazon here.

Even though this bulb is slightly larger than the dead bulb, no one will notice.

I keep any additional chandelier related items nearby in the buffet so I am not searching for them every December.

So now the chandelier cleaning is finally completed! Remember if you have issues with height, use a good ladder or have someone else do this for you. After looking up for a period of time, it is easy to get dizzy.

While I had the ladder out I also cleaned the foyer chandelier, which took only a few minutes because it is much smaller.

Hopefully this post will inspire you to clean any chandeliers or glass globe pendant lights. It is amazing how something this easy makes a subtle but dazzling difference around the holidays.

Thanks for joining me today and now for other lighting ideas, please keep reading.

This post shared with Between Naps on the Porch Metamorphosis Monday #622

Niky from The House on Silverado shares her Cozy Lighting Tips and Tricks.

Kristin from White Arrows Home has 3 Christmas Lighting Projects.

Kim from Shiplap and Shells teaches you how to make a Mercury Glass Lamp Base with a Twist.

Andrea from Design Morsels show us how to Paint a Chandelier.

Amy from Health Home and Hearth demonstrates how to add wireless under cabinet lighting.

Chas from Chas Crazy Creations makes this adorable lampshade makeover.

Tarah from Grandmas House DIY creates a moody speakeasy with Basement Lighting.

Kippi from Kippi at Home makes these pretty DIY Wooden Lanterns.

Thank you for joining me. Please remember that all of us love your comments and feedback!