1

Combining Real and Artificial Flowers

Easter centerpiece using fresh and faux flowers

Everyone probably already does this, but I am just recently discovering the flexibility one has with combining both real and artificial flowers in floral arrangements.

When I think of all those years of being a purist on fresh flower arrangements, combining fresh and artificial really makes sense. Faux flower quality is significantly better than ever. Artificial flowers last forever and over time, can be the more affordable choice. Access to a wide variety of faux flowers is now available on the internet. When real flowers are pricey, filing in with artificial ones gives you an abundant arrangement at less cost.

Faux hyacinths

For our Easter table centerpiece this year, can you tell which flowers are real and which aren’t? The blue hyacinths and the white peonies are the artificial flowers. The pops of blue and white help complement the blue Indian block tablecloth and china. Faux blue hyacinths here and beautiful faux peonies in many colors can be found here.

Fresh and faux centerpiece

These faux peonies are found in many of my photos as I always have a good looking arrangement available to enhance my shots.

Faux Peonies

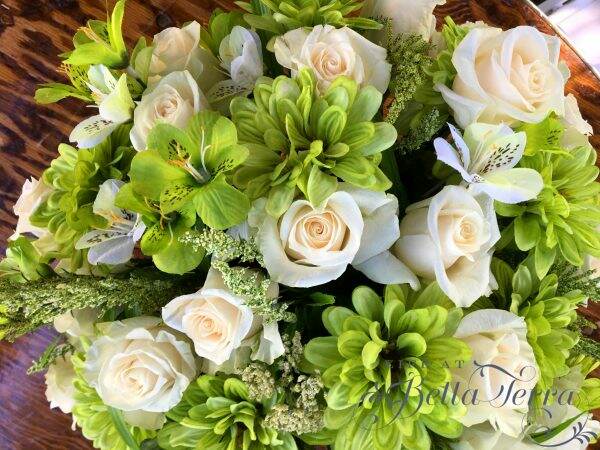
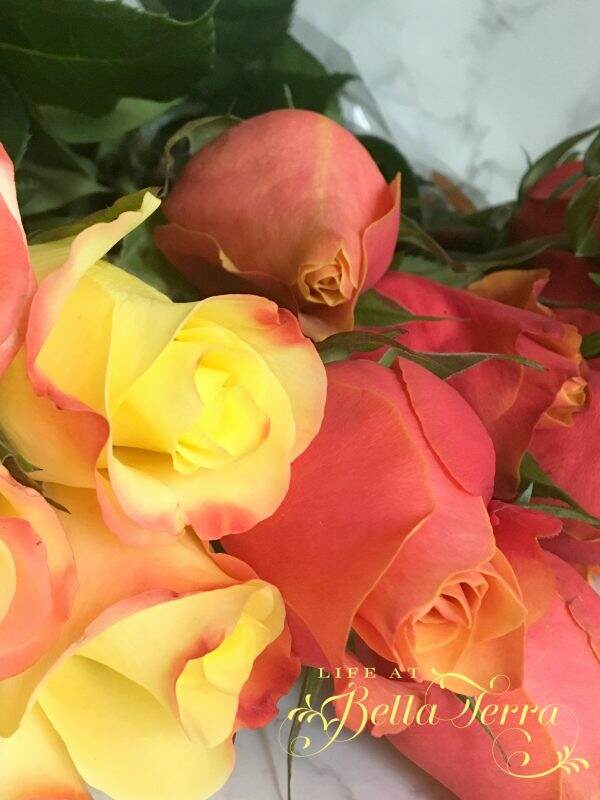
Here is another arrangement in a pedestal bowl. Can you tell which flowers are real? Actually in this one, only the creamy white roses are fresh.

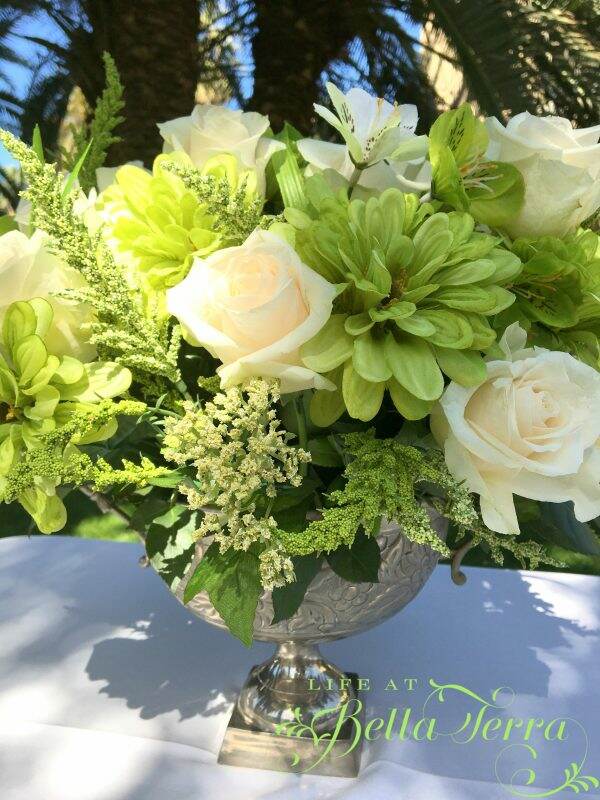
Even the sprigs of greens and the alstroemeria are faux.

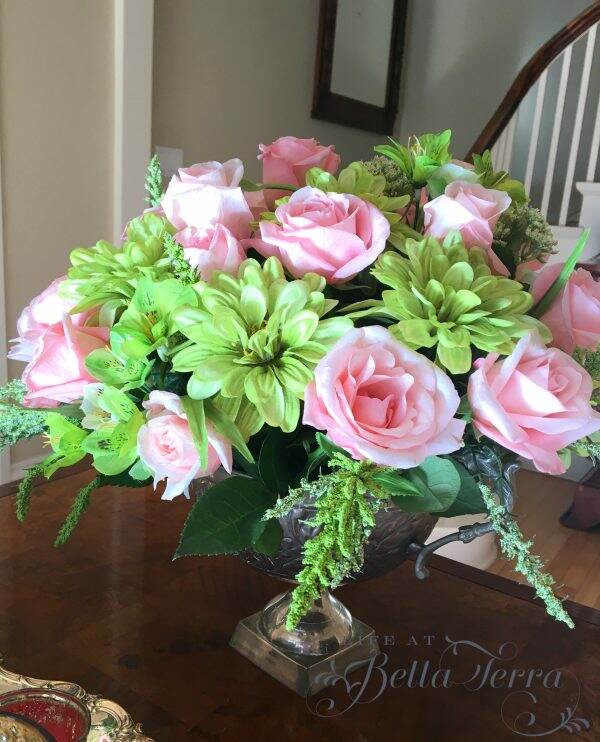
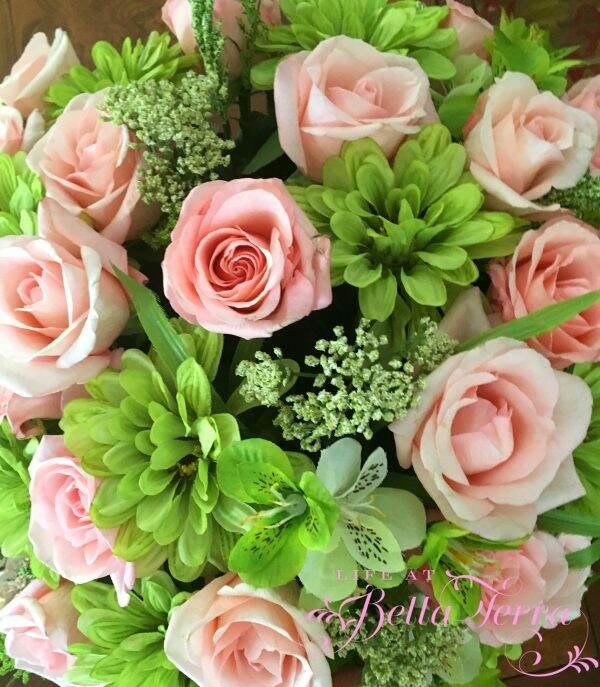
Once the white roses are past their prime, it was easy to fill in with new fresh pink ones.

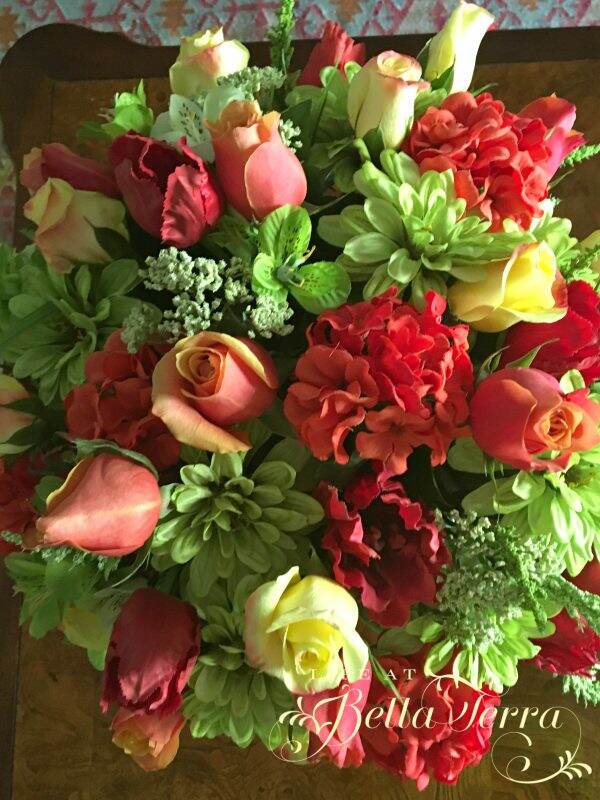
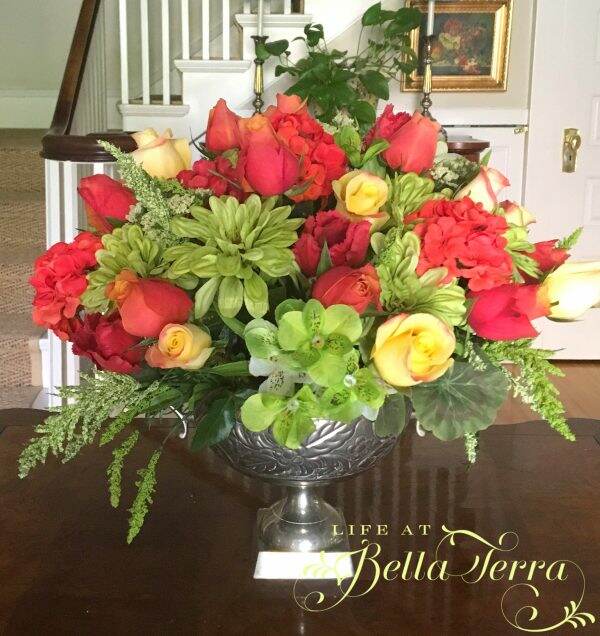
Using the same base of faux flowers, it is fun to branch out using more vibrant and vivid colors. Isn’t it interesting how different this brightly colored one looks compared to the previous two?

The red geraniums and tulips are not real. If you don’t have an attractive pedestal bowl, there is a wide assortment here.

Even for my recent Valentine dinner party where I tend to go all out with fresh flowers, in the areas that need beefing up, you can spot a faux peony or two. To see more about this Valentine dinner party, click here.

Mostly fresh Valentine dinner party flowers

Recently I did spend a bit much on box of 26″ long faux lilacs from The Enchanted Home. I LOVE real lilacs but they do not grow here.

The quality of these branches is very good and I actually did spray the faux flowers with a French Lilac micro-batch perfume by Pacifica.

My friend, Karen says this is the closest fragrance to the real lilac scent so I bought some here. Since these lilacs are a close replica, it is fun to watch our guests walk over and sniff them.

Real lilacs

My first choice is to create beautiful arrangements with real flowers, if for nothing else, the scent. But if you are like me, my home looks better with multiple flower arrangements. Like the pedestal bowl ideas above, faux flowers can be the framework and each week you can add a variety of fresh ones.

Have you tried combining and artificial flowers? If so, share your experience.

Flowers always make people better, happier and more helpful; they are sunshine, food and medicine to the soul.” – Luther Burbank

Happy arranging!

If you enjoy this post, please share on Pinterest.

This post shared with Between Naps on the Porch Tablescape Thursday #622


Saturday Meanderings

Happy Easter (or Passover) weekend! The weather is certainly warmer in Phoenix but hoping it will get back down to something less than 88 degrees. Our Easter dinner will be small but we will do all the traditional family events just the same. Welcome to Saturday Meanderings where we chat about all things good and wonderful this week.

Amazing Online Magazine

Chic & Country Magazine

I just discovered Chic & Country magazine and I am SO impressed. This virtual magazine comes out quarterly (I think) and you can access it anytime.

Chic & Country is a magazine about country style interiors with a touch of French chic and Nordic whites, featuring house tours, home stories, decor ideas, food recipes, flower design, gatherings’ styling, gardens and unique travel destinations. The subscription is $20.00 a year. This is my new go-to read just before bed. Here is the link.

Doing a 5K

My daughter has a goal to do 52 hikes annually. And she’s added a few 10Ks as well. As a result, I am supporting her efforts to be more active so I am participating by signing up for the same races~but only the 5Ks. I can no longer run, as my knees cannot tolerate the impact after multiple knee surgeries. In completing the Shamrock Run last month, I received this Mr.T-like medal and cool t-shirt, so I am looking forward to participating in the Hippity-Hop run today.

A 5K sounds impressive but it is only 3.11 miles and my fast walking time is about 50 minutes. The good news is that I can log my time and get another t-shirt and medal!

Disappointed with Results

One of my garden goals this year is to grow abundant amounts of strawberries. Typically I will buy starter plants from our local nursery, but this year I purchased strawberry starter roots online from Gurneys. Twenty root stock and crowns arrive and I plant them according to the instructions.

All the strawberry plants showed good signs of growth for a few weeks and now nearly 50% of them are dead. Literally. No reason, as I am taking care of them. Every day I go out to my garden another plant has died. So I am supplementing with locally grown starter plants from Whitfill. Live and learn, I guess.

Best Cake Ever

Hands down, my new favorite cake! I made this for my daughter’s birthday in March and am excited to make another for this weekend. It is a London Fog Cake~ a chocolate cake with coffee, smothered in Earl Grey tea infused buttercream and then drizzled with salted caramel sauce. Oh my.

The recipe is from my favorite cake cookbook, Layered, by Tessa Huff. Truly a winner. And if I have shared this with you before, it’s worth repeating…..it’s that good!

New Eating program

My metabolism is very slow, unfortunately. Unlike my son, who has an extremely fast metabolism, mine just chugs along. Barbara, from Mantel and Table, recommends this program to me to jump start my metabolism. We are both doing it for the next month.

I am completing my first week and love it so far! Grounded in real science and written by nutritionist, Haylie Pomroy, it’s a 28 day program. The hope is to mix things up and get my metabolism working at an optimal level. Will let you know how it goes! Here is a link to the book if you are interested.

Annual Lamb Cake

Traditional Easter Lamb Cake

As a child, I have fond memories of Mom’s lamb cake at Easter. Made in a cast iron mold, this cake is now an annual tradition in our home. I will be baking it on Saturday, with an orange blossom cake recipe. So excited to try this new cake as right now, our orchard is filled with orange blossoms. If you would like to see a post on how the lamb cake is made, click here. Isn’t he cute?

Easter Dinner table

Since we are expecting a few more guests, Easter dinner will be in the dining room. A few weeks ago I did a post on a yellow and blue Easter table (see here), but for Sunday, this one is more blue and pink.

If you missed the post this week on these sweet decoupage eggs, click here. The block print tablecloth is just the right shade of blue for Spring. The bunny plates from Pottery Barn connect the patterns and colors in the Royal Doulton Juliet plates. Scattered about are birds, bunnies, and even a stone frog.

That wraps it up for Saturday Meanderings. I hope you have a glorious and blessed weekend. My goal is to stay away from my phone and social media and just relax a little. I know I will be making adjustments to the Easter dinner so I do not stray from my new eating plan, but it will still be wonderful to share it with family and friends.

This post shared with Between Naps on the Porch Tablescape Thursdays #654


How to Make Decoupage Easter Eggs

Decoupage eggs

I have always wanted to try decoupaging eggs with pretty napkins for Easter and Spring. However, I couldn’t find any appropriate napkins laying around the house to do this. So instead, I find paper hand towels with a pretty peony pattern. This is a relatively easy DIY project and would be so fun to do with children or grandchildren too. Keep reading to find out how to make decoupage Easter eggs.

Materials

Materials for making decoupage eggs

After you find the perfect napkin or paper hand towel (mine is from Hester & Cook) you will need scissors, Mod Podge, eggs and a paint brush. You can find Mod Podge here or at any craft store. If you have not used Mod Podge before it is a water base sealer, glue and finish. Mine is a Matte finish, but if you like glossy, why not?

Fresh eggs from our hens

Regarding eggs, since we have SO many laying chickens I am using our fresh eggs. However, craft eggs would work, maybe even plastic or wooden eggs (see here). A neutral color would be my suggestion as I only use white eggs vs. the brown or blue eggs our chickens lay.

Blowing out the Eggs

Lightly tap in a hole at both ends

This is a relatively easy process. First of all, prepare your work surface. A good size piece of parchment paper is taped to the granite counter as my work area. With a metal skewer (or you can use a knife), I gently tap a hole in both ends of the egg at the tips.

If the egg cracks a bit, don’t worry as you will be covering it. Make sure you take a skewer or wooden pick and pierce the inner membrane of the egg. It will be MUCH easier to remove the contents if the inside of the egg is not whole. Last time my husband blew out the contents of eggs for me, he ended up bursting a blood vessel in his eye.

Break up the interior membrane

There is no need for this be difficult. A gentle, steady breath will release the contents of the egg easily. If not, try shaking the egg to “scramble” the insides.

After all the eggs are empty, I gently rinse them and wipe dry with a paper towel.

Adding the Paper

Cut out whatever pattern you like

Depending on the design of your napkin/hand towel, cut out a section. My hand towels are 3 ply so remember to check for that. The first one I did the white paper backing stuck to the egg, but the peony design did not.

Remember to separate any other layer

Using your foam brush (or any brush) paint the Mod Podge to the egg. I like using these disposable foam brushes as you can discard them when you are finished.

Brush egg with Mod Podge

Add your paper cut-out to the egg, smoothing the wrinkles and edges. You can also paint the Mod Podge right on the paper too. It will dry clear and keep the edges fastened to the egg.

Add your paper to the egg in pieces

Keep adding pieces of your paper to the egg. My peony paper is very thin and any overlap can be seen. It may not matter but it all depends on your pattern and how you want it to look in the end.

Letting them dry

Let egg dry

The eggs will need to dry to set the glue. I get better at this with each application.

Make as many as you want

What is nice about these eggs is that they will keep forever. And I can use these pretty eggs in my table decor if I ever do another peony themed tablescape like the one I did last spring. See it here.

Peony-theme luncheon

These eggs are so cheerful and fun. Now I am inspired to look at other napkins and for future projects. The possibilities are endless since there are now many papers especially for decoupage. See some ideas here.

Sweet peony eggs

And the best part? Using all the fresh eggs for a homemade quiche! I love it when there is no waste.

Using the egg leftovers

Thank you so much for joining me today. It feels good to accomplish something that I have been wanting to do. I hope you like this simple DIY project. We will more than likely dye our eggs the traditional way but it’s fun to have other egg options.

Happy Tuesday, my sweet friends!

If you enjoy this post, please share on Pinterest.


Easter Tablescape Ideas

Today, I am happy to share Easter tablescape ideas with many talented friends. Welcome to the Easter Table blog hop. At the bottom of my post you will find links to other holiday table ideas.

Since Easter is early this year, we will more than likely have our Easter dinner inside at the smaller round table located in our family room . We have always celebrated with family only and unfortunately not all our children are in town and can participate.

Tulipieres from The Enchanted Home

The Centerpiece

The set of tulipieres I purchased from The Enchanted Home a few years ago, is the star of the show. To see more about these tulipieres and how to fill them, click here. Since daffodils are now available and affordable vs. tulips, I find this to be the most attractive and economical solution.

Rose pattern damask

The Tablecloth and Dishes

With a neutral damask white tablecloth, this year I am experimenting with blue and white with the yellow daffodils. These blue and white dishes I have never used. This set remains out in our pool house for guests.

Each blue and white plate is a different pattern but in the same tones. I believe I may have purchased them from Horchow years ago. However, Amazon surprisingly has a great selection of new and vintage blue and white dishes. See here.

Stacked on top of a white beaded stoneware plate from Pottery Barn, provides a nice contrast to the gold charger.

I really struggle choosing the charger. The brushed gold ones did win in the end over the wooden scallop and silver ones. It’s time I invest in something neutral like white or wicker, which would look even better. To find super affordable brushed gold chargers, click here.

The Glassware

A simple Lenox water and wine glass with a gold rim complements the setting. Hard to believe these glasses are over 44 years old!

Pots de creme with a gold handle by JSC are small vessels for more fresh daffodils. I collect pots de creme and use them for many purposes.

Handmade nests and handprinted eggs as a place card

Easter Touches

The clay bunnies are a whimsical addition to remind everyone of the spring and Easter theme. Homemade nests from shredded paper and glue (see post here), hold a real egg shell painted with the guest’s initial~as a place card.

My favorite Wallace go-to flatware with a bee motif works well with this blue/white/yellow theme. Blue embroidered napkins are an antique store find.

Here are some fun overhead shots of the table.

I am so happy to share my Easter table theme and now onto the others!

If you enjoy this post, please share on Pinterest.

My sweet friend, Chloe from Celebrate and Decorate is hosting this Easter Tablescape Blog Hop. All you need to do is click on the names below and you will (hopefully) be taken to their website to see what they have in store for Easter. You will be able to open a new tab with each so you can return back to this page and just keep going. A fun way to see LOTS of other bloggers without having to search. Enjoy!

Celebrate and Decorate

Design Morsels

Home is Where the Boat Is

Living with Thanksgiving

Panoply

The Little Yellow Corner Store

My Hubbard Home

Everyday Living

Corner of Plaid and Paisley

The Sweet Sensations

Belle Blue Interiors

Red Cottage Chronicles

Zucchini Sisters

Life and Linda

Mantel and Table

Calypso in the Country

The Painted Apron

Blue Sky at Home

Me and My Captain

My Thrift Store Addiction

This post shared with Between Naps on the Porch Tablescape Thursday #652


My Easter Table

I know many of us are having smaller Easter dinner celebrations this year. However, albeit cozy, it is important to make it special for several reasons. Easter is a time of rebirth, joy and celebration. Even though we may be apart from our friends and family, we are healthy and safe.

Typically we have our sit-down dinners in the dining room, but since I have a “new” (from a yard sale) table in the family room with 4 “new” (from a yard sale) chairs, this location felt right for 4 people.

I chose the Royal Worcester Yellow Urn/Roses/Greek Key china because of the cheerful colors. An old business friend bought me 4 dishes many years ago. Slowly, over time, I have added to my collection but it is a rather difficult to find other pieces to this pattern.

Check out my adorable DIY bird nests! I am still tickled over how they turned out. If you missed my last blog post, click here. They fit perfectly inside my creamed soup bowl and add the Spring touch the table needed.

Yellow linen napkins are from Sferra. The sweet lamb napkin holders are gifts from my friend, Gwen. I am putting the napkins off to the side in a non-traditional location but this seems to work best with the round table configuration.

It’s hard to have Easter without bunnies! Daffodils were from our local Safeway store. I have no idea where the bunnies came from…maybe I just started with two? Ha!

My latest glassware purchase include these drop dead gorgeous Rogaska Gallia crystal glasses. They stand 9 3/8″ tall and the crystal cuts are stunning. Thanks to my friend, Louise, I was introduced to them at her dinner party last fall. I fell in love with the weight of the glass and was fortunate to find these on eBay.

Though I haven’t finalized the menu, I am hoping we have all the ingredients here so no one has to make a trip to the grocery store. We are wearing our masks out in public. I am encouraged by the latest projections as it appears that sheltering in is helping.

Wallace Silversmiths Bee Flatware from Horchow

Today I am making the annual family Lamb Cake. I am hoping all my siblings and my son are doing the same so we can have our Lamb Cake competition. My mother would bake one every year and it is one of many fond memories I have of her. Here’s a glimpse of last year’s cake. To learn more about the tradition of this cake, click here.

Happy Saturday and wishing you a blessed Easter with your family. May you continue to have good physical, mental and spiritual health!

The post shared with Between Naps on the Porch Tablescape Thursday #653


Making Easter Nests

In setting the table for Easter Sunday dinner, I needed something to make it feel more spring-like. I love birds’ nests and have a few, but didn’t think it was very sanitary to actually place them at the dinner table.

The Royal Worcester dishes I am using for the place settings have a lovely small 4″ creamed soup bowl with plate that I want to place on the dinner platter. Now the challenge is making a nest that will sit inside the bowl. I’ve got this!

Getting Started

After some pondering, and not wanting to go to the hobby store, I searched the house for materials. Leftover bottles of Mod Podge and shredded paper from the shredder sparked me into action.

In order to form the depression in the middle of the nest, I made a ball out of aluminum foil and covered it with plastic wrap. I have not used Mod Podge in years and I couldn’t recall if it would adhere to foil, hence the protective plastic wrap.

Knowing this would be a bit messy, I put down a piece of parchment paper, gathered my supplies of latex gloves, shredded paper, 4-5″ styrofoam bowls, plastic wrap and glue. If you don’t have Mod Podge I would imagine any glue diluted with a bit of water would work.

The Process

Line one bowl with plastic wrap. In another bowl, mix the shredded paper and Mod Podge. Use enough so the paper follows your hand around the bowl. If you use more, the drying time will increase.

Pat the glue/paper mixture around your center ball until you get the size nest you want. Do not cover the ball.

Let dry. I put mine in the sun since it was late afternoon. I removed my ball to make sure my depression was deep enough and clearly defined.

After approximately 1 hour, the nest is consolidated enough but not completely dry. I re-shaped the nests to have more of a rounded base vs. the shape of the plastic bowl.

Like most projects, the more you practice the better you get. The first nest I made, had more glue than the others. However, it did require a bit more drying time. The Mod Podge is very sticky and the shredded paper stayed together.

The Finishing Touches

While the nests are drying, choose your paint colors. Using old cans of spray paint, I selected 3 colors that would resemble a real nest.

Matching spray paint colors to a real bird’s nest

For protection, lay down a drop cloth or plastic, and spray your nests to the color of your choice. Think of all the possibilities! I even used a bit of gold on top.

I let the nests dry overnight. They are nice and sturdy.

The next morning, I added bits of different color moss for additional texture. You can add twigs, feathers or really any yard debris for a more natural look.

Using a glue gun, drip the glue over the nest. Push the moss onto the glue. I placed darker moss on the inside and a lighter one on the top.

Trim any excess if necessary.

Fill the nests with faux eggs or candied eggs ones for color. The nests fit perfectly into the soup bowls.

This project was completely unexpected! It was fun for me to search the house for supplies to make it. Now I am thinking of all the things I can make out of glue and shredded paper. My own version of paper mâché!

This project took approximately 2 hours. If I used less glue, they would have dried faster. You may need to let them completely set overnight. Today, I will leave them in the sun to get rid of the spray paint smell. I like the fact that I can use these year to year too!

I can’t wait to show you how adorable these look on my Easter table ~~that will be Saturday’s blog post!

Happy Wednesday! What are you up to day?