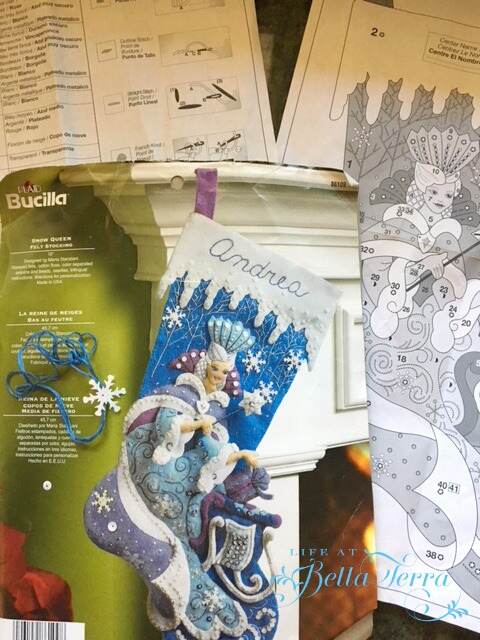
1

My Kitchen – Part 1

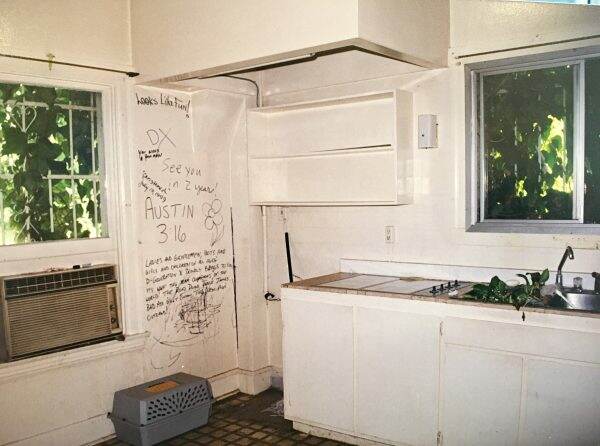
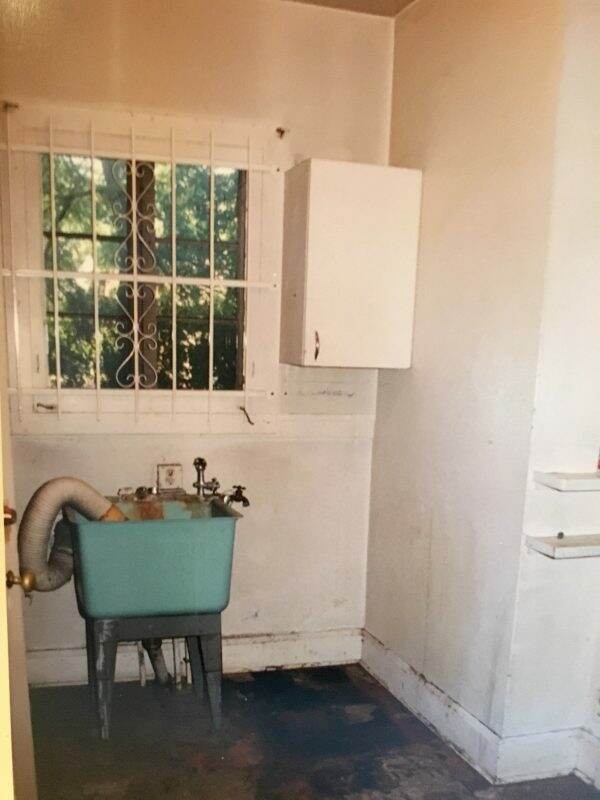
The original kitchen was woefully inadequate. Gotta love the electric cooktop right next to the sink!  It was so small we converted this space into the breakfast room.

We desperately needed a new kitchen. Trying to add such a vital room to a 100+ year old home took some careful design and planning.  Thankfully we had a wonderful architect who understood how important it was to ensure the transition from the old to the new was seamless. I wanted the new kitchen to look like it was original to the house.

When designing the kitchen, I divided it up into working sections~~cooking, baking, prepping, cleaning, storage and dining.

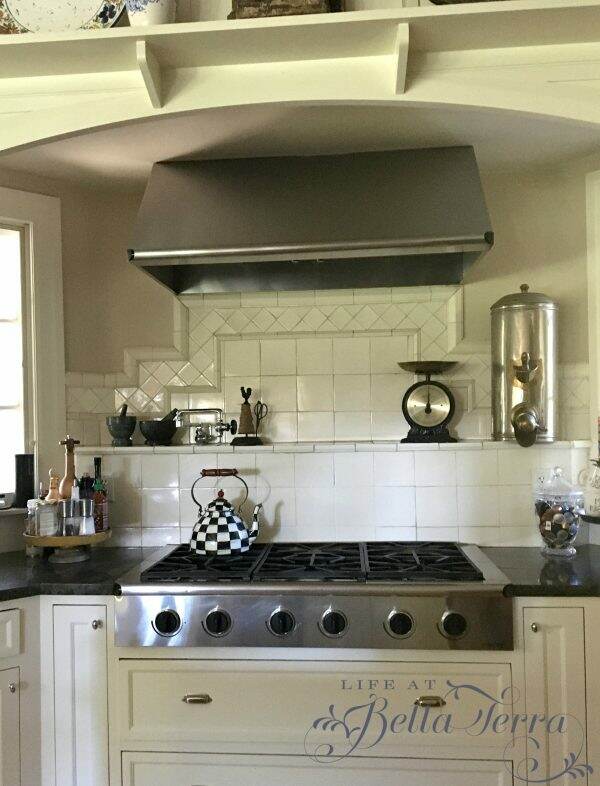
The Cooking Section:

The cooking area is set off to the side in its own alcove.  The main focus is the 6 burner Dacor range. The two deep drawers below hold all the pots and pans I use on a regular basis.

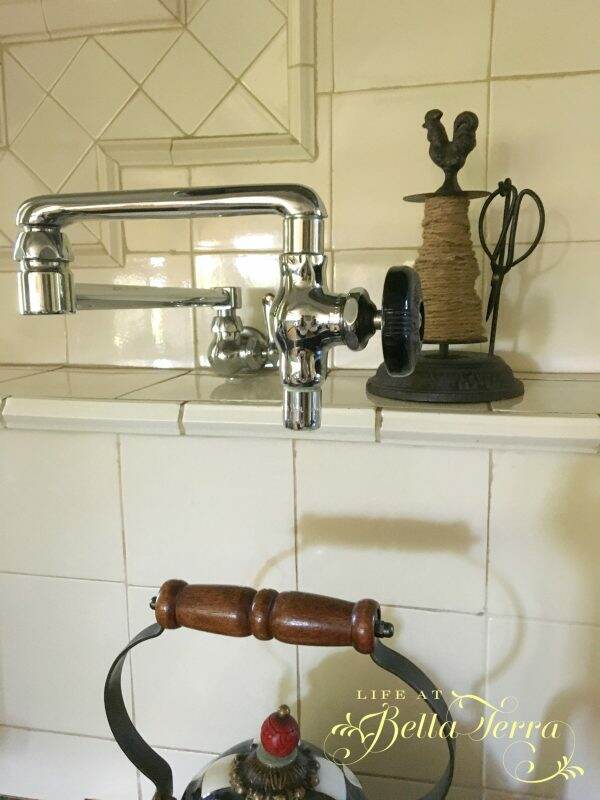
One of my favorite parts of the cooking alcove is the pot filler.  It is so easy to fill stock pots vs. carrying them across the room from the nearest sink.

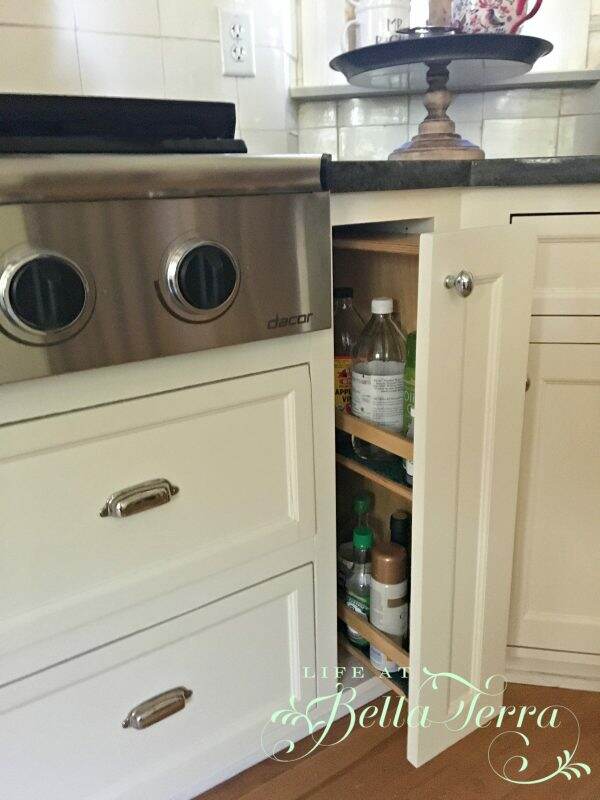
The two pull out drawers on either side of the Dacor 6 burner gas range as used for oils and seasonings.

Everything I need while cooking is close at hand. Utensils are kept in vintage crocks within easy reach. Being left handed, all this sits to the left of the range.

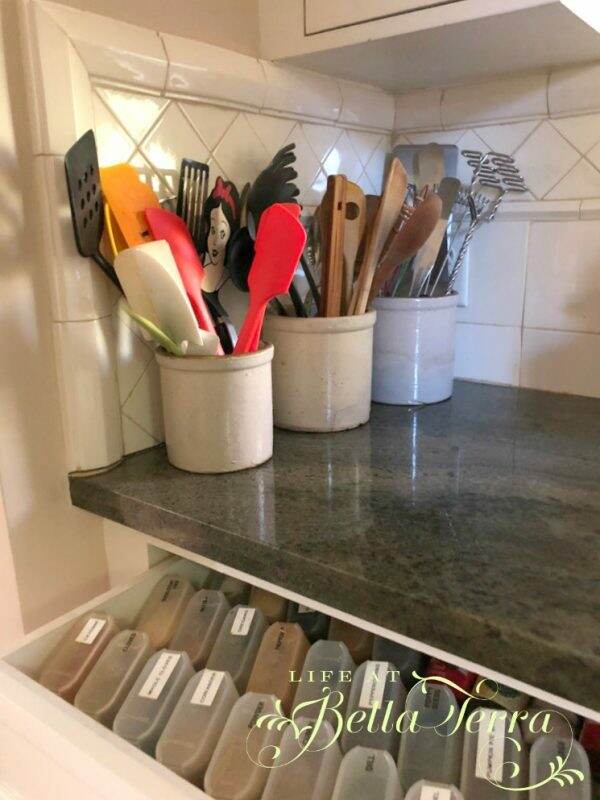
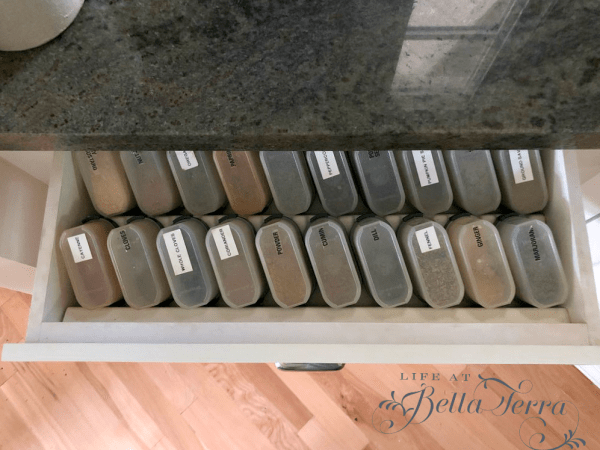
The spice drawer is filled with Tupperware spice containers that are labeled.  I do love matching labels but haven’t gotten around to making these look all the same.

I just read that narrow width, light flooring is back in style.  We matched the original floors using Canadian Beech.  See? If you wait long enough, everything comes back in style!

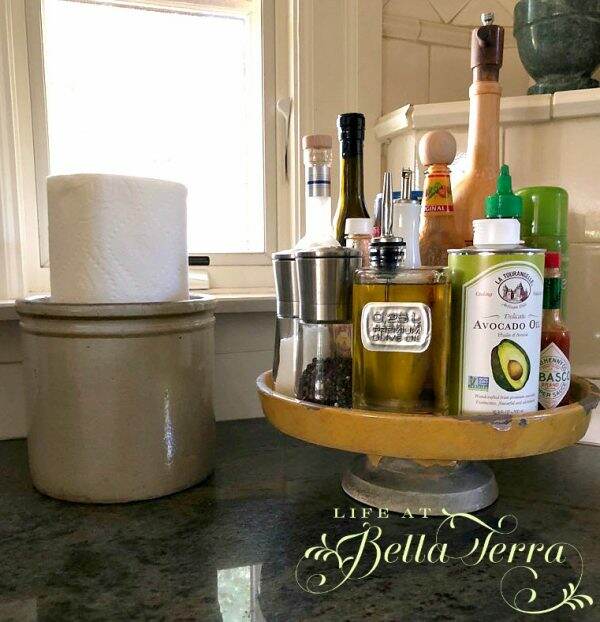
On a vintage pedestal stand, I keep the daily essentials~~salt, pepper, oils, sauces, vinegar out on the counter.  A roll of paper towel is very close to help with wipe ups and spills.

To the right of the range is our coffee/tea station.  To see more about this, click here.

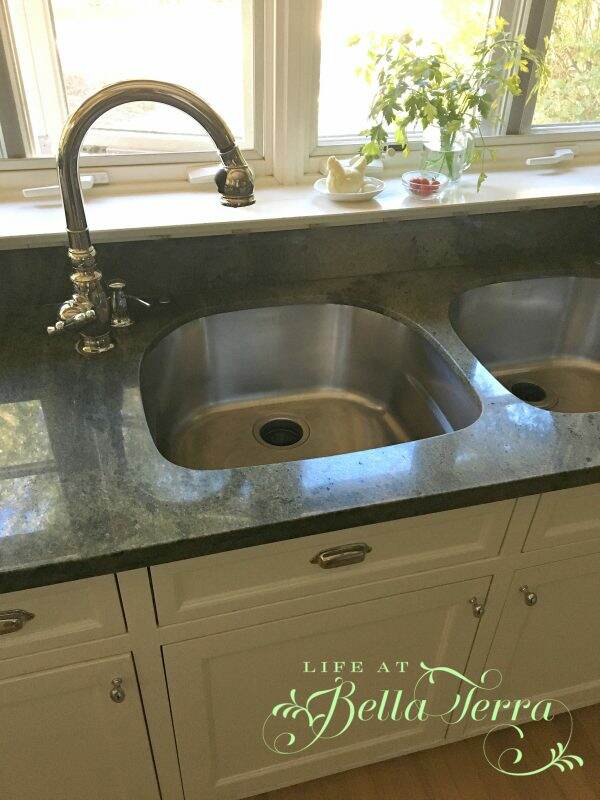
The Cleaning Section:

The cleaning area supports 2 sinks with their own individual faucets.  I’ve never had a kitchen with 2 faucets (usually there is one faucet that both sinks share), but we use both sinks ALL the time.  The two sinks/faucets allows 2 people to do separate tasks without being in each other’s way.

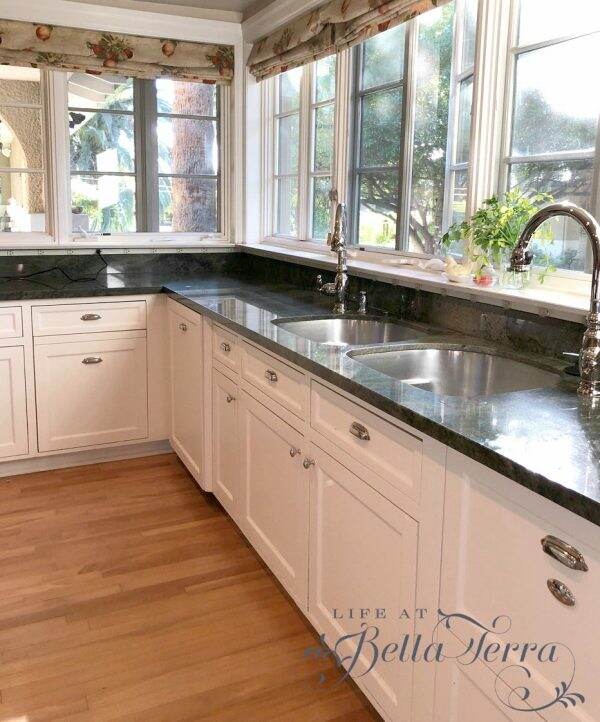
The faucet pulls out and can be used as a sprayer.  Buttons on the faucet change the water from a stream to a spray.

Investing in good sinks is a must. These deep Franke sinks were well worth the money.  They still polish up nicely and provide enough space to wash the most difficult items.  When the children were little, they would sit in the water and play while I prepared meals.

Dishwashers are on either side of the sink.  There are 3 pullout trash containers-one for regular trash; one for composting and one for recycling.

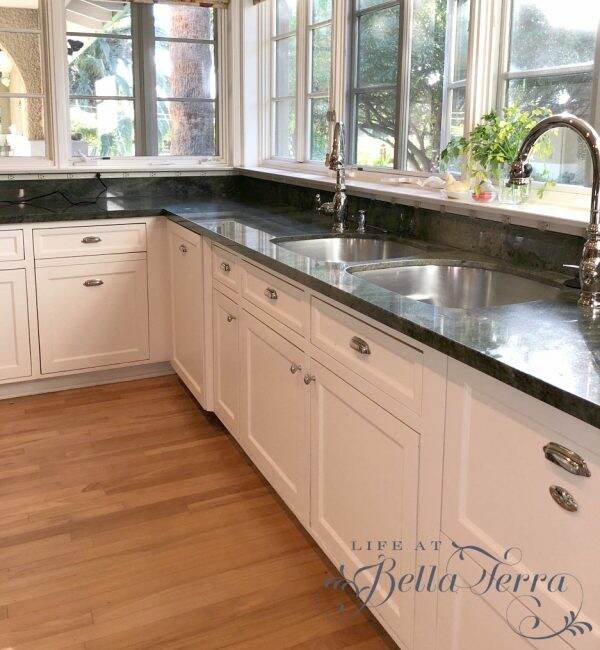
The L shaped bank of casement windows overlook the backyard and terrace, providing an abundance of natural light and ventilation.  These were installed so I could keep an eye on the children playing in the backyard and pool. The latest harvest from the garden is often found on the windowsills.

I hope you enjoyed seeing some of my kitchen.  My next post will focus on the baking, storage and dining sections.


Architect: Cathy Hayes Architecture, Phoenix

Dacor range

KitchenAid dishwasher

Fisher Paykel dishwasher drawers

Marvin Windows

The Chicago Faucet Co.-potfiller

Waterworks tile

Franke sinks

Cabinetry-custom, Lacquer finish in Cottage White

Hardware-Restoration Hardware

Flooring-Wildwood Custom Flooring, Phoenix

Kitchen Faucets- Clyde Hardware, Phoenix.


The Mudroom

The mudroom is perhaps the most used, and abused room in our home.  Here is a “before the restoration” picture:

And after:

This room was designed to withstand a steady stream of muddy feet, wet bathing suits, dogs, cats, and sometimes chickens (when one is ill).  Located at the back of the house, off the kitchen, it is a hub of activity.  I chose a stone floor, a blue slate, to withstand the traffic.  The diamond sisal rug is from Ballard Designs and still looks new.

The dutch door leads to the back porch/yard.  To the right, there is a broom closet which houses all the cleaning supplies, batteries, light bulbs, vacuum cleaner and tool box.

The kitchen is to the right of the hat rack.  Santa hats are still up but will be coming down this weekend.

Below is command central.  All the brains/technology to the house are located in the top 3 cabinets.  The doors have metal screens for ventilation.

Below there is the gift wrapping area and numerous drawers for miscellaneous items-scissors, tape, glue gun, ribbon pieces, etc.

This also serves as the laundry folding area or a place to wrap gifts. The drawer pulls out when needed and provides a nice, large flat work surface.

The narrow upper cabinet is where various rolls of ribbon are stored.  Notice the old wall color~~a golden rod (what was I thinking????).  I can happily report the entire room has been recently painted white.  What a difference!

To the right of command central, is the back staircase.  This will be a 2018 project.  Since this staircase is used more than the front one, the sisal rug is in need of replacement.  It will be my third rug in 15 years..

We had some fun in designing the railing.  Grizzly Iron, Inc. in Phoenix made a wrought iron snake that winds it way up the stairs. His rattle is at the end. All the custom iron work at Bella Terra was done by Rodger LaBrash and his company.  I highly recommend them.

Behind the pocket door is our “smaller than I would like” laundry room and half bath.  A long story for another time.

I didn’t realize before writing this post, but this small room has LOTS of doors-5 in total!  The one between the laundry and my workspace is to the library.

Next to the entrance to the library is a wall mounted hidden ironing board, which is convenient to the laundry room.

The long countertop and cabinets make up my office/workspace.

As you can see, I often have helpers…

I hope you had a wonderful holiday season!  Any New Year’s resolutions you’d like to share???

* designed by freepik.com


Happy New Year’s Eve!

Happy New Year’s Eve….hard to believe it will be 2018. I want to push a big brake pedal on life…it’s is going TOO fast!

We are having a nice dinner this evening with no plans for anything formal tomorrow. When I made my Thanksgiving centerpiece (to see the post, click here), my friend Tracy, wished I had provided more information on how I did it.  As a result, I created a similar one for our New Year’s Eve dinner table.

You can really use any tray or container that will hold plants and flowers and is somewhat waterproof.  For Thanksgiving, I used a wooden tray I lined with foil and plastic.  For this one, I went to the Garden Shop at Whitfill Nursery and purchased an oval, galvanized tin one with handles.  I had them fill it with water to make sure it didn’t leak.

It was nearly waterproof, but leaked slightly on the side edge. I can work with that. While I was there, I selected a variety of green plants with white flowers-geraniums, ornamental cabbages, variegated ivy, and dusty miller.

I lined the tray with a black plastic trash bag, covering the seam where there is a slight water leak.

I removed the plastic containers and arranged the plants in the tray.  I did not need to add additional soil, since I will be removing them and planting them in the garden next week. I really like the ability to re-purpose these plants after they have served their time as a centerpiece.

Next, I added some cut flowers for color and texture~~using 2 dozen white roses.

I inserted plastic cups in the bare spots, filled them with water and added the cut roses.

There were still some holes so I filled them with leftover fresh greens from the Christmas tree (that were sitting in a bucket of water for the last few weeks). Again, I can’t say enough about the quality of Christmas trees at Whitfill.  Our tree and these greens are still so firm and fragrant.

At this point I thought the centerpiece was completed.  I really like how it looks against the natural wood table.  However, when I placed it on the white linen tablecloth, I felt it still needed something.

Initially, I wanted my New Year’s table to be whites, greens and silver.  But at the last minute I changed my china to this for a burst of color.

By adding gold and green balls,  it help to spice it up a bit. I love the shape of this tray, however, I feel the galvanized tin is a bit rustic for the formal place settings.  I’m hoping with the candles lit, it won’t be as noticeable.  But again, it’s fun to mix and match!

Thank you for your inspiration, kind words and loyalty in 2017.  From everyone at Bella Terra, we wish you and your family a safe, healthy and prosperous 2018!

Resources:  Silverware: Wallace Napolean Bee purchased from Horchow; China:  Royal Worcester Greek Urn with Flowers; Roses purchased from Safeway


Christmas Recap

I am enjoying the lull after Christmas, finding it a bit hard to get back into the swing and routine of everyday life.  But bills need to be paid and laundry keeps coming, so today is my “get all the little piddly stuff out of the way” day.

But before I “get” to do the nuisance things, here’s a recap of our holiday.

The cookies were eaten.  Santa left his annual letter, responding to the hilarious ones the children still write for him. His large footprint was in ashes on the living room fireplace hearth.

My son was all decked out in his holiday suit for opening presents.

Baby Jesus was in the cradle, surrounded by Mary and Joseph.

There were presents under the tree and the stockings were filled.

We probably say this every holiday, but the tree this year was so beautiful.  It is still very fresh and fills the room with the smell of pine.

As you know, I am such a novice painter, but I tried my hand at my second holiday painting.

Some presents for the children included a painting of my daughter’s dog, Sox. Elisabeth absolutely LOVES this dog, who has been part of our family since 2007. I’ve discovered that animals are hard to paint!

Each child receives a snow globe (until age 21), so here is Julianna’s last one for her collection.

It was an ambitious project but I made two Christmas quilts for the girls, which I will write about later.  During the sewing process, I had lots of help.

After opening presents, we put the ham in the oven.  Instead of a formal sit down dinner, we elected to have a buffet of ham sandwiches on croissants, a salad, and leftovers from the charcuterie and vegetable platters. Very casual and very appreciated…

My son and I baked a cake together.  This recipe did not disappoint.  It is from Tessa Huff’s Layered cookbook, the Red Currant Chocolate Cake. The buttercream was flavored with a raspberry/currant curd and creme de cassis.

We are still enjoying all the lights and decorations and will do so until the Epiphany on January 6th.

I love this time between Christmas and New Year’s where the world seems to slow down a bit.  Enjoy each and every minute.  There’s a New Year right around the corner….


Entertaining Shortcuts

Every year we host our neighborhood board for a holiday celebration.  We have the most wonderful group of neighbors who spend countless volunteer hours maintaining the integrity and character of our North Central neighborhood.  I always feel so lucky to welcome them into our home to celebrate them and the holidays.

Typically, I would love to think I have the time and energy to make everything from scratch, but realistically that’s not always the case. What did we do before Costco or Sam’s Club? This year, I capitalized on all the wonderful things available at Costco for the hors d’oerves, flowers and desserts.  With a little imagination you can take ordinary items and turn them into something special with these entertaining shortcuts.

As you know, I think the carnation is the underdog of flower choices, but they are affordable, hold up well and provide a burst of color.

With some evergreens from our Christmas tree (or greens from your yard), you can make them look like this.

Costco has a gourmet food section with an extensive assortment of salami, proscuitto, and cheeses. The French brie, Isigny Ste. Mere is from Normandy and is so delicious.  The Cambozola blue cheese was only $8.00 for 2 wedges! Their Cranberry Cinnamon goat cheese is so festive.

With a very large tray and some effort (I had my son’s assistance), it can look like this! We added olives, nuts and fruit for a beautiful display.

Pre-packed vegetables trays are available in most grocery stores.

With a few added tomatoes and sprigs of herbs (I used thyme, but rosemary or parsley would also work), the vegetable tray can have a holiday theme.

I love making Christmas cookies, but I’ve had no time this year.  Costco has a very good selection and I especially like their Holiday Stollen Bites.

Though the picture isn’t great because I took it after our guests started arriving, you can see how I arranged the desserts.

In addition to beer and wine, my son made a Christmas sangria.  Our non-alc0holic options were water and hot mulled cider, which was a perfect choice on a chilly December night.

The cider is from Trader Joe’s.  Simmered with mulled spices, the presentation was made pretty by adding mini Rome apples and whole cloves.

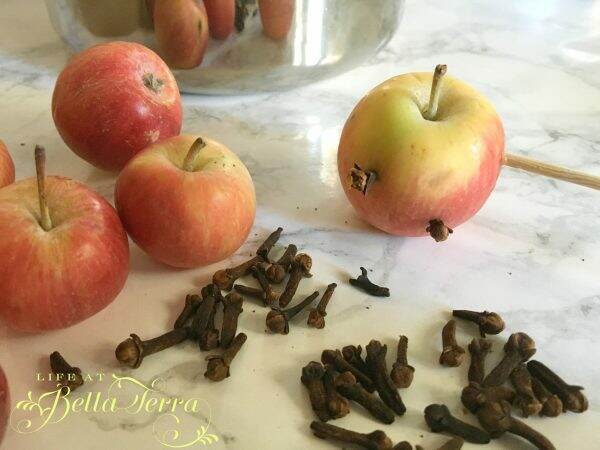
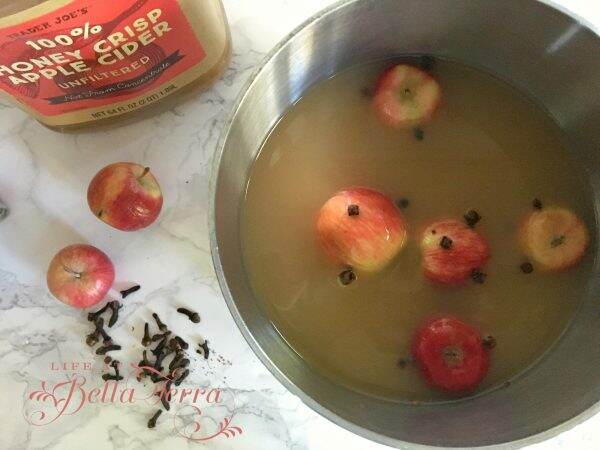
By using a skewer to pre-poke the holes, the cloves are easier to insert.

A crockpot full of Trader Joe’s party size mini meatballs and their Bold & Smoky Kansas City Style BBQ sauce rounded out the appetizers.

The back porch is the perfect location for larger gatherings.  With the fireplace roaring and the ceiling heaters on, it was a lovely evening with neighbors.

What I didn’t know before writing this post, is that Costco delivers!  It appears they can do so in a few hours or a few days~~that opens up so many new possibilities!

Taking some entertaining shortcuts during this holiday season is a way to lower the stress and still provide a warm and welcoming environment for your guests.

Happy Entertaining!


And the Stockings were hung….

I am not sure why we hang stockings by the chimney with care, but it appears to be a long standing custom.  Since 1823 when Clement Clarke Moore wrote “A Visit from St. Nicholas”, Christmas stockings have been an essential part of Christmas traditions.

We have 5 handmade stockings for our family and multiple ones for each of the pets.  Our family stockings are made from a Bucilla felt stocking kit, which can be easily purchased online or at a craft store. Click here to see Bucilla stocking ideas on Pinterest.

The kit provides everything you need~~stamped felts, embroidery floss, ribbons, sequins, beads, needles and lengthy instructions.   I made the very first one 23 years ago when I was pregnant with our first child and subsequently made one for each child since. Be aware~~they are very time consuming.

For Benjamin’s stocking, each toy in Santa’s bag was individually made and then stitched in place.

Since my husband loves to golf, it was very easy to select the theme for his stocking.

My daughter’s stocking is a little different but still required a great deal of time and skill to make.  French knots and delicate needle work was required.

Each stocking is lined with a different fabric.  I recycled my daughter’s favorite blue velvet holiday dress as the lining of her stocking.  The dress had little white pom poms on the neckline and I used those too.

This year I FINALLY completed my stocking kit which my husband bought for me.

The living room mantle is nice and wide, allowing for an abundant garland of greens, berries and hydrangeas (from The Enchanted Home).

Brass hangers are tucked in the garland.  In retrospect, I would have been more careful in adding the tabs on the handmade stockings, because it affects how they hang.

Now for the fun part~~tucking a clementine in the toe and filling them with goodies for Christmas Day!  Do you have a favorite stocking?