1

Painting a Laundry Organizer and its Challenges

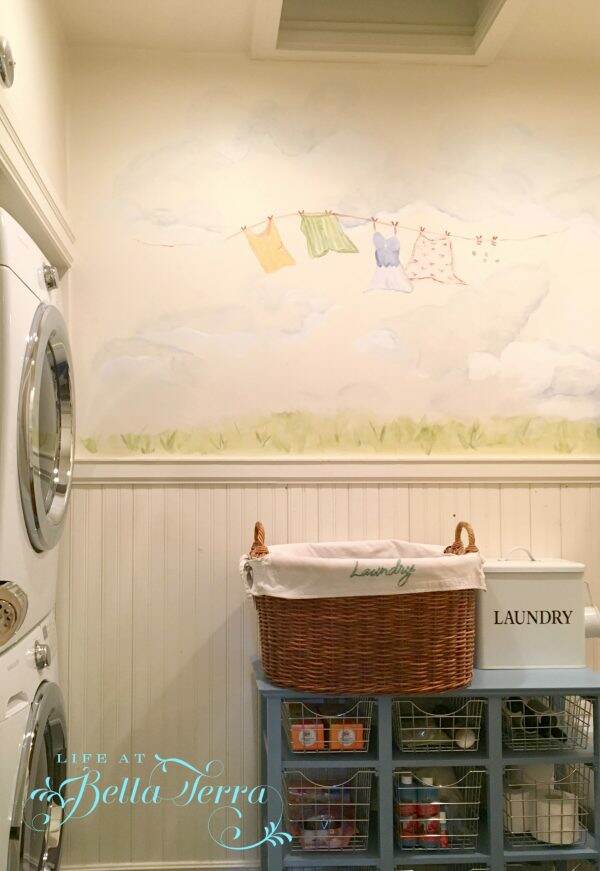
I don’t know about you, but my laundry room often gets overlooked.  Not only does it hold the washer/dryer, but there is a utility sink, toilet, cat litter box, laundry shoot and a French rolling basket. It’s hard to make it pretty with a cat litter box…..is there anything more unattractive?

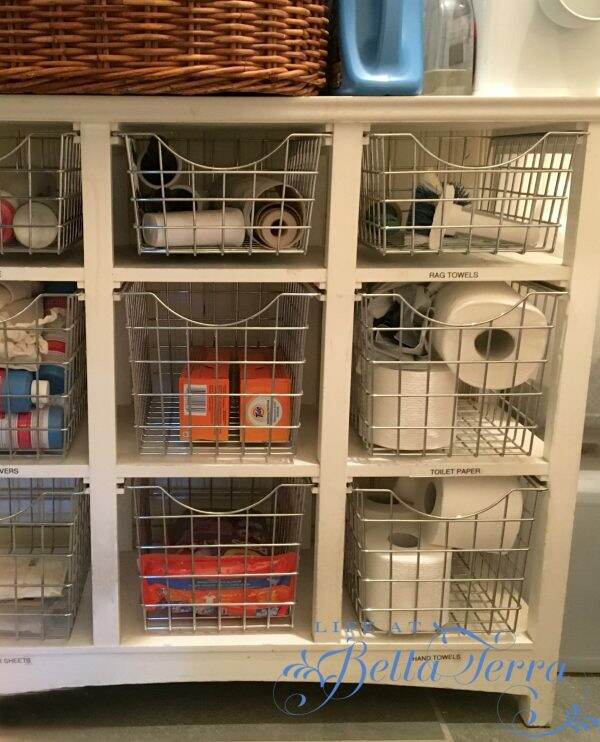
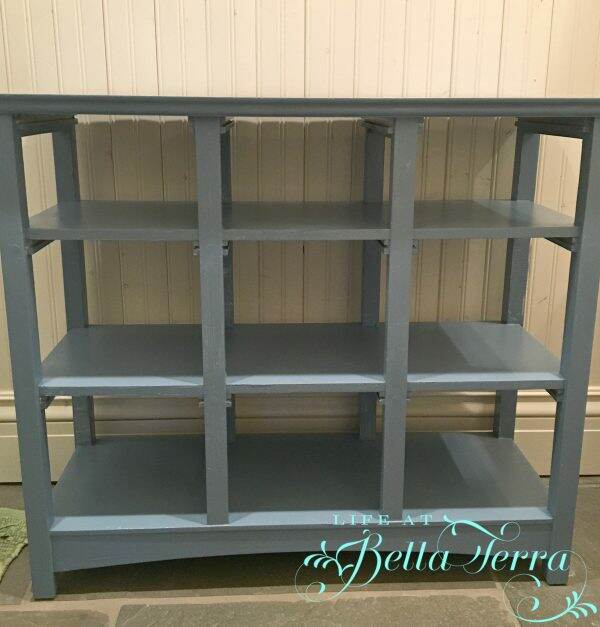
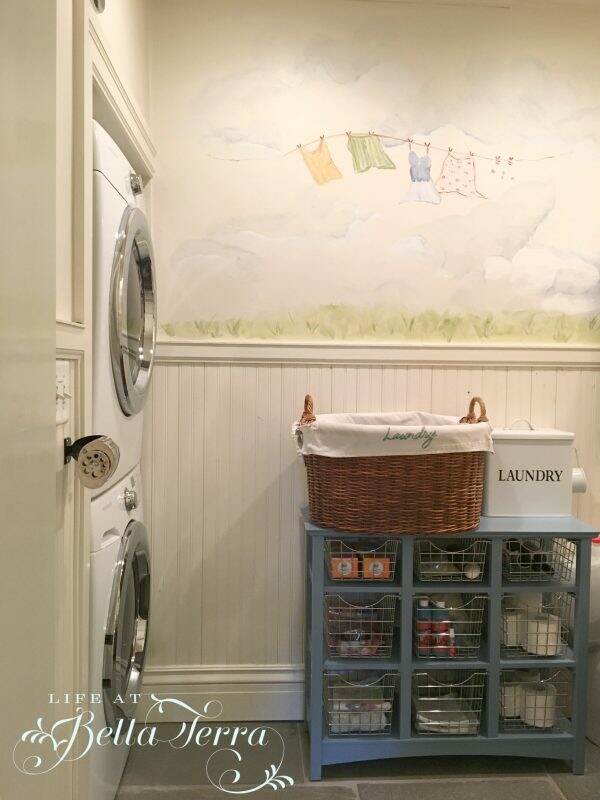
I purchased this piece of furniture with wire baskets years ago from Pottery Barn. Of course I didn’t have any great before pictures, but you can see it is white.

Laundry Organizer Ideas

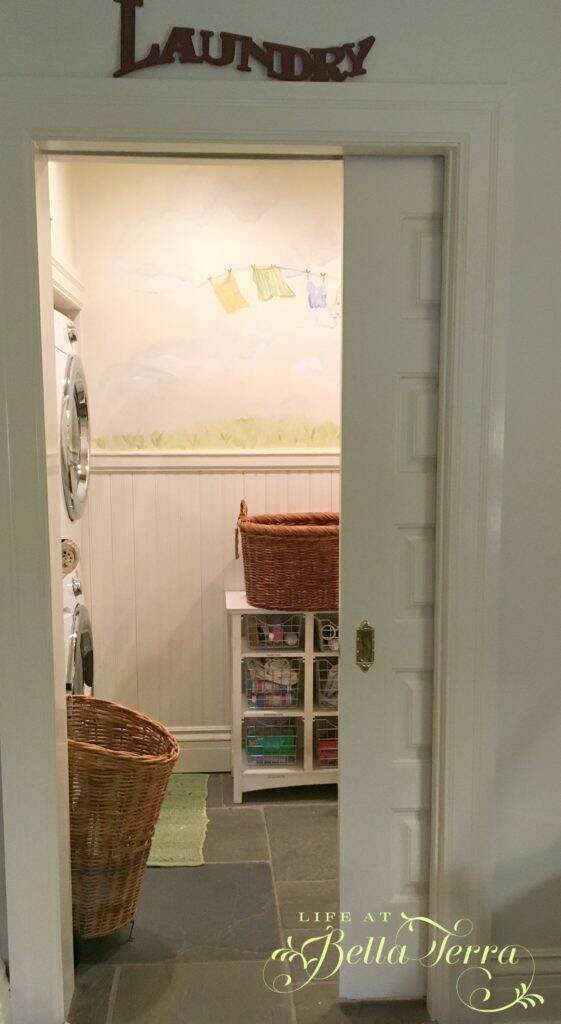
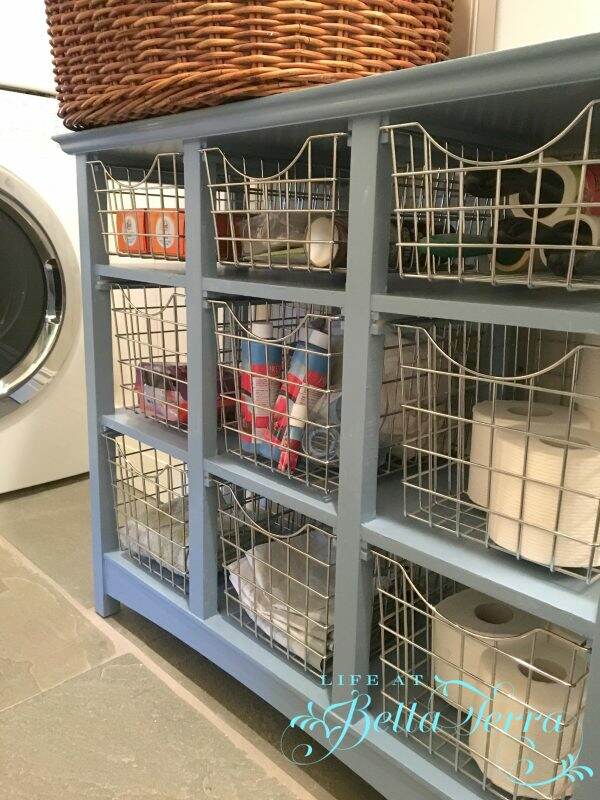
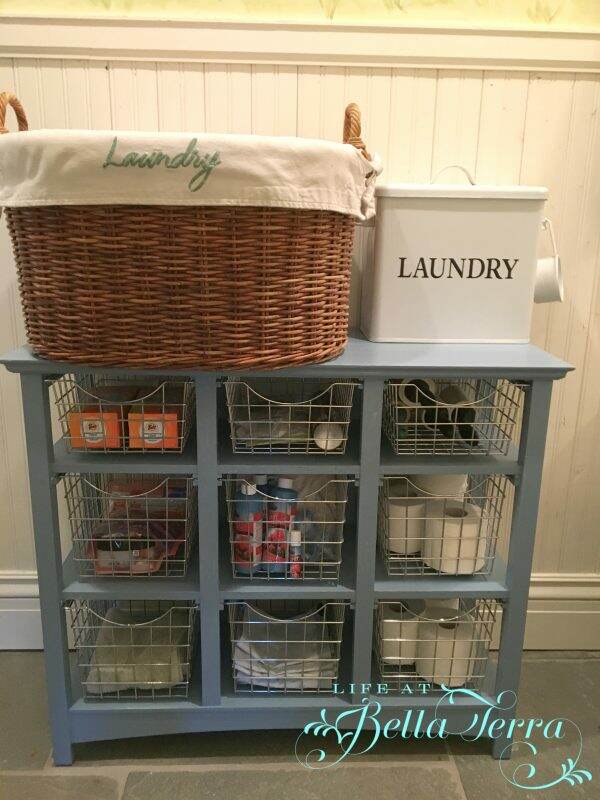
The baskets hold everything from toilet paper to laundry pods to spot remover.  The wicker basket on top is the landing place for the laundry shoot located directly above. I’m not sure I still like the “clothes line” painting on the wall, but I don’t dislike it enough to paint over it just yet.

Painting a Laundry Organizer and its Challenges

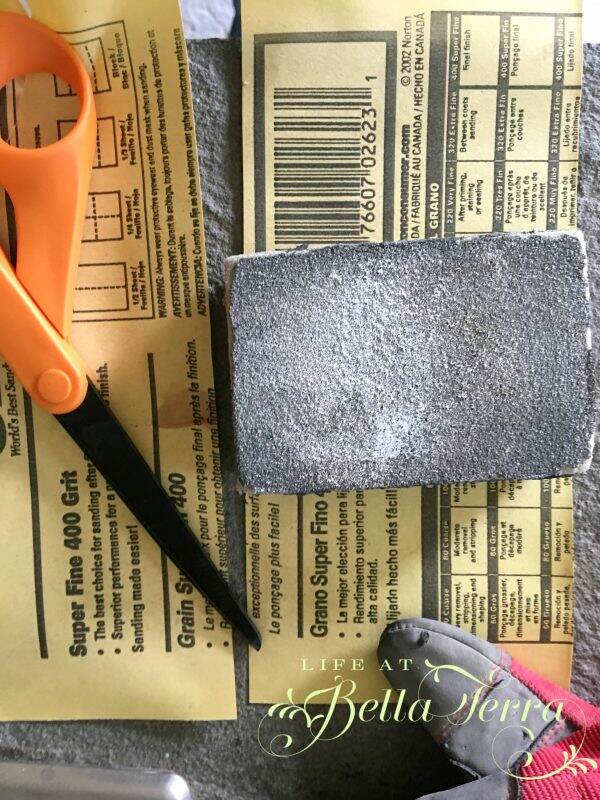
Guessing the original paint was lacquer, I sanded the glossy finish so the new coat of paint would stick.  I used 400 grit paper that I wrapped around a sanding sponge.

In this photo, you can see the damage done by detergent spills.  I guess if it can get grass stains out, it can eat away at paint.

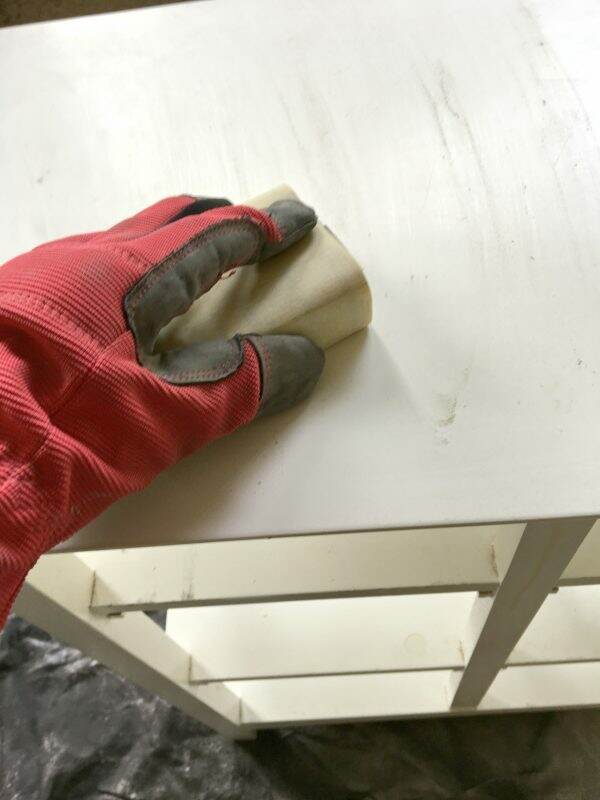
I tried hand sanding this~~just roughing up the surface a little.  However, when I applied my first coat of paint, it smeared and didn’t seem to stick.  So much so that I wiped it off.  Time for serious power tools. I then re-sanded it.

You may notice I have only one sock on…..that’s because I accidentally stepped on the lid which was facing up and of course, loaded with paint.  It wasn’t until I started walking on the terrace and leaving blue footprints behind that I realized it.  Truly, I am the messiest painter I know.

Here’s what it looked like after the first coat.  Obviously there was still an issue on having the paint stick to the surface.  I don’t know what they used to protect the surface, but it was very difficult to penetrate.  Of course I didn’t want to halt the project and buy a proper primer (which I should have done).

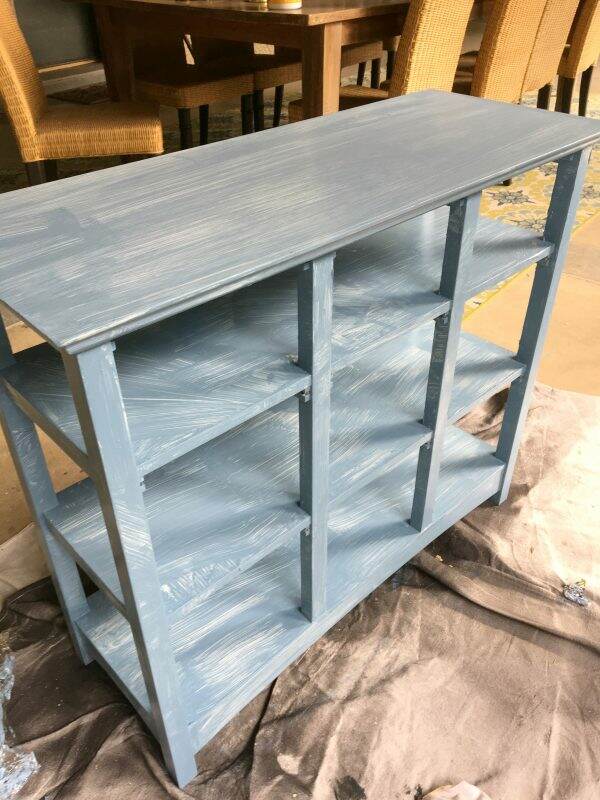
At this point, I am groaning because I thought this was going to be an easy, few hour project. But with the second coat, I was starting to see some progress.

Finally, this pain in the neck project was completed! Took me two days, but I like how the blue paint color goes with the slate floor.

Here’s a view up to the laundry shoot.

Now I need to update the rugs in this room and find a clever way to make the litter box look more appealing.

What I learned:

  1.  90% of painting is the prep work and I always want to short cut that.. Bad move.
  2. Remember where you put the exposed paint so you don’t step in it (lid, stir stick).
  3. Don’t wear your favorite socks while painting
  4. If you think a project will take a short period of time, double or triple that.
  5. I used plastic wrap to cover my paint brush so I didn’t have to keep washing it out between paint drying times.
  6. Pre-finished furniture has some coating which is nearly impenetrable-perhaps a different grit sandpaper and/or a suitable primer would have made this easier.

So, do you think? Should I keep the wall painting of the clothes on the line or paint over it?


Paint color-Valspar Duramax WV39009 Dutch Blue Exterior Semigloss (This leftover paint was our front door color a few years back).


DIY Table Centerpiece Display

In my last post, Valentine Dinner Party, I indicated my husband made the wooden base for the centerpiece.  I didn’t realize what a difference it made in the overall presentation, having the centerpiece just inches above the plane of the table.

So I decided he should be today’s featured DIY person.  Take it away, Scott!

The Inspiration

Photo from Style Me Pretty

Mary had shown me an “inspiration” picture of a raised DIY centerpiece.  This is where she turns to me and gives me the appreciative “eye”. Then she’s off to her art class leaving me about a 3-hour window.  I’m trying to figure out how I’m going to do this.  Off to my local Lowe’s where I start looking for a piece of wood.

The Materials

Table Centerpiece Display

Not being one to over complicate, I decide to look at shelving material.  There before me is the perfect finish, dimensions and non-warping piece of material.

DIY Centerpiece

I try to determine how I will elevate it from the dining table AND give it some stability.  This “something” has to have some variability in size and can be attached to what I am now calling “my” Table Centerpiece Display.  I’m thinking cabinet pulls, slightly repurposed.  The friendly Lowe’s staff takes me to their impressive selection where I grab 7 (more on that later).

How do I attach them since I need a “bolt free” top?  Lowe’s has the answer.  One end screws into my pull and the other end has a short wood screw…called Hanger Bolts.

I purchase a few felt pads to help level and protect the table and then I’m headed home to create.  I assemble my tools ~~ a drill, a drill bit, measuring tools and of course, a towel to protect the table…and I get busy.

Placement of the “feet” is important for esthetics and strength and stability.

The Assembly

Hence, the seven pulls.  Two on the ends and three in the middle.  I screw the hanger bolts into the pulls and use the pulls to screw each one into my board.

Finally, I add the same color pads (so they disappear) and I’m done.

Now it’s time to put it on the table, clean up my tools and see if Mary notices when she gets home.  Then I get to pretend it was MUCH harder to do that it really was.  Mission accomplished!

Just a reminder, this is how it looked for our dinner party.

Total cost of the project was under $50.00.  Though my time is priceless, Mary considers it free:)

The helpful husband,

Scott

If you enjoy this post, please share on Pinterest.

This post shared with Between Naps on the Porch Tablescape Thursday #646


Valentine Dinner Party

Typically we are a bit casual when entertaining.  However, once a year we do a formal sit down dinner party for Valentine’s Day. This year we are having a Valentine dinner party for 5 couples. Generally we use the dining room, but the weather has been so glorious lately, we decided to have it outside on our back terrace. And now with the pandemic, having a dinner party outside while social distancing is a safe option.

The attire for the evening is Fetching for the women and Dapper for the men.

Inspiration is from this original photo from Style Me Pretty. I love the mood of this table~romantic, elegant, with shades of pink. See Style Me Pretty’s link here.

What is unique about this centerpiece is the various sizes of cups/vessels for flowers positioned on a long piece of raised wood.

I showed a picture of the wooden base to my husband.  Within a few hours he had made me this raised platform. (See post here).

I gather any and all cups, bowls, spooners, and vases that would fill the space. The plan is to abundantly fill each vessel with lots of flowers.

Keeping with soft pastels, I purchase hydrangeas, stock, tulips, roses, carnations (from Trader Joe’s, Fry’s and Safeway) and add some flowers from the garden. Aren’t these so pretty?

The brass candlesticks and tapers are a purchase from West Elm. I must say these tapers are my new favorite. They burn well and are nice and tall.

It was a bit time consuming to do this, but the results are spectacular.  Thankfully my sweet daughter, Elisabeth provides an extra set of hands.

Menus are printed on shades of pink card stock. I cut the edges with decorative scissors (purchased at Michaels ages ago). Using a 2 hole paper punch, we add holes at the top of the menu.

My daughter helps tie each menu with a pink satin ribbon.

I am so excited to use my very first set of china, Romance Collection- Juliet by Royal Doulton.  It has since been discontinued but the pattern is perfect for this dinner theme.

The gifts for each guest (Pink Champagne scented candles for the women and silk ascots for the men), also serve as a place card.    Using baker’s twine, I create pink card stock heart shapes with our guests’ names.

My husband had never worn an ascot before, nor had any of our guests.  It will be fun to see them figure out how to tie them. Quite dapper!

We serve Prosecco and a pink themed Ruby Red Grapefruit Greyhounds with Rosemary Simple Syrup (my favorite winter cocktail) with appetizers.  The recipe is from Farmgirl’s Dabbles and click here for the recipe.

Julie Greder, once again caters this event.  She never disappoints. Calm and gracious, Julie creates a delicious menu.  The large pink wine goblets are a purchase from Pier 1.

Here is the view before our guests arrive, as dusk is approaching.

The weather in Phoenix is spectacular this time of year. Cool enough for a fire in the fireplace, but cozy enough for our guests. We will have a wonderful evening with a very fun group of friends.

Wishing you a Happy Valentine’s Day!

If you enjoy this post, please share on Pinterest.

This post is shared with Between Naps on the Porch Tablescape Thursday #645.


Same Flowers – 2 Different Ways

When I was in my 20s, I offered to take a work shift for my friend, Gwen allowing her to escape on a weekend mountain trip.  When Gwen returned, she presented, as a thank you, a collection of wild grasses and cattails she had gathered on her trip, wrapped in burlap with a gorgeous ribbon.

The sweet gesture made such an impression on me…so much so that I truly think about nearly each and every gift I give.

With Valentine’s Day around the corner, you may be giving flowers as a gift to a loved one, friend or co-worker. Here are two very different presentations with the same roses.

I bought the roses at Safeway.  I wanted all pink roses but they only had 2 dozen available. I wasn’t sure about mixing pink and red but I added 2 dozen red anyway.

I covered a box (I used a square box) with wrapping paper.  I initially wanted a solid color but I didn’t have anything so I used this sweet paper from The Enchanted Home. The ribbon was a scrap that I had in my drawer and it works with the colors of the paper.

I was just at Michaels and they have several different size boxes, in both solids and prints, which would work too.

I found (in my collection of vases in the basement), a round, short glass container that would fit snuggly into the box.

Gathering 8 roses in a bunch, I wrapped them in twine. I continued to do this with the balance of the roses, until the container felt full and lush.

With a craft punch (again, from Michaels) I cut a heart out of pink paper stock and tied it with baker’s twine.

Here is the finished product.  The picture below shows this arrangement with all pink roses.

Since the container for the next arrangement was a bit larger, I added the red roses to the mix.

This pink, fabric-covered basket (from Debi-Lilly) was purchased from Safeway last year for $2.00.  Our grocery store often has great discounts on their floral products, especially after a holiday. It is normally a plant holder, but the glass container fit right into it.

It’s interesting how a solid color container creates a totally different look. And I don’t mind the red and pink roses in the same arrangement.

I added a different color craft paper heart, to create some interest.

So use your imagination when presenting flowers.  It doesn’t need to be expensive or luxurious.  Being thoughtful is priceless and the recipient of your gift will appreciate it.

Is there one you like better than the other?


Organizing the Butler’s Pantry

The butler’s pantry is a service room between a kitchen and dining room, typically equipped with counters, a sink, and storage space for china and silver.  The origin of the butler’s pantry was between 1810-1820. Our butler’s pantry fits that definition to a tee.
The only thing missing in our butler’s pantry is the butler.  I would really like a butler.
Above is a typical day in the butler’s pantry-messy and unorganized.  There is tall upper storage on either side, a sink in the middle and the original wood countertops.  Several drawers are below on both sides as well.
This weekend I decided to clean and organize this pantry.
The original shelf paper was rubber and started to break down (since I first did this nearly 17 years ago).  I replaced it with Con-Tact, a non-self adhesive fabric with a non-slip grip purchased at The Container Store.
I washed each and every glass, got rid of the chipped, cracked and mismatched ones.  I rediscovered items I loved but had overlooked. This project took so much longer than I anticipated, but everything sparkles and is in place.
The drawers below hold everything from napkins to candles.
Each drawer is labeled which helps me put things back where they belong.  I love my labeler.
There is flat storage for trays and behind the skirt under the sink, I keep large vases for flowers.
 Living in an historical home can offer some experiences of what has come before.  The countertop on either side of the sink is marked with cigarette burns~~my assumption is that back in the day one would lay down their cigarette to make a cocktail or wash a glass.
After I completely reorganized the left side of the pantry, I tackled the right side, which holds some of my china.
And my pots de creme collection (as if I make pots de creme all the time!!!)….
I have too many sets of china and most of the dinnerware is stored in the basement.
Here are the after photos.  Sorry for the quality as I took it early this morning them rather low light.
This project took nearly 3 days to complete as I found many pieces of silver that needed polishing, crystal needing washing, plus the sorting and organizing part.  Now I know why people had butlers to do all this work!


My Kitchen – Part 2

Yesterday, I visited the home of a friend who is an interior designer with a contemporary, minimalist style.  I was amazed that she lives with absolutely no clutter.  Nothing. Granted, we have vastly different lifestyles but when I came home, I felt my home was cluttered.

Isn’t it interesting how different we are and how we live?

Anyway, back to the kitchen.  Welcome to Part 2.  If you missed Part 1, please click here.

Baking/Prep section:

In the baking/prepping section, the retractable shelf for the mixer and food processor provides additional workspace.  Equipped with their own electric outlet, these appliances can be pulled out when in use and tucked away later. All bowls and baking items (flour, baking powder, etc.) are stored in cabinets nearby.

Utilizing the 4″ toe kick under the kitchen island, a collapsible stool is hidden in that dead space.  This stool was used ALL the time when the children were my little baking helpers.

The Step-Fix collapsible stool is made in Germany by Hailo. This could also easily fit into a drawer and I believe it’s less than $50.

The double Dacor ovens allow baking choices from pure convection to regular baking. We tend to use the upper oven much more than the lower one, but it’s nice to have an additional oven on hand, especially during the holidays.

It’s frustrating to be in a kitchen and lack electrical outlets.  I made sure this didn’t happen by adding a plug strip under the large kitchen windowsills.

We have three refrigerator sections.  The side-by-side SubZero refrigerator and freezer are fabulous.  They provide more than enough storage and refrigeration for our family of 5. Grizzly Welding made the iron door pulls.

Double drawers (also made by SubZero) were initially installed for everything and anything child related. The drawers provided easy access to snacks and drinks.  The 3rd refrigerator is the glass front wine unit by U-Line.

Dining and everything else:

The island in the center of the kitchen is very large and serves as the hub for all family activity-baking, cooking, school projects, sewing, dining, and entertaining.

In the island is an additional sink ~~very handy and convenient for fruits and vegetables coming out of the freezer. Our reverse osmosis system is located here too, steps from the ice maker.

Two warming drawers are also housed in the island, on the range side.

In the center of the island is a pastry shelf, which helps break up the expanse of the island. I also like to seasonally decorate it, but it can also be used while entertaining for desserts or other items.

The goal was to create a high functioning kitchen in a classic design that would look like it had always been there. I love this room as it truly is where everyone gathers.

I hope you enjoyed the kitchen tour.  I am now off to declutter.


Dacor Double Ovens

Dacor Warming Drawers

Kinetico R-O system

Stepfix by Hailo

U-Line wine refrigerator

Wedgewood china tea cups/pot

Subzero Refrigerator/Freezer and Drawers