1

Saturday Meanderings

stories
On my morning walk

Happy July 4th to all of you! We are happily ensconced here in the mountains of Arizona enjoying the cooler temperatures. I love all the patriotism here as nearly every cabin is displaying flags and lots of red, white and blue.

Our mountain community is a combination of older, original cabins and of course, the newly built McMansions. I love walking in this area because I get to snoop at each and every house. Who doesn’t love looking at other people’s homes? My favorites are the original ones that are bursting with charm and character.

The Drive Up

The trip from our home in Phoenix is approximately 3.5 hours. I love the drive, because the minute you leave the metropolitan area you are winding up through the mountains and forest.

A view of the Bush Fire from the air on June 20, 2020.

As you may or may not have heard, but we had a very large fire (Bush Fire) that started on June 13th and today is 99% contained. It was so big that NASA could see it from space. However, even though I heard about it, it wasn’t until I drove through it did I realize the extent of the damage.

Evacuations issued for 'Bush Fire' along State Route 87 near Bush ...

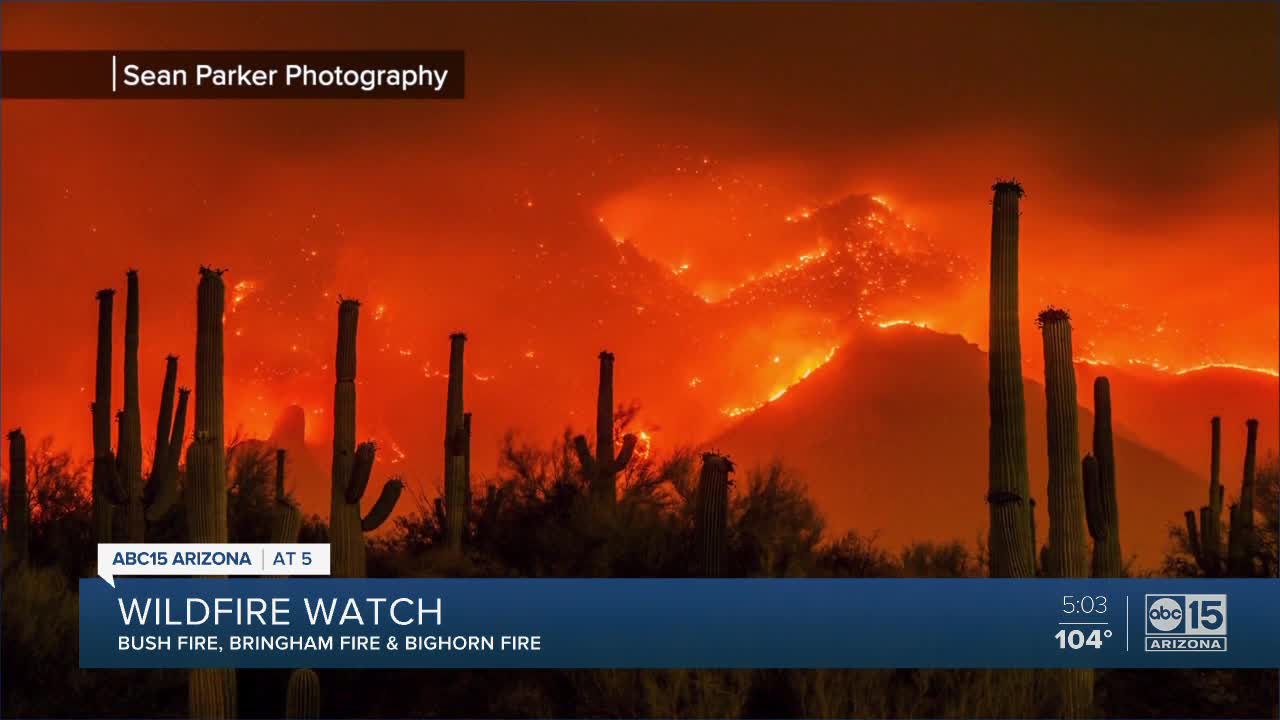
Experiencing it first hand was shocking and heartbreaking. Here is my posting on Instagram.

Highway 87 runs right through the middle of the 194,000 acres that have burned. On both sides of the road, as far as the eye can see, was blackened earth covered in fire retardant spray. I drove for an hour and the view was the same.

For a 13 mile stretch, the road was reduced to one lane because the guard rail posts had burned and the actual guard rail looked like a melted ribbon. Apparently the fire was caused by a burning vehicle and high winds. Our firefighters are such heroes in battling what is now the 5th largest fire in our state’s history.

State Route 260 - AARoads - Arizona

That was bad enough, but when I was driving on State Route 260, there was a driver traveling at very high speeds going the WRONG WAY. Thankfully I was in the right hand land and since we were moving up an incline, I didn’t see him/her until they blew by me. It was so fast I couldn’t tell you the make, model or color of the car. I pray no one was killed by this maniac.

Finally Here!

The rest of the way I drove like a little old lady. Naturally, after such an eventful trip, I am thrilled to be here.

Every time I arrive at the cabin, I start daydreaming about re-decorating it. Right now, it is a hodgepodge of furniture we’ve collected over time. I suppose if we spent more time here, it would make sense to redecorate. Here are some inspirational photos on what I’d love to do to the bedrooms.

Next 4 photos from Google.com

google.com

I love how they have displayed the quilt on the wall below.

To see more pictures of our cabin, click here.

Lack of Rain and a Surprise

As you may recall, we haul our several big pots of geraniums up to the cooler climate every year. There has been such little rain, and the plants are looking a bit stressed. While watering them, we found this sweet bird’s nest tucked inside the greenery.

Momma bird was startled by the garden hose and flew out, long enough for me to take this photo. Sorry it’s a bit blurred, but I didn’t want to disturb this protected setting. Momma is back on the nest happily protecting her eggs. To see all our geraniums journey, click here.

Sox, our Beagle Update

Like me, Sox needs to ride in the front or he gets car sick

About 10 days ago, our beagle, Sox lost the control of his back legs. I found him laying in the driveway, overheated and exhausted. We rushed him to the vet and was told he has arthritis (he’s soon to be 13) and a disc issue with his spine.

He still loves his puppy bed

Our instructions are to keep him crated as much as possible for at least the next few weeks and only take him out for bathroom runs. Well, if you’ve ever had a beagle, this is a very challenging task. This dog follows his nose and from the waist up, he’s very puppy-like. He’s on oral steroids, muscle relaxants and pain meds.

However, his legs are still working and he does get around fairly well on carpets or rugs. Hardwood floors are difficult for his balance. But it’s looking hopeful. Here is how we walk him around. The exercise band is perfect for supporting his hips and still allows him to do his business without obstruction.

Happy July 4th Weekend!

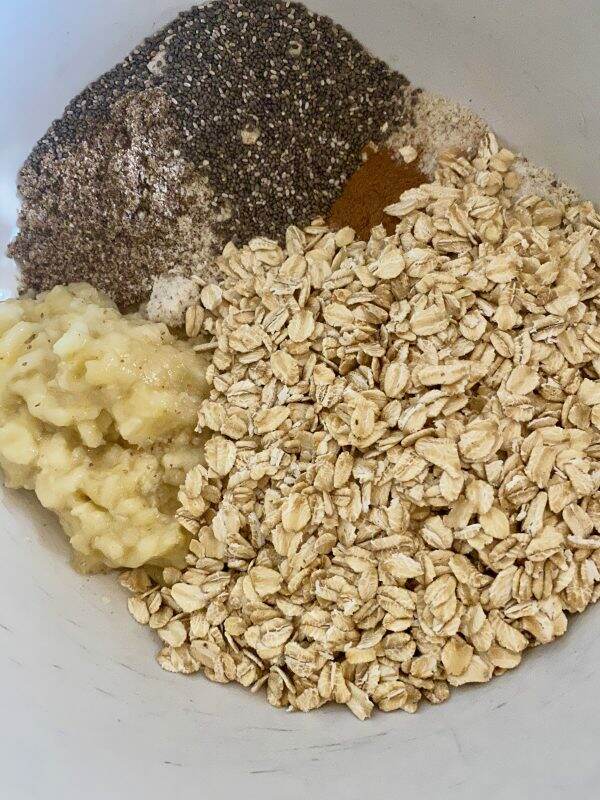
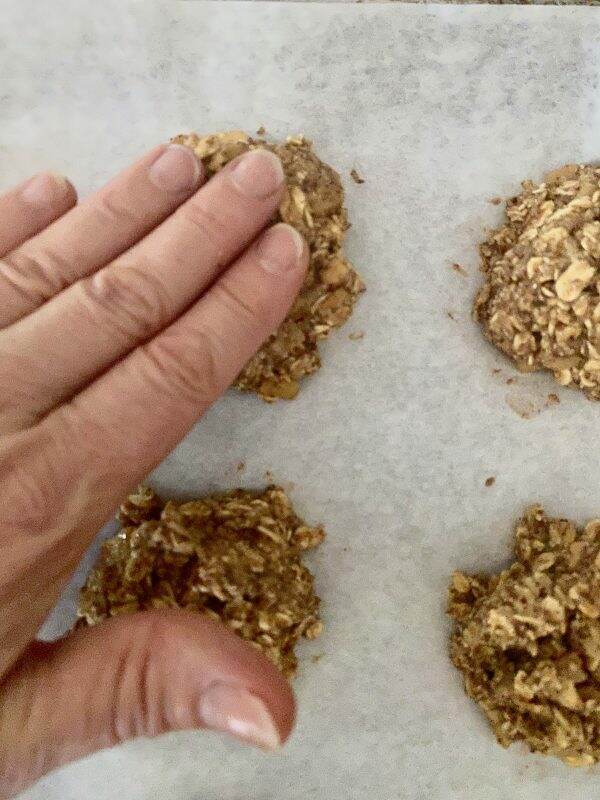
I am getting ready to have an Independence Day breakfast. Fresh berries, plain yogurt and my breakfast cookie accompanied by morning coffee. If you missed my breakfast cookie(s) recipe, click here.

In my last post, I stated that our July 4th parade is cancelled. However, some clever residents are creating a golf cart parade that will start at 10:00 a.m. So after I send this post out to you, I’ll be decorating Shrek, our green golf cart in July 4th attire!

4th of July and Patriotic Quotes (some with pictures!) | Fourth of ...

Whatever you have planned for this holiday weekend, I hope you are with those you love, either in person or virtually. Being here in the cabin and around nature has already lowered my stress levels. Be happy, be kind and most of all, be safe.


All Things July 4th

holidays

We always look forward to going to our cabin for the July 4th holiday. It is much cooler in the mountains of Arizona and this area has a nice small town feel. The highlight is the July 4th parade, which started many years ago by a wonderful neighbor who believed this holiday needed proper celebrating.

Parade Cancelled

Yesterday, we received word that the parade is cancelled this year. My heart sank as it is just one more thing to adjust to during this pandemic. Intellectually I understand, but emotionally, I was really looking forward to it. And our governor has imposed a 30-day lockdown….again. But we will prevail and keep our spirits up. What choice do we have.

Not only is this parade quite fun but every year thousands of dollars is raised through t-shirt sales and donations supporting the local fire department. Being in the mountains, our firefighters are true heroes as the threat of devastating fires is common during our hot summer months. I am hoping there is still a way to donate?

Annual Bullfrog Loop Parade

Nonetheless, we will celebrate our independence and freedom in the true spirit of red, white and blue. Today’s post is a compilation of patriotic celebrations over the past few years. Since I barely know what day it is, I haven’t thought ahead on how I will set the table nor what foods I will prepare. But for some reason, like Christmas, it all comes together, right?

Patriotic Brunch

Our July 4th morning starts with a patriotic brunch and I do serve the same dishes every year. Perhaps I should try something new but these recipes continue to be crowd pleasers.

The egg casserole can be served hot or cold~it’s delicious either way. Hard to believe I shared this with you in 2016! Click here for the recipe.

Egg Casserole

A tried and true coffee cake recipe can be adjusted each year depending on what fruit you have. My 2017 recipe includes raspberries, but it can be made with peaches, pears, apples, or blueberries. Click here for the recipe.

Since we need our fruits and vegetables there is always a green salad and a fruit salad. Our guests tend to linger after the parade so I make a charcuterie board for nibbling. Ha! I just realized I made a 6 pointed star vs. a 5 pointed star with the cheese! I get an A for effort….Here’s the link to the charcuterie board.

Can’t have brunch without a dessert! I was rather ambitious in 2018 when I baked this impressive red, white and blue 8 layer American Flag cake. First of all, I am never going to do this again, as baking in high altitudes is not one of my strengths. But surprisingly, it did taste very good! Here is the link to that post.

What is July 4th without cherry pie? I have yet to master the perfect cherry pie, but I hope to try my friend Gwen’s recipe this year. It is my husband’s favorite.

Typically I set up brunch around the kitchen island so guests can go in and out of the house, eat, watch the parade, eat some more, watch the parade. But with no parade, we will more than likely sit down at the table on the outdoor covered porch. Here are a few pictures from previous events.

The Table

July 2019
Memorial Day 2019
Memorial Day 2020

July 4th is a very important holiday. We often take for granted our independence and freedom. On July 4, 1776, the Declaration of Independence and the birth of the United States as an independent nation began.

We live in an amazing country and I will proudly display many flags. Let’s all remember what the flag symbolizes: white signifies purity and innocence; red, hardiness and valor; and blue signifies vigilance, perseverance, and justice. Long may she wave.

What are you doing to celebrate the 4th of July? My next post will be from the mountains! Happy Wednesday, my friends!

Today’s post shared with Charming Cottages and Gardens

and Centerpiece Wednesday Linky Party at Karins Kottage


My Breakfast Challenge

I am not a breakfast person. The thought of any meal in the morning is almost hard for me to comprehend. So I struggle with what breakfast options are healthy, quick and not big in volume.

Collagen Peptides

Every morning starts with my delicious Nespresso coffee with foamed milk and two scoops of Vital Proteins Collagen Peptides.

Vital Proteins provides 18 grams of protein, which is just enough to sustain me through my morning workout. But there are days where I am more hungry, especially if I skipped dinner the night before. Sometimes grabbing a quick hardboiled egg (pre-made and in the fridge) does it, but other days, I need something with a bit more substance.

Breakfast Cookies

I started making breakfast cookies when I was the Food Mom for my son’s high school crew team. Often the boys would be up at the crack of dawn before a regatta wanting something light, but healthy to eat. Cookies, you say? For breakfast?

Blueberry Breakfast Cookies

Yesterday, I dusted off the recipe for Ambitious Kitchen’s Omega 3 Blueberry Breakfast Cookies and made a batch. Being challenged with too many apples, I found an additional recipe online from Kristine’s Kitchen for Apple Pie Breakfast cookies. Both recipes are chock-a-block full of fiber and goodness. So it is time to compare the two recipes.

The Blueberry Breakfast cookies are gluten-free and dairy free. Using almond meal, coconut sugar, flaxseed meal, rolled oats, chia seeds, banana, blueberries, walnuts and an optional add ~ dark chocolate, these large cookies are very flavorful and filling.

This recipe makes 8 large cookies. The most time consuming part of the recipe is gathering the ingredients! Using an ice cream scoop makes it easy to plop these down on a cookie sheet to bake. Prep time is 10 minutes with a cook time of 15.

Apple Pie Breakfast Cookies

The Apple Pie Breakfast cookies have similar ingredients~rolled oats, apples, oat flour, ground flaxseed, applesauce, maple syrup, egg, butter and spices. Refined sugar-free, this recipe makes 18 large cookies.

Similar to the first recipe, drop balls of dough on a cookie sheet and flatten with your hand.

These cookies are perfect if you have children or grandchildren that you need to feed quickly. They freezer beautifully and a few seconds in the microwave, you have a nutritious and delicious snack.

As food crew mom, at one point, I needed to feed 65 high school athletic boys. The Blueberry Breakfast cookie recipe is the one that they boys would shove in their mouths as they raced to their next regatta.

This morning, we sampled both recipes. My husband and I prefer the Blueberry ones, as we love the combination of blueberries, walnuts and dark chocolate. The Apple Pie ones were good, but I think I would make the apple pieces bigger as they got a bit lost in the cookie. Also, our apples from the orchard are Anna apples, which have a mild, sweet flavor. Using an apple with more tang will bump up the taste. But both are worthy recipes. Now they will be frozen for future use!

I hope if you are a non-breakfast eater like me, you will find these recipes to be a helpful addition to your morning routine.

Happy Wednesday! I am heading over to visit my elderly neighbor who lives alone and wants some company….of course, at a distance! Wishing you a day of wonder and love!

If you enjoy this post, please feel free to share on Pinterest.


Blueberry Breakfast Cookies

These cookies would be excellent, not only for breakfast, but as a delicious snack. Freezer-friendly.

  • 2 Tbsp melted coconut oil
  • 1/4 cup coconut sugar
  • 1 medium banana
  • 1/2 tsp vanilla extract
  • 1/2 tsp almond extract
  • 1/4 cup flaxseed meal
  • 1/2 cup almond meal/flour
  • 1/2 tsp baking soda
  • 1/2 tsp cinnamon
  • 1/4 tsp salt
  • 1 1/4 cups rolled oats, gluten free if desired
  • 1 Tbsp chia seeds
  • 1/2 cup frozen or fresh blueberries
  • 1/4 cup chopped walnuts
  • 2 oz vegan dark chocolate chips (or regular chocolate (coarsely chopped-optional ingredient)
  1. Preheat oven to 350 degrees F. Line a large baking sheet with parchment paper to prevent sticking.

  2. In a large bowl, mix together melted coconut oil, coconut sugar, mashed banana, and vanilla and almond extracts, until smooth and creamy. Next fold in flaxseed meal, almond meal, baking soda, cinnamon and salt and mix until a thick dough forms. Next add in oats and chia seeds and gently fold into the batter until evenly distributed. Lastly fold in blueberries, walnuts and dark chocolate, if using.

  3. Use a large cookie dough scoop or 1/4 cup to scoop dough onto prepared cookie sheet (we want these to be BIG cookies!). Make sure you tightly pack the dough into a ball before putting it onto the sheet. Gently press the top of the dough down just a little to flatten the tops. Bake for 13-16 minutes until edges begin to turn slightly golden brown. Allow cookies to cool for 15 minutes before removing from pan and transferring to a wire rack to finish cooling. Makes 8 big cookies.

    Feel free to sub chopped pecans or almonds for the walnuts.

Calories: 206kcal
Fat: 12.2g
Saturated fat: 3.7g
Carbohydrates: 22.8g
Fiber: 4.5g
Sugar: 9.4g
Protein: 4.9g


Apple Pie Breakfast Cookies

These cookies are filled with whole grain oats, apples and cinnamon. A delicious breakfast or quick snack!

For the Apples

  • 2 cups finely chopped apples (1/4 inch pieces, no need to peel)
  • 2 Tbsp pure maple syrup
  • 1 tsp cinnamon

For the cookies:

  • 2 cups old-fashioned rolled oats (gluten free if needed)
  • 1 cup oat flour*
  • 1/2 cup ground flaxseed
  • 1 tsp cinnamon
  • 1/2 tsp nutmeg
  • 1/2 tsp baking soda
  • 1/2 tsp salt
  • 3/4 cup unsweetened applesauce
  • 1/3 cup honey or pure maple syrup
  • 1 large egg
  • 2 tsp vanilla extract
  • 1/4 cup 4 tablespoons unsalted butter (melted and cooled slightly)
  1. Preheat oven to 350 degrees F. Line a baking sheet with parchment paper.

  2. In a small saucepan, combine the apples, 2 tablespoons pure maple syrup, and 1 teaspoon cinnamon. Cook over medium-low heat, about 10 minutes, until apples have softened.

  3. Meanwhile, in a large bowl, stir together oats, oat flour, flaxseed, 1 teaspoon cinnamon, nutmeg, baking soda and salt. Set aside.

  4. In a medium bowl or measuring cup, whisk together the applesauce, honey or maple syrup, egg and vanilla. Whisk in the melted butter.

  5. Pour the wet ingredients into the bowl and with the dry and stir until combined. Fold in the cooked apples and their syrup.

  6. Scoop rounded 1/4 cup portions of dough onto the prepared baking sheet, using your hands to shape the dough into uniform balls as needed. Gently flatten each cookie a bit as they won't flatten on their own during baking. Bake for 12-14 minutes until the cookies are set and lightly golden.

  7. One completely cooled, cookies can be stored in an airtight container in the freezer for up to 2 months.

  • You can make your own oat flour in your food processor or blender.  For 1 cup of oat flour, process 1 heaping cup of old-fashioned rolled oats until finely ground, about 1 minute 
  • Serving: 1 cookie|Calories: 141kcal|Carbohydrates: 22 g|Protein: 3 g|Fat: 5 g|Saturated Fat: 2 g|Cholesterol: 17 mg|Sodium: 72 mg|Fiber: 3 g|Sugar: 9 g


This post shared with To Grandma’s House We Go Link Party 203


Making Easy Fig Preserves

The garden is literally bursting at the seams. With the heat, the ripening has exponentially increased. But it’s a good thing, as being in the garden is calming for me, especially in today’s chaotic world. To see my post on Gardening 101, please click here.

It is that time of year again when the fig tree is producing fruit. The fig tree is part of the mulberry family (I had no idea). They are low in calories and have no fat. A large fig has approximately 47 calories making it a great healthy snack. Our fig tree produces twice a year, but this latest crop is producing figs on steroids. The fruit is HUGE and fleshy and sweet.

My neighbor’s fig; my fig.

I have many books on making preserves, jams and jellies to reference.

But the easiest recipe and one I had not tried before, is from the Williams Sonoma, The Art of Preserving book.

Really, this recipe is so easy. First trim the figs.

Since I am using a combination of our gargantuan figs and a few smaller ones from my friend and neighbor, Anne, I cut the figs to more or less the the same size.

The figs will cook in a combination of orange and lemon juice. We still have some remaining oranges on one of our trees but you can also use store-bought fresh juice.

Add sugar to the orange/lemon juice combo. Bring to a boil and stir to dissolve the sugar.

Add the figs, reduce the heat to medium, cook and stir gently for 5 minutes.

Using a slotted spoon, remove the figs to a bowl. Add orange zest to the syrup and cook, uncovered until reduced by one-third, 2-3 minutes. I inadvertently added the zest when I added the sugar, but I don’t think it affected the taste of the syrup.

Return the figs to the pan and cook for one minute to heat through.

The oven is my choice for sterilizing the jars and lids. After washing them in hot soapy water, I put the jars in the oven on a cookie sheet for at least 30 minutes at 250 degrees. I then fill them with the hot figs, leaving 1/4″ at the top. Any sticky syrup on the rim is wiped away before I add the lid.

After being severely burned using the hot-bath canning method, I now do all my fruit processing in the oven. (Note: please research this if you are canning meats or other foods that require different sterilization). After the jars are filled and the lid snugly secured, I replace the jars in the oven for 15 minutes or so to ensure that are completely sterilized.

I let the jars cool overnight to set. They will seal as they cool.

Once the jar is opened and the seal is broken, the figs will last for 30 days in the refrigerator. The fig preserves can be used on chicken or pork. Or spread on warm bread or toast. Or just eaten with a spoon!

One of my favorite uses is a crostini appetizer with goat cheese and figs.

The syrup on this recipe isn’t as thick as a jam or preserve, but is very flavorful. All in all, a quick and easy recipe to make. And a way to enjoy figs until the next production cycle!

On a separate note, I know these are troubling times. I want my blog to be a place where you are welcomed, perhaps learn something along the way, and to celebrate the simple beauty in everyday life. Nearly a year and a half ago, I wrote a post on Kindness. It was difficult to share some personal moments with you, but the message remains the same. Kindness is free and the rewards are tremendous. And it is something we all can practice. If you would like to read this post again, click here. More than ever, we need each other.

Sending all my loving energy your way.


Easy Fig Preserves

This easy recipe will work with any variety of fig.

  • 3 lbs figs (such as Mission, Adriatic, or Brown Turkey)
  • 4 cups sugar
  • 1 1/4 cups fresh orange juice
  • 3/4 cup fresh lemon juice
  • Grated zest of 1 orange
  1. Have ready, hot, sterilized jars and their lids

  2. Trim the fig stems, leaving a little of the stem attached to each fig.

  3. In a large nonreative saucepan, combine the sugar and orange and lemon juices. Bring to a boil over medium-high heat, stirring to dissolve the sugar. Add the figs, reduce the heat to medium, and cook, stirring gently for 5 miniutes.

  4. Using a slotted spoon, transfer the figs to a bowl. Add the orange zest to the syrup and cook, uncovered, until reduced by one-third, 2-3 minutes. Return the figs to the pan and cook for 1 minute to heat through.

  5. Using the slotted spoon, divide the hot figs evenly among the jars. Ladle the syrup over the figs, leaving 1/4 inch of headspace. Remove any air bubbles and adjust the headspace, if necessary. Wipe the rims clean and seal tightly with the lids.

  6. Process the jar for 10 minutes in a boiling water bath. The sealed jars can be stored in a cool, dark place for up to 1 year. If a seal has failed, store the jar in the refrigerator for up to 1 month.


Meyer Lemon Marmalade

I stumbled across this 2008 recipe from Simply Recipes and just happened to have several Meyer lemons that needed to be used. I am one of those people who love marmalade~~on freshly made bread with a cup of tea or coffee. There is something so romantic and very British about it.

Meyer lemons are a hybrid of a regular lemon and an orange. The skin is thinner and it is sweeter than a regular lemon. With this recipe, please note that you cannot substitute regular lemons for Meyer lemons.

If you live locally, Whitfill Nursery on Glendale Avenue is selling boxes of gorgeous organic Meyer lemons. With only 3 ingredients, you can have your very own fresh marmalade. What is also important to know is that the ratio for this recipe is 1:1:1, which makes this a simple recipe to use with any quantity lemons.

The recipe calls for 2 1/2 lbs. of Meyer lemons (about 9 lemons), 6 cups of water and 6 cups of granulated sugar.

After scrubbing the lemons clean, and discarding any damaged ones, I prepared the lemons by cutting 1/4″ off from both ends.

Working one lemon at a time, cut the lemon in half lengthwise and then cut the lemon half into several segments, lengthwise.

As you cut the lemons into segments, if you can, pull off any exposed membranes.

When you get to the final segment, cut away the pithy core. Remove all seeds from the segments. Reserve the seeds and any removed membrane or pith. You will need these later.

Cut each lemon segment crosswise into even pieces to make little triangles of the lemon peel and pulp until you have 6 cups of chopped lemons.

Put all of the seeds, membranes and pith you removed from the lemons into a bag fashioned out of two layers of cheesecloth or a muslin bag. I used my nut bag (from making almond milk). This is now referred to as your pectin bag. Typically one would add store-bought pectin. Since I had never done this before I was curious to try it~who knew this would become your pectin?

Place the lemon segments and 6 cups of water into a large, wide pot. Make sure it is NOT aluminum which will leach. Place the pectin bag in the pot with the fruit pulp and secure it to the pot handle. Make sure the bag is below the surface.

Bring mixture to a medium boil on medium high heat. Let boil, uncovered for about 25-35 minutes, until peels are soft and cooked through. Remove from heat.

Remove the pectin bag. Place the pectin bag in a bowl and let cool until it is comfortable to touch. Once the pectin bag has cooled to the point you can handle it, squeeze it like play-doh to extract any pectin. You should be able to get a tablespoon or two more from the bag. It has the consistency of sour cream. Return this pectin to the pan with the lemon mixture. Notice how I used a latex glove to protect my hand from any residual heat.

Measure out your sugar (6 cups) and add to the pan with the lemon mixture.

Heat the jelly mixture on medium high and bring it to a rapid boil. Secure a candy thermometer to the side of the pan. Make sure the thermometer doesn’t touch the bottom of the pan. The marmalade may take anywhere from 20 to 35 minutes or so to be ready to pour out. Please note that mine took a lot longer than 35 minutes. I think my lemons were extra juicy.

Note the golden color of the jelly

Testing the marmalade to see if it is ready can be done either on a plate or a spoon. I placed spoons in the freezer and when the mixture reached a temperature of 220-222 degrees F, I placed the marmalade on a frozen spoon and cooled it on a plate in the refrigerator for a few minutes.

When the jelly holds its shape (and doesn’t spread out), it is ready. When you push the jelly with your finger, it should wrinkle. If it is not ready, keep testing with a spoon. It took about 4 or 5 tests, before my marmalade was ready.

While the marmalade is in its second cooking stage, rinse out your canning jars, dry them and place them, without lids, in a 200 degree F oven. They should be in the oven at least 10 minutes before using them.

As the time approaches for the marmalade to be done, boil some water in a tea pot. Put the jar lids in a glass or ceramic bowl and pour the boiling water over them to sterilize.

Once the jelly has reached 220 degrees F or its “wrinkly” stage, remove the jelly pot from the heat. Carefully ladle the jelly into the jars, one at a time, leaving 1/4 “ head space at the top of the jars for a vacuum seal. Wipe the rims clean with a wet paper towel. Place the lid on the jar, securing with a jar ring. Work quickly.

The small leftover amount of marmalade was placed in a small bowl for immediate consumption

Allow the jars to sit overnight. You will hear them make a popping sound as the vacuum seal is created. The jelly will firm up as it cools.

I love the fresh, tart/sweet flavor of this marmalade. Now I need to make some fresh, warm bread!

For the complete recipe, please click this link https://www.simplyrecipes.com/recipes/meyer_lemon_marmalade/. Happy Saturday!


Post Christmas News

It was a very rainy Christmas morning here in Phoenix~~just perfect for lighting each of the fireplaces. This is one of the first years we didn’t have guests, so it was just our family. That set the tone for a very relaxing and easy day.

After reading Santa’s letter and opening presents, Dad made his legendary Eggs a la Goldenrod for breakfast. Click here for previous post recipe. This breakfast dish has been a family tradition and is a big hit with the children.

Benjamin made mimosas with fresh squeezed orange juice and Prosecco.

Picking fruit in the rain in his annual holiday suit

I set an easy table this year for dinner, mostly because I left that chore to the last minute. In keeping with my “simple” theme, we used holiday placemats in lieu of a tablecloth.

The 3 silvery trees came from Whitfill Nursery

The Christmas dinner was also simple. Benjamin made a reverse-seared prime rib and the rest were items from the garden. Two types of cauliflower, broccoli, peppers, carrots and beets were seasoned and roasted. I even managed to dig up potatoes too!

As you know, each holiday we bake, from scratch, a new cake for dessert. This year’s selection was superb! From our favorite cake cookbook, Layered by Tessa Huff, we made the Gingerbread Coffee Toffee cake. Four layers of an old fashioned molasses cake, with coffee French buttercream and toffee pieces between the layers. It was covered in a Swiss Vanilla Meringue buttercream on the outside and a toffee molasses sauce on top. Ooh la la!

We also tried a new cocktail from Half Baked Harvest~~White Christmas Mojitos. It was surprisingly light and refreshing. An easy blender drink using coconut rum, white rum, coconut milk and sparkling water. We used cranberries instead of pomegranate arils for garnish. Click here for the recipe.

My big surprise present from Santa was an Apple Watch. With news this year of a few friends having cardiac moments, I am happy to be able to track my heart rate and workouts going forward (plus work off that delicious cake!)

Nearly fell off the elliptical taking this picture-which is why it is a bit blurry!

We had a REALLY good Christmas. I hope you had the same. Not sure what, if anything, we will do to celebrate the New Year. But I am truly enjoying this quiet time in between. Happy Saturday!